AnAdditionalLectureOnCProgramming

Page Actions

An additional Lecture on C Programming

Creating a Signal Generator

Uli Raich

Course on Embedded Systems
UCC semester end 2017

C is too abstract?

I was told that you find the course on C too abstract!

  • What is is good for?
  • What are pointers good for?
  • Why use command line arguments?
  • What has all this to do with embedded systems?
  • Can I use it for my Physics experiments?

A pulse generator

A pulse generator is a device you use to test your electronics

(e.g. electronics to read out an experiment

which generates electronic signals


On a professional pulse generator you can:

  • change the wave form
    sine, rectangular, triangular, sawtooth,
    arbitrary user defined wave form
  • change the frequency
  • change the pulse height
  • change rise and fall times
  • and many parameters more

The oscilloscope

Before using the signal from the pulse generator

you observe the signal on an oscilloscope

How does an oscilloscope work?

What is
  • vertical gain
  • time base
  • auto versus normal, external, single trigger
  • trigger level and trigger position

A standard oscilloscope

A standard digital storage oscilloscope uses
  • a very fast (GHz) analogue to digital converter (ADC)
  • plenty of knobs and buttons to select
    gain, timebase, trigger parameters \x85
  • a screen to display the input signal
  • Price: ~ 5kUS$ - 50kUS$
I have a 60 US$ oscilloscope

(not useful for professional applications

but ok for the slow signals we produce

with our electronics) featuring:

  • 2 input channels
  • 40 MHz sampling rate (20 MHz band width)
  • No screen
  • USB connection to a computer

Oscilloscope Example
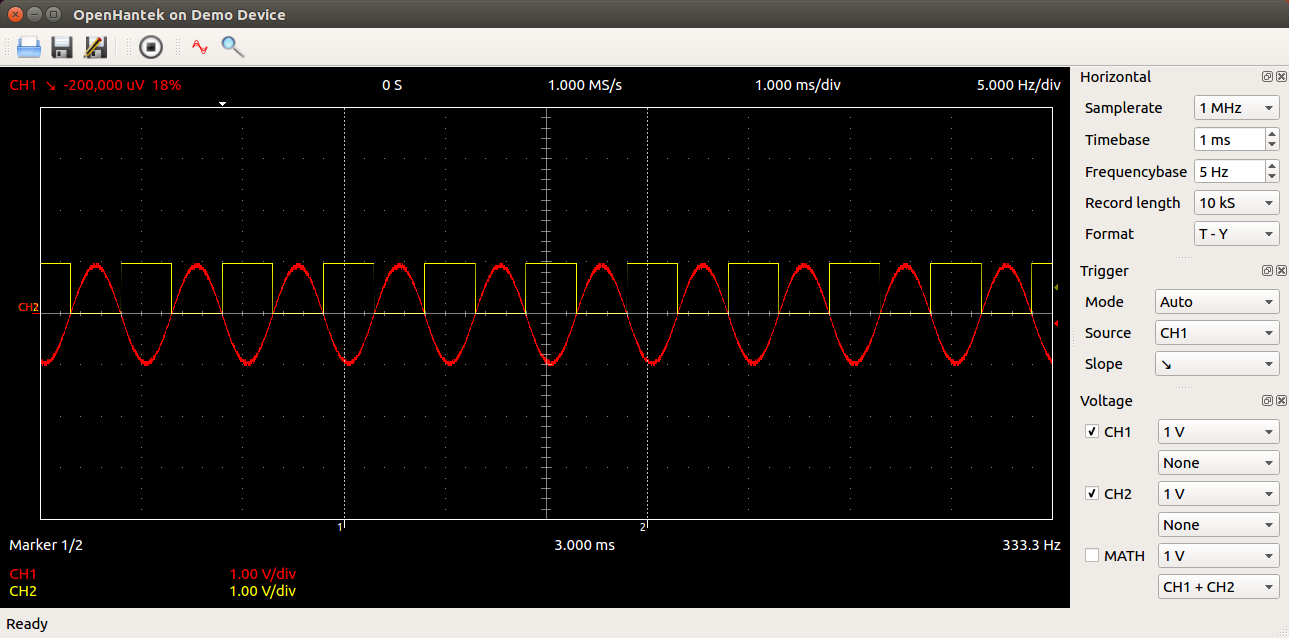
scope.png

Our pulse generator

Let us create our own pulse generator!
It should provide

  • sine wave
  • rectangular wave
What do we need?

  • A table of numerical values that describes the wave form
  • A digital to analogue converter (DAC) to convert the numbers into a signal level.

The DAC

We have a 12 bit DAC, which creates signal

levels from 0V to Vcc

What is the max. number this DAC can take in

decimal and in hex?

What is the signal resolution in \x89

This is Physics!

DAC access

The DAC has 3 registers with the following bit layout:

register 0 takes the lowest 4 bits of the DAC value

register 1 takes the middle 4 bits

register 2 takes the highest 4 bits

RS selects the register

The strobe line (STR) must pulse (go high and low again)

to read/ write the data (R/W line) from/to the DAC

What is the bit combination and sequence to write the

middle 4 bits with the data 0xa

Breaking down the problem

Even though this will be still a very small and simple

program, let\x92s break it down into smaller pieces:

  • Get the wave form from the user through command line arguments
  • Create the wave form within a table of
    100 short (16 bit) values. The upper 4 bits will always be zero
  • Function to write all 12 data bits to the DAC

Slide 10 of 38

Check the number of cmd line args

Write a piece of code that checks that the user

has entered 1 arguments

The program prints a \x93Usage\x94 message and exits if the

no of arguments given by the user is not exactly 1

Slide 11 of 38

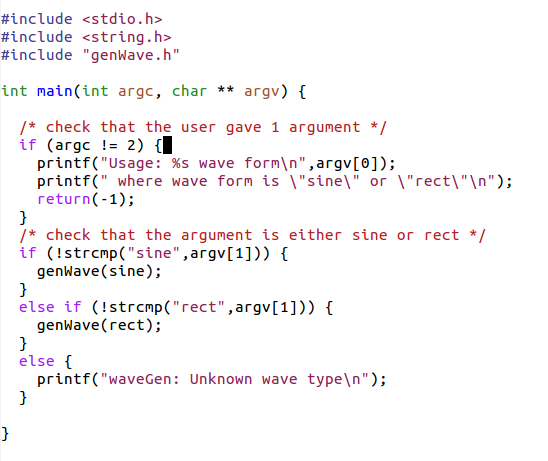
Solution: arg count

cmdLineCountv2.png

Slide 12 of 38

Argument Check

If the no of args is correct we have to check

if the argument given is either

  • \x93sine\x94
  • or \x93rect\x94
To do this we need a string compare function:

int strcmp(const char *s1, const char *s2)

This function returns zero if the 2 strings match

You must include <string.h> to use this function

Slide 13 of 38

Check the argument

Improve your program to include a check

if the argument given is \x93sine\x94 or \x93rect\x94.

Print an error message it it is not

and a success message if it is.

Slide 14 of 38

Solution: argument check

genWavev2.png

Slide 15 of 38

Creating the wave form

As we said, the DAC takes 12 bit values which

can be stored in an array of short (16 bits)

The upper 4 bits of each element will be zero

The generation of the waveform goes into a

separate source file and its associated include file

I give you the example for the sine wave and

you write the code for the rectangular wave

Slide 16 of 38

Function test

First we create the framework

We will need:

  • the function itself (genWave.c)
  • an include file describing it (genWave.h) and containing
    definitions needed by it and useful to the calling program
  • a main routine (createWaveForm.c) to call it

Slide 17 of 38

Write the Test function

Write a test function (genWaveTest.c) taking one argument

(the wave type) and printing which wave type has been selected.

Which definitions should go into the include file?

How do you have to modify the main program

to call the genWave function?

Slide 18 of 38

Dummy function and test (main)

functionTest.png

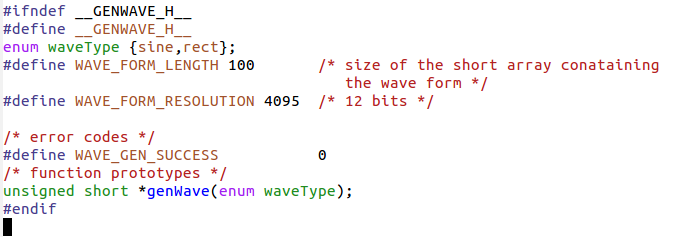
Slide 19 of 38

The include file

includeFile.png

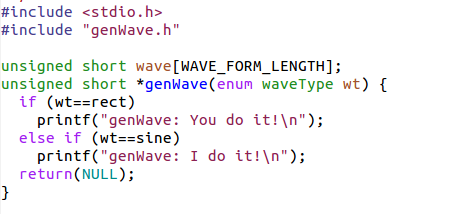
Slide 20 of 38

The test function

genWaveTest.png

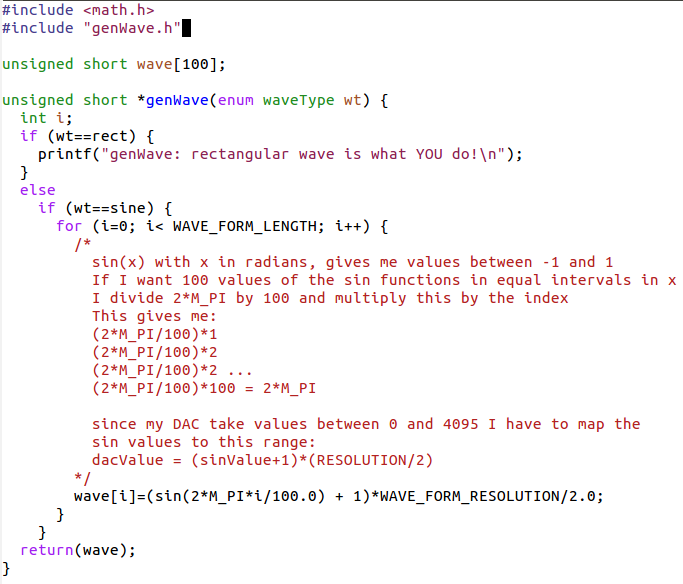
Slide 21 of 38

Implementing the function

sine.png

Slide 22 of 38

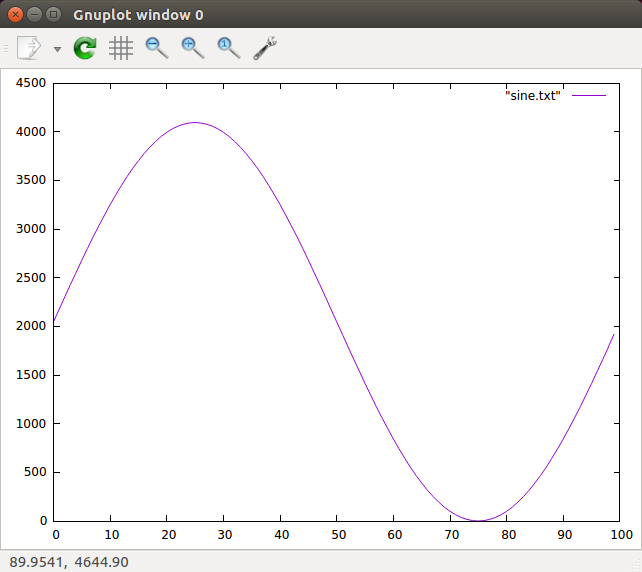
Was it correct?

gnuplot.png

Slide 23 of 38

The rectangular wave form

Write the code for the generation of the rectangular wave form.

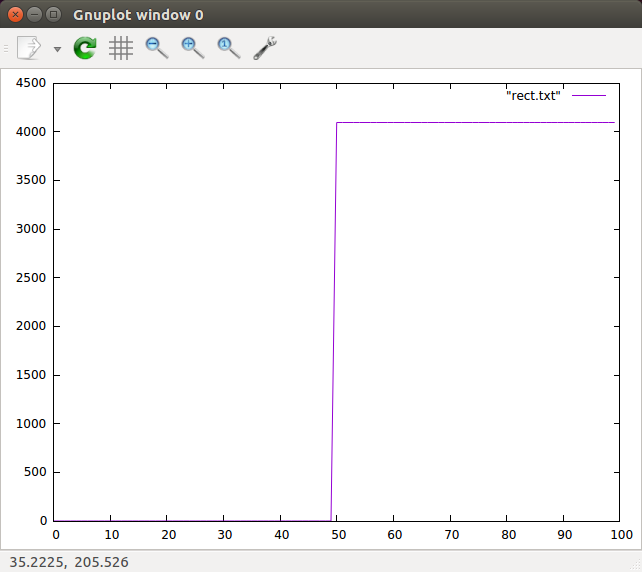
The signal should be zero for the first 50 values of the wave,

4095 for the following 50 values

Slide 24 of 38

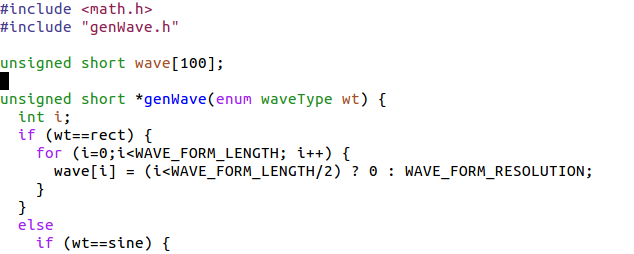
Solution: Rectangular wave

rectWave.png

Slide 25 of 38

The rectangular wave form

gnuplotRect.png

Slide 26 of 38

Bit handling functions

We need to learn a few bit handling operators before

being able to prepare the data for the DAC:

| : bitwise or

& : bitwise and

data += 5 <=> data = data + 5

data |= 5 <=> data = data | 5

~data: invert all bits in data

data >> 4 all bits in data are shifted right by 4

data << 4 all bits in data are shifted left by 4

example:

data = 16  00010000
data >> 4  00000001

Slide 27 of 38

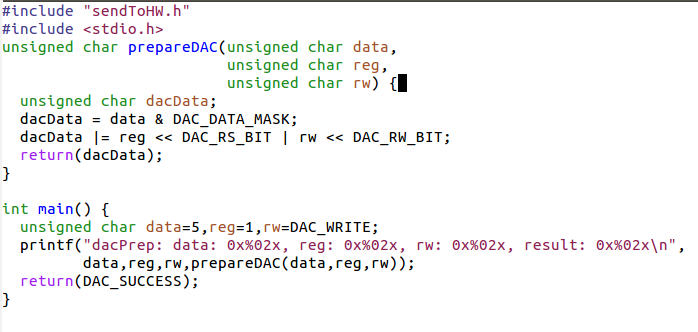
DAC preparation

Write a function which prepares a byte for the DAC

The functions takes 3 arguments:

  • The data nibble (4 bits of data)
  • The register selection (0,1,2)
  • The read/write bit
  • Leave the strobe bit zero!
What will be the result if you want to write 5

to register to the middle nibble?

Slide 28 of 38

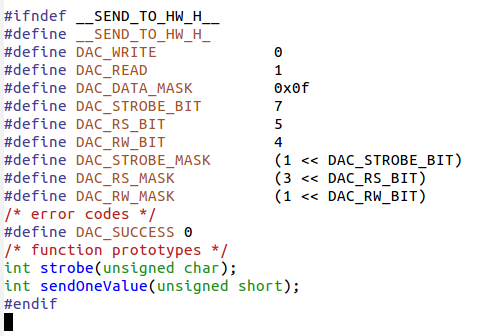
Solution: DAC preparation

sendToHWInclude.png

Slide 29 of 38

Now the test program

dacPrep.png

dacPrepResult.png

Slide 30 of 38

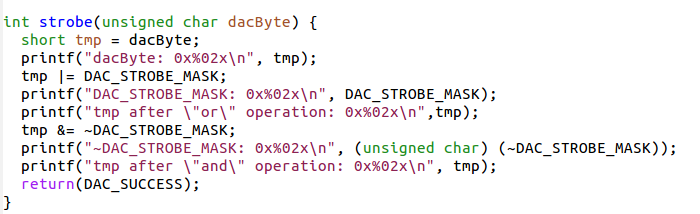
Strobe

Now create a strobe function which takes DAC data

and generates a strobe signal on the

STR line without touching the other bits

Slide 31 of 38

Solution: Strobe

strobe.png

Slide 32 of 38

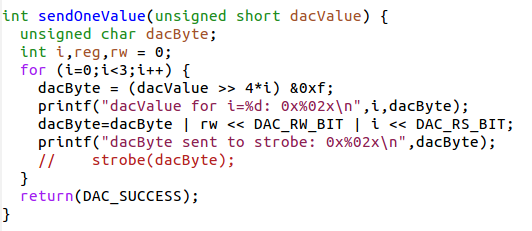
Send one short value to the DAC

Now that we know how to strobe, it is easy to write

a 12 bit value to the DAC

We must do it in 3 steps:
  • "and" out all the bits in the data word
    except the last 4 (first data nibble)
  • \x93or\x94 in the rw and register bits (must be reg 0! )
    and send the dataByte to strobe

  • Shift the data word by for bits and do the same thing
    (now the register bits must be 1 of course)

  • Shift again by 4 bits and repeat

Slide 33 of 38

Solution: send one data word

sendOneValue.png4

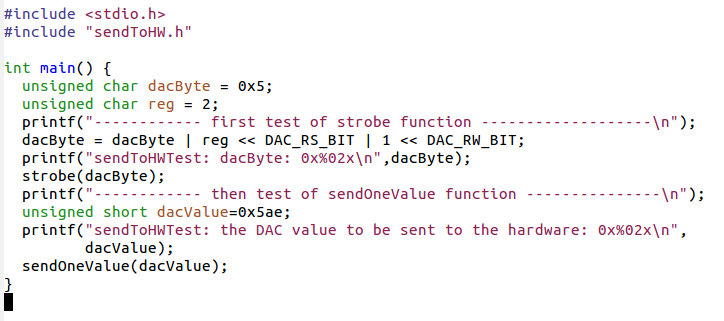
Slide 34 of 38

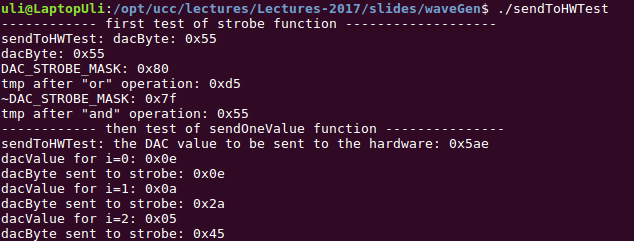
...and the test program for it

sendToHWTest.png

Slide 35 of 38

\x85 with the result

sendToHWTestResult.png

Slide 36 of 38

Assembling the whole thing

Now we have all the bits and pieces and

finalizing the project becomes easy.

In the file accessing the hardware we add:
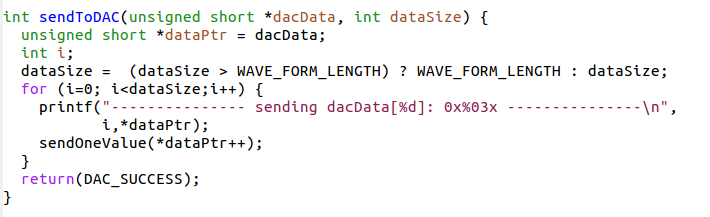
sendToDAC.png

and we call this in main.

Slide 37 of 38

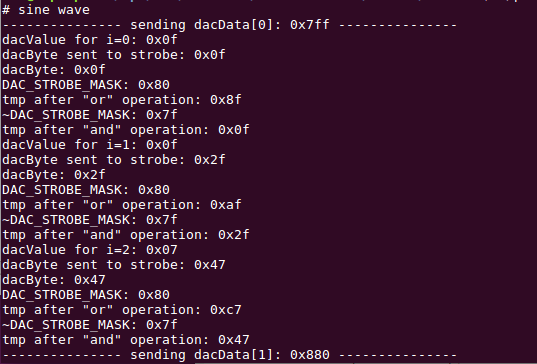
And this is the final result

pulseGenResult.png

Slide 38 of 38