
Slide 1: Setting up and IoT
Session 4: Sending real measurement data to Cayenne and
receiving commands and executing them on the hardware
Uli Raich
formally CERN, Geneva, Switzerland
Slide 2: The Cayenne MQTT protocol
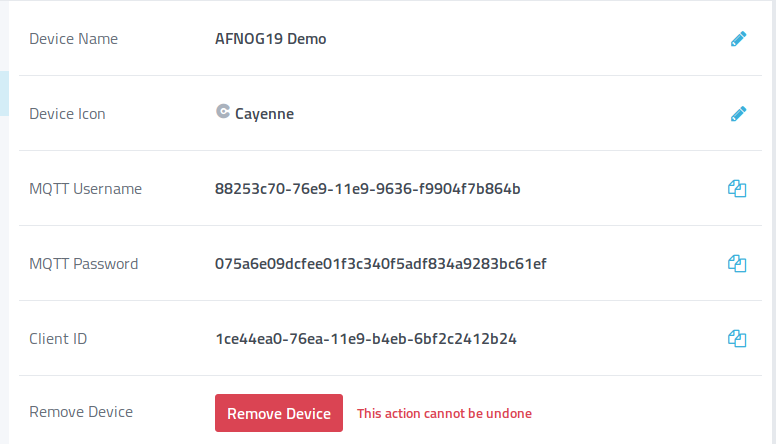
In the last lecture we have seen the command message sent by Cayenne: 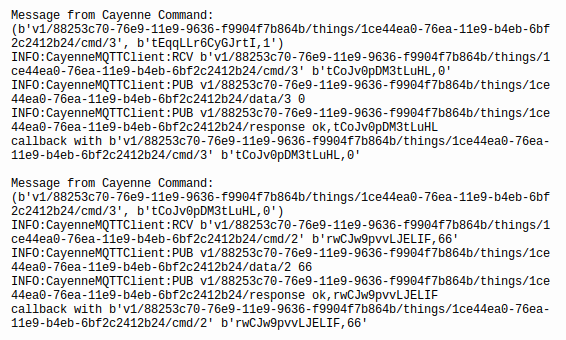 |
 |
Slide 3: Trying the protocol with MQTTfx
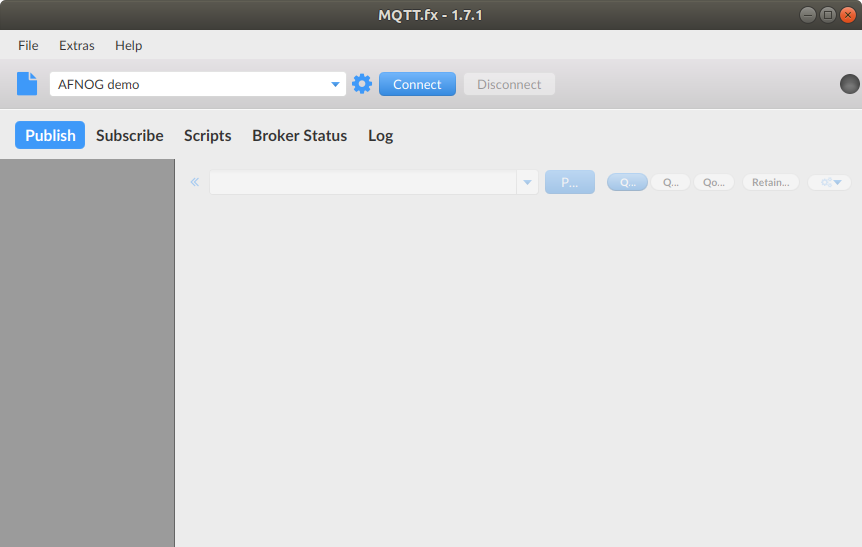
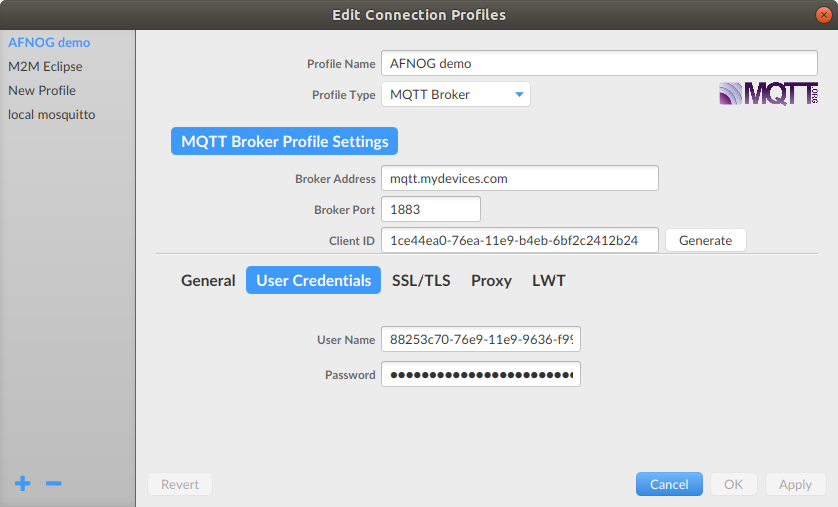
The MQTTfx client allows you to- manually configure a Cayenne client creating a connection profile.
This profile contains the Cayenne credentials
- Cayenne user name
- Cayenne password
- Cayenne client_id
- Cayenne user name
- connect to the Cayenne MQTT broker at mqtt.mydevices.com
- publish messages in Cayenne MQTT format
- Subscribe to and receive Cayenne cmd messages and answer them
Slide 4: Starting MQTTfx
Slide 5: Setting up the profile
Slide 6: Copy Cayenne credentials
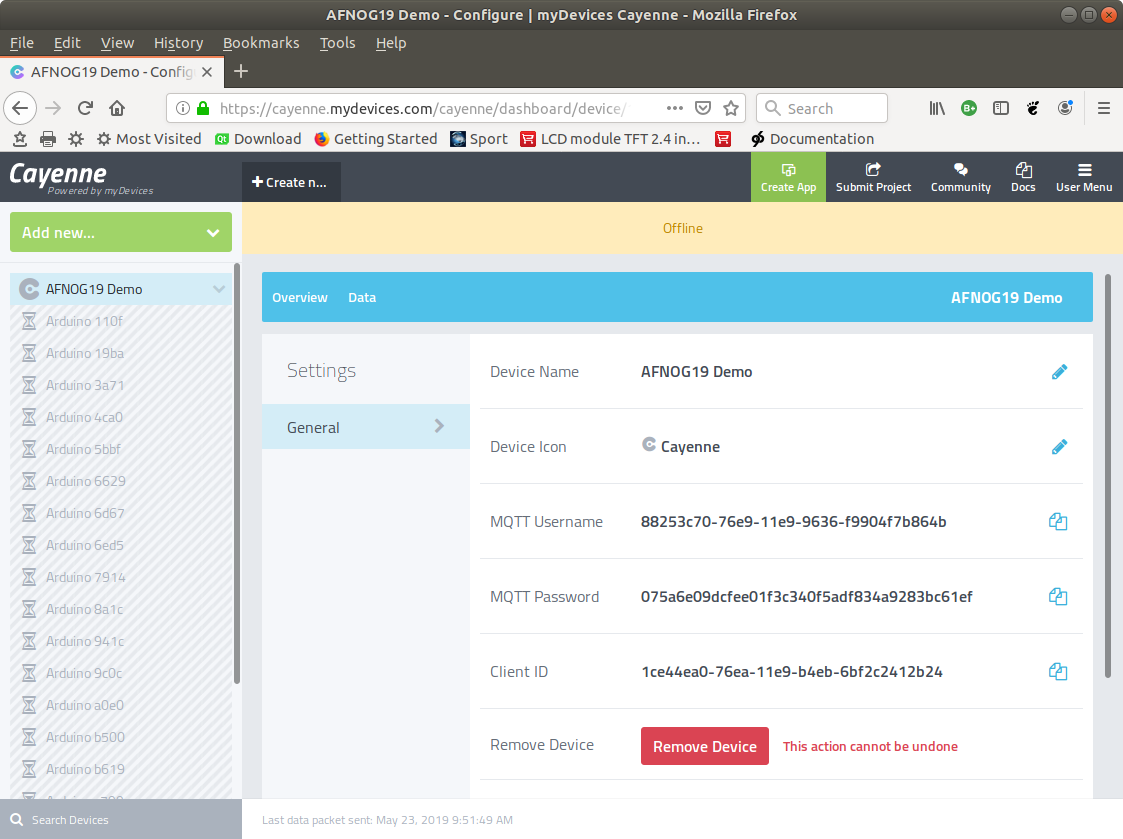
Slide 7: Connecting to Cayenne
Once the profile is created you can connect to Cayenne with the “connect” button.You should see the “offline” note in on your Cayenne device page go away
Once connected we can start sending messages to Cayenne
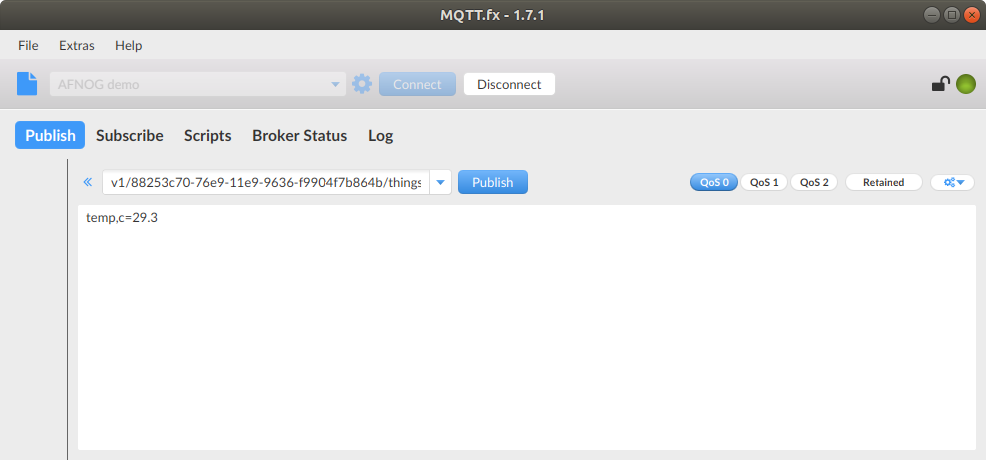
Slide 8: Publish a message on Cayenne
Cayenne MQTT expects topics of the following form:v1/username/things/clientID/data/channel
This tells Cayenne that “data” are going to be sent.
Replace “username” with your Cayenne user name and
“clientID” with the client ID of your device
We will send dummy temperature data to channel 0.
Therefore “channel” must be replaced by “0”.
Slide 9: The payload
The payload (the actual data) has the following form:type,unit=value
In our case:
Type (temperature): temp
Unit (Celsius): c
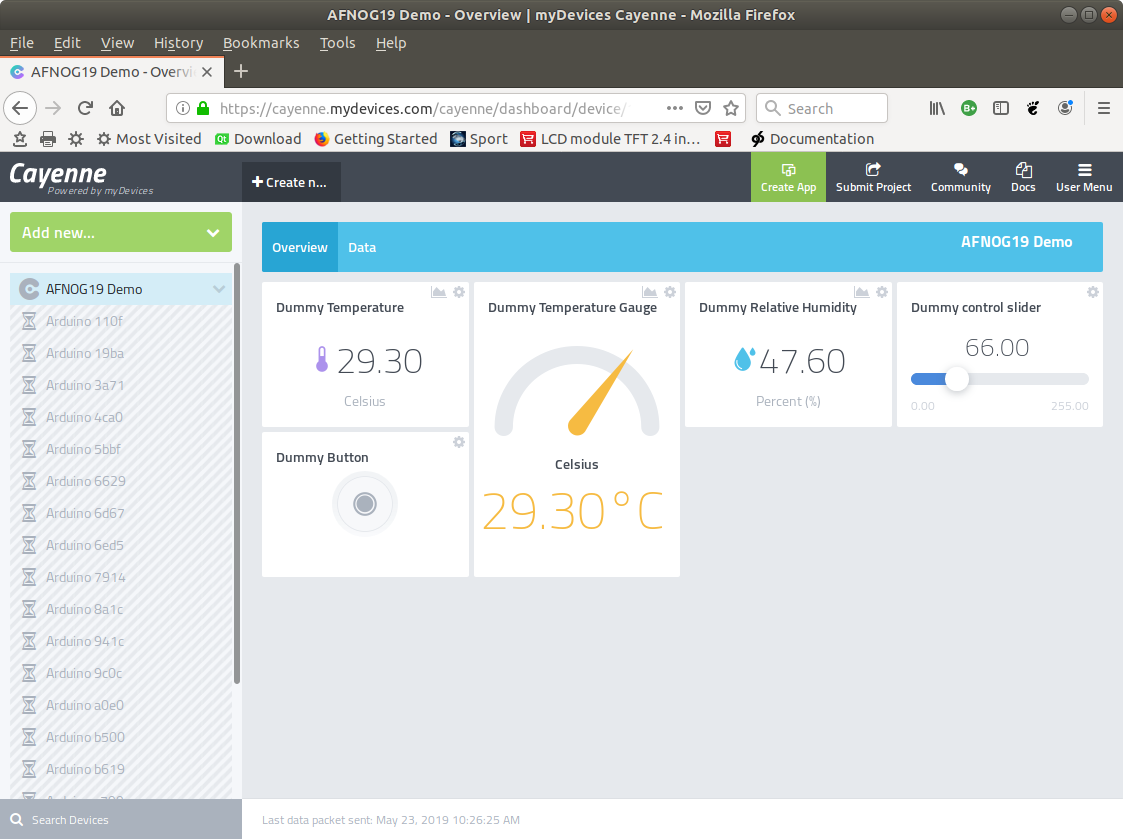
Value: 29.3 (typical Ugandan temperature)
Our payload therefore becomes:
Temp,c=29.3
Slide 10: Publish the data message
Slide 11: MQTTfx data seen in Cayenne
Slide 12: Subscribing to cmd messages
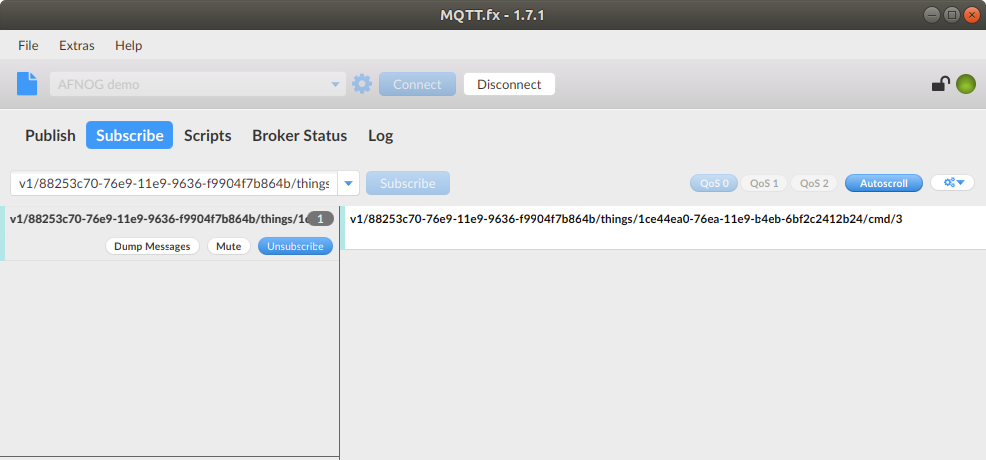
In order to see the command messages e.g. thosesent by the push button we must first subscribe to them.
The format of a subscription is:
v1/username/things/clientID/cmd/channel
Since our push button is connected to channel 3
this is what we define as channel
.
v1/88253c70-76e9-11e9-9636-f9904f7b864b/things/
1ce44ea0-76ea-11e9-b4eb-6bf2c2412b24/cmd/3
Slide 13: Subscribing in MQTTfx
Slide 14: Clicking the button
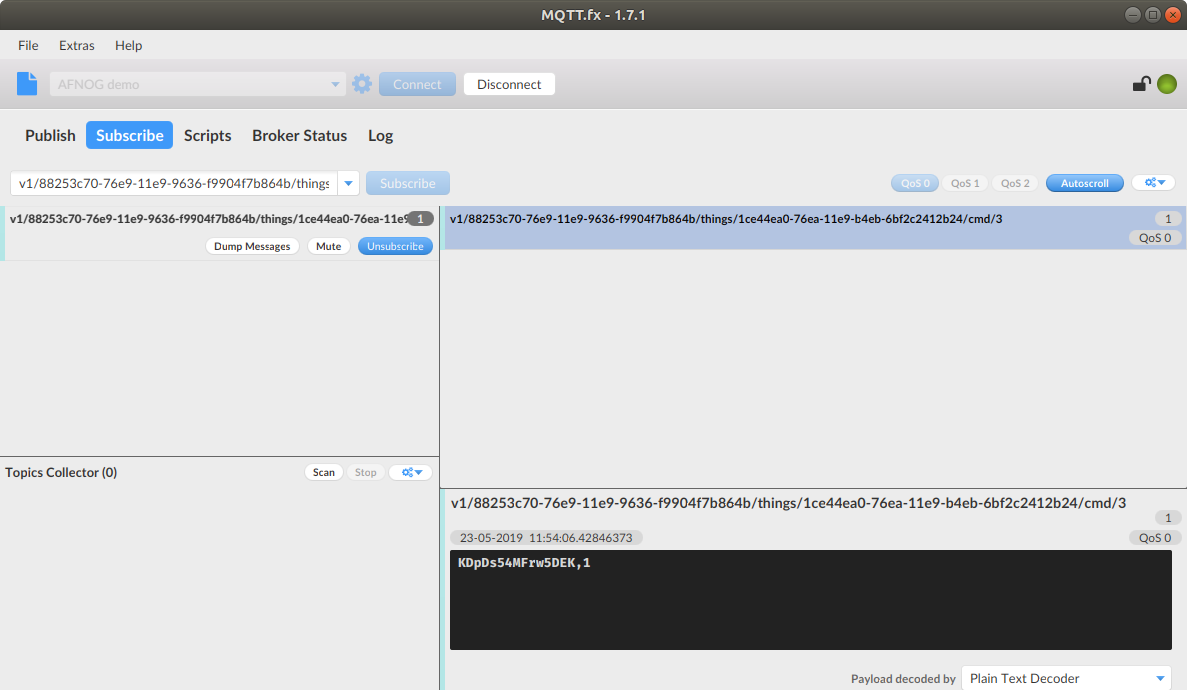
Slide 15: Cayenne is waiting for a response
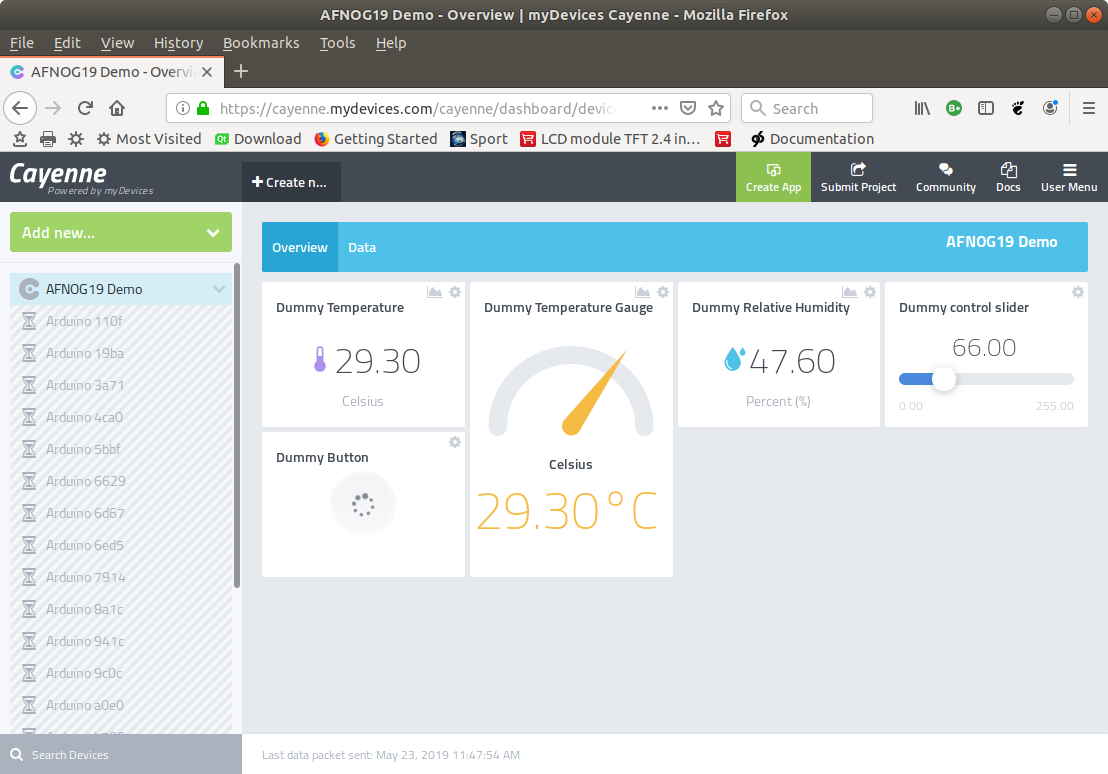
Slide 16: Treating the command
Normally we would treat the command by acting on the hardware.If this was successful we would inform Cayenne that the new value was set:
Format:
v1/88253c70-76e9-11e9-9636-f9904f7b864b/things/
1ce44ea0-76ea-11e9-b4eb-6bf2c2412b24/data/3
and the topic would be the new value: in this case: 1
Slide 17: Sending the response
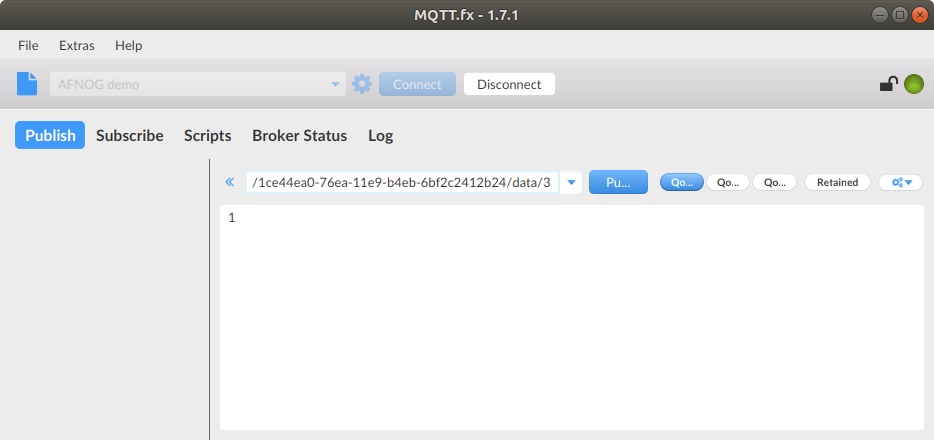
Slide 18: The switch shows “on”
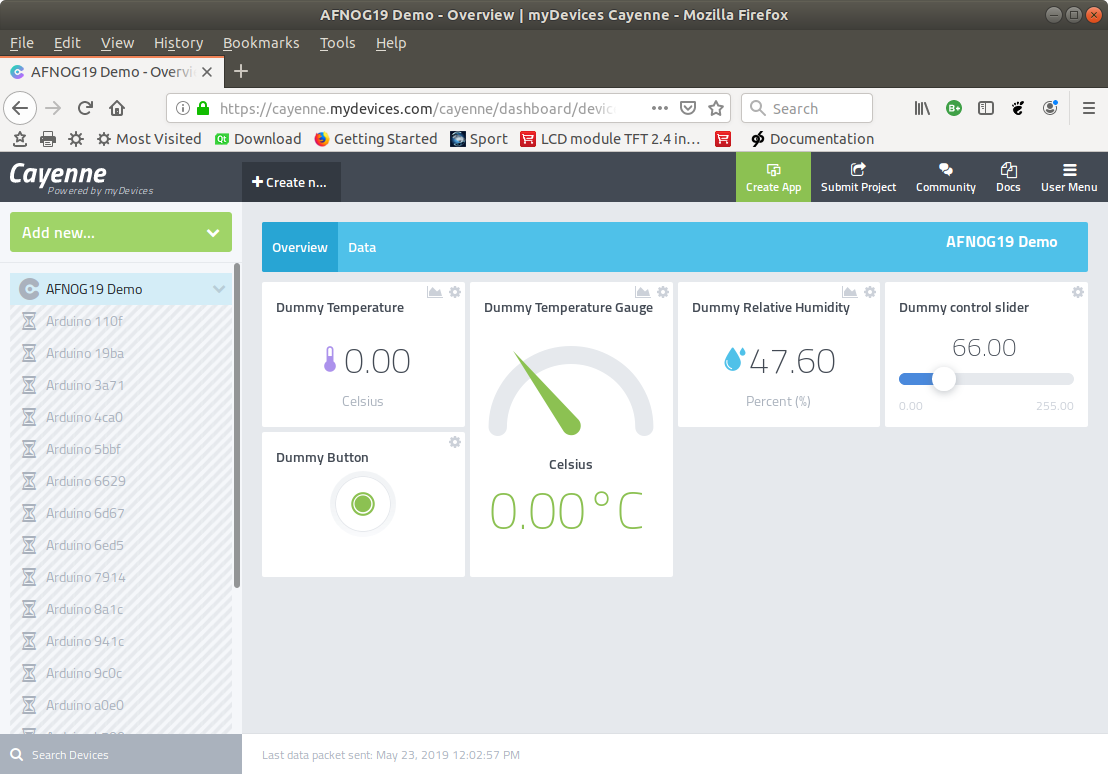
Slide 19: The Cayenne MQTT client
With this information we understand how the Cayenne MQTT client works:- In its begin method it gets the Cayenne credentials and saves them
- It sets up a root topic string
self.rootTopic = "v1/%s/things/%s" % (username, clientid)
- It connects to WiFi and then to the Cayenne MQTT
broker using the tcp protocol
- It subscribes to the cmd topic
- It sets up a root topic string
Slide 20: Cayenne MQTT client publish
When you publish measurement data with- celsiusWrite(channel,value)
- humidityWrite(channel,value)
- hectrPascalWrite(channel,value)
- etc.
The corresponding data type and the unit (this information is hard coded into the call: for celsiusWrite the data type is “temp” and the unit is “c”) as well as the value as used to create the payload string
This information is published
Slide 21: Measurement types
A big number of data types is defined in the Cayenne MQTT protocolHave a look at the docs under”Supported data types”: https://mydevices.com/cayenne/docs/cayenne-mqtt-api/#cayenne-mqtt-api-mqtt-messaging-topics
Only the most basic ones are implemented in our client:
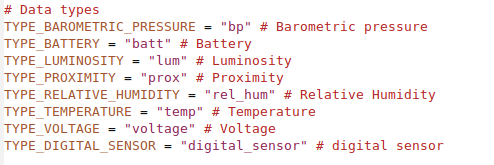
Slide 22: Measurement units
The same is true for the units, here are the ones defined in the client: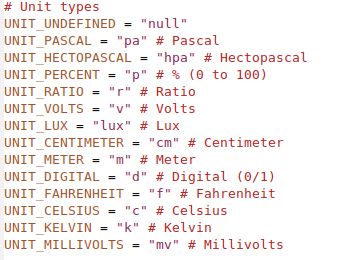
Slide 23: Combining measurement and publishing
In session 2 we have seen how to readout sensors and control actuatorsNow we have seen how to publish and how to subscribe to Cayenne messages
We have to combine those two in order to create a full cayenne IoT node.
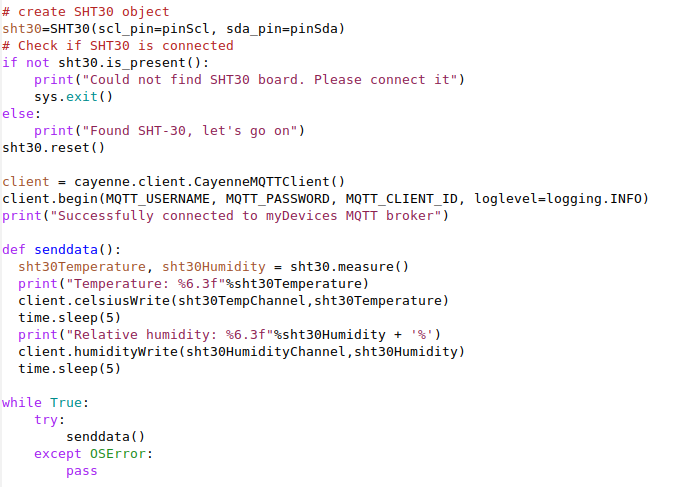
Slide 24: SHT30 on Cayenne(1)
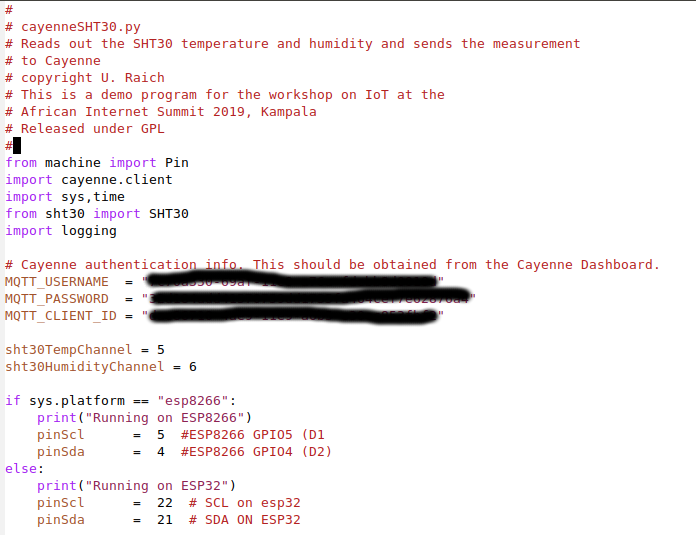
Slide 25: SHT30 on Cayenne(2)
Slide 26: Cayenne MQTT client subscribe
This is a little more tricky:We have to create a callback function and register it with the Cayenne MQTT client
When the push button or slider on Cayenne are activated this function will be called
The function must find out from which channel the request is coming, and which are the data
It must then act on the hardware correspondingly
The Cayenne MQTT client sends a response message without our intervention
Slide 27: Registering the callback

Slide 28: Parsing the command message
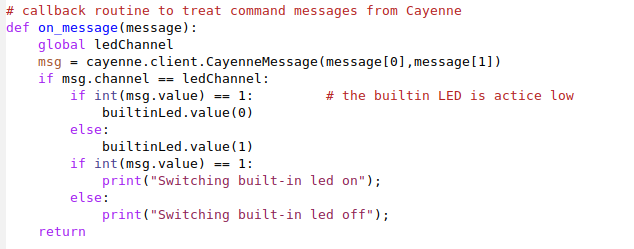 The callback gets a tuple with topic and payload as parameter
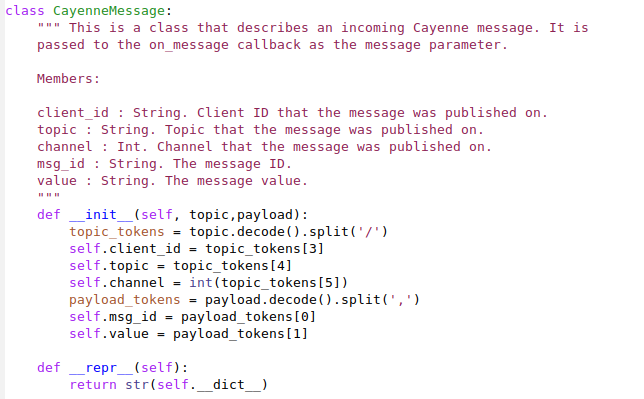
The CayenneMessage class helps with parsing the message
Slide 29: The CayenneMessage class
Slide 30: Analogue to Digital Conversion
Often real world signals are analogue in nature. Before treating them digitally we must convert them to digital valuesThis is done by an Analogue to Digital Converter
The ESP8266 has a 10 bit ADC on chip, the ESP32 has 3 12 bit ADCs
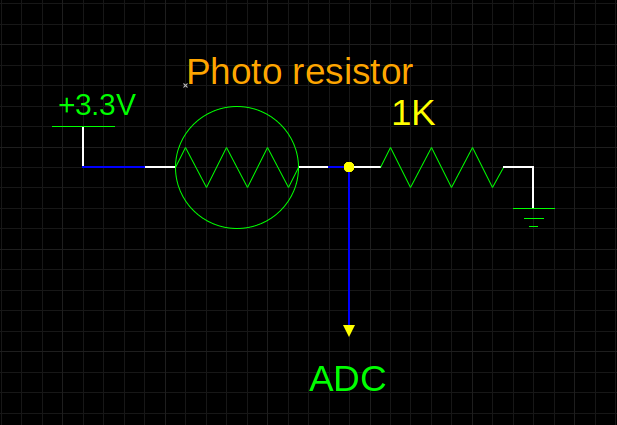
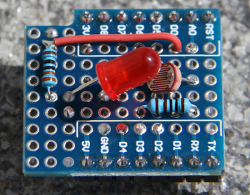
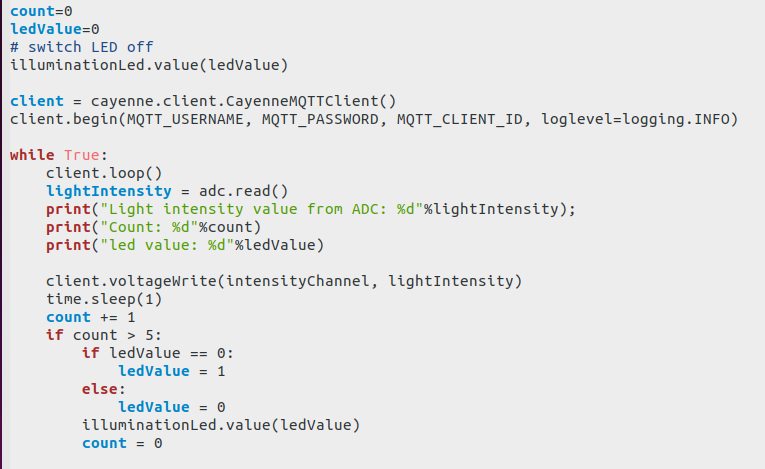
To demonstrate this we use a photo resistor reading the light intensity.
Slide 31: Photo resistor and LED
The photo resistor and the 1 kΩ resistor form a voltage dividerThe LED can be switched on by program and changes the light
Intensity seen by the photo resistor
 |
 |
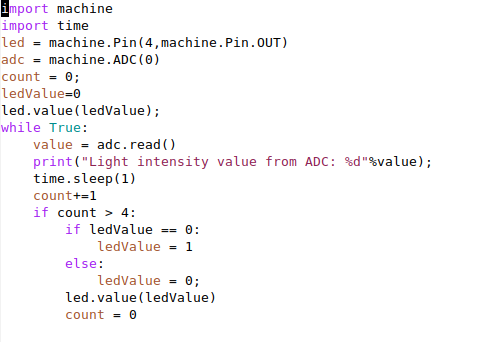
Slide 32: ADC readout
| The ADC and GPIO driver classes are already available in MicroPython. |
 |
Slide 33: Prototype board on Cayenne
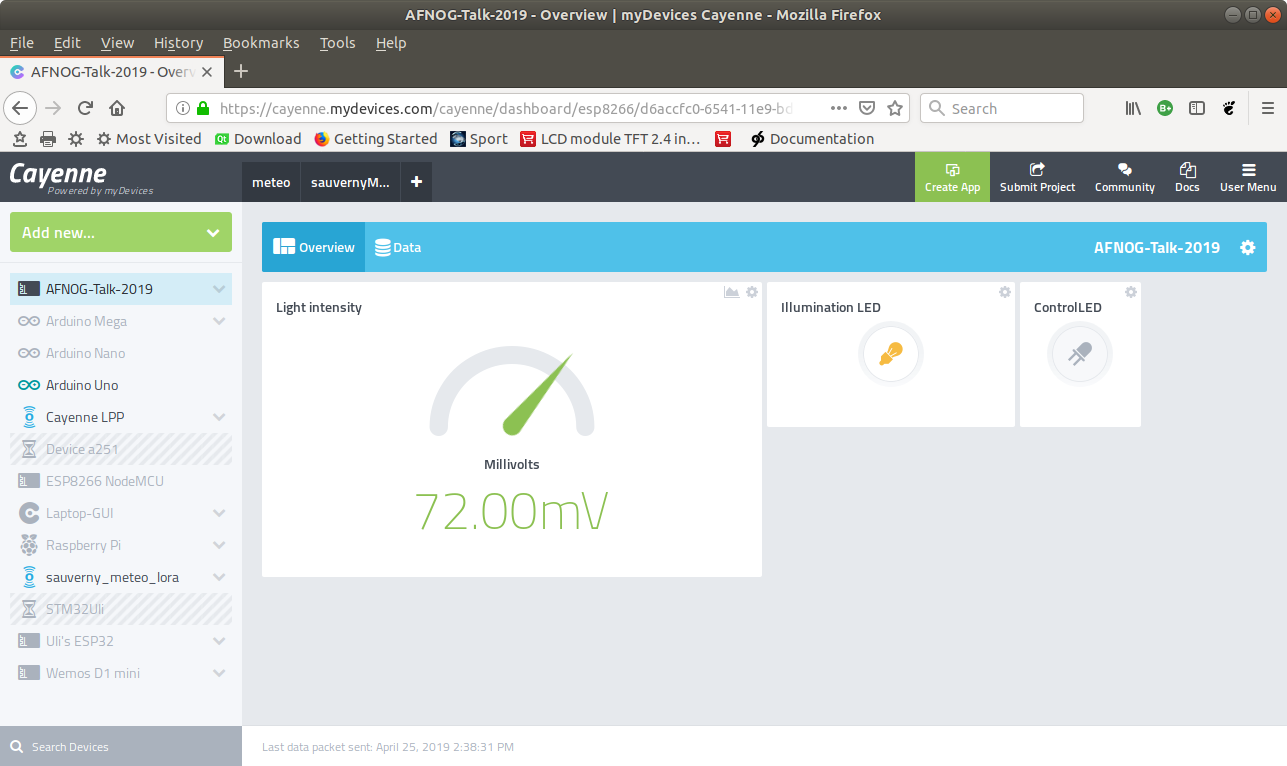
Slide 34: The prototype GUI
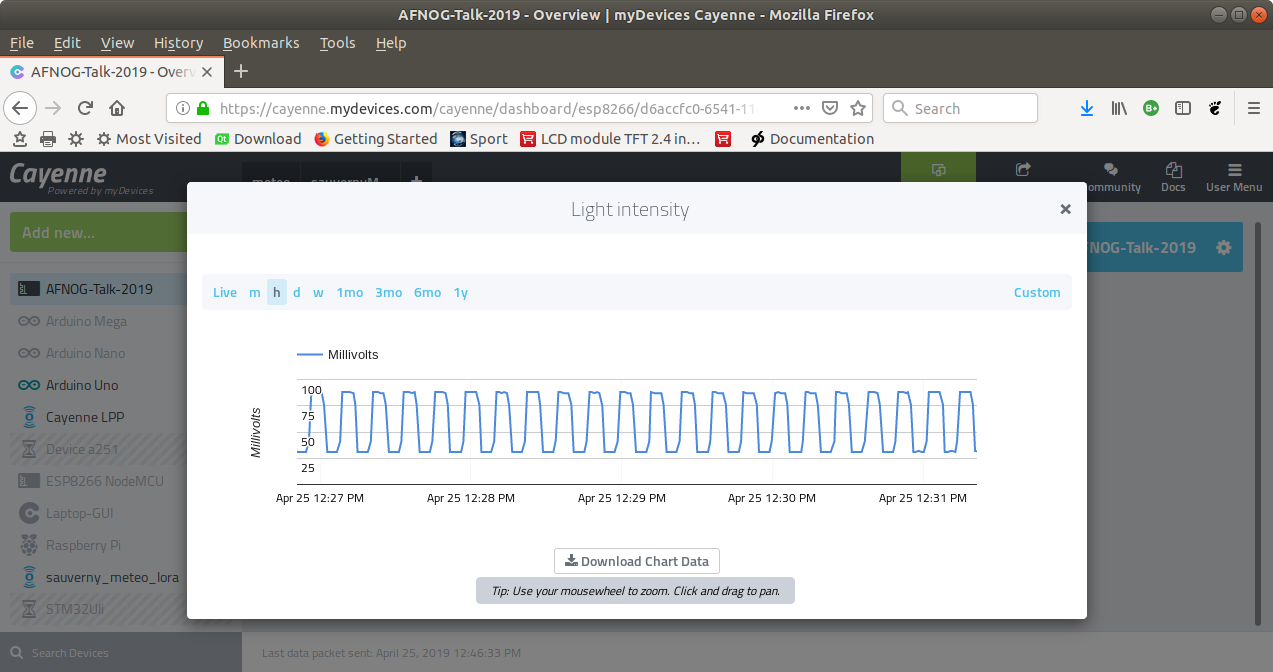
Slide 35: History of Intensity Measurements
Slide 36: A trigger in Cayenne
We will observe the light intensity a and switch a light on, if it gets too dark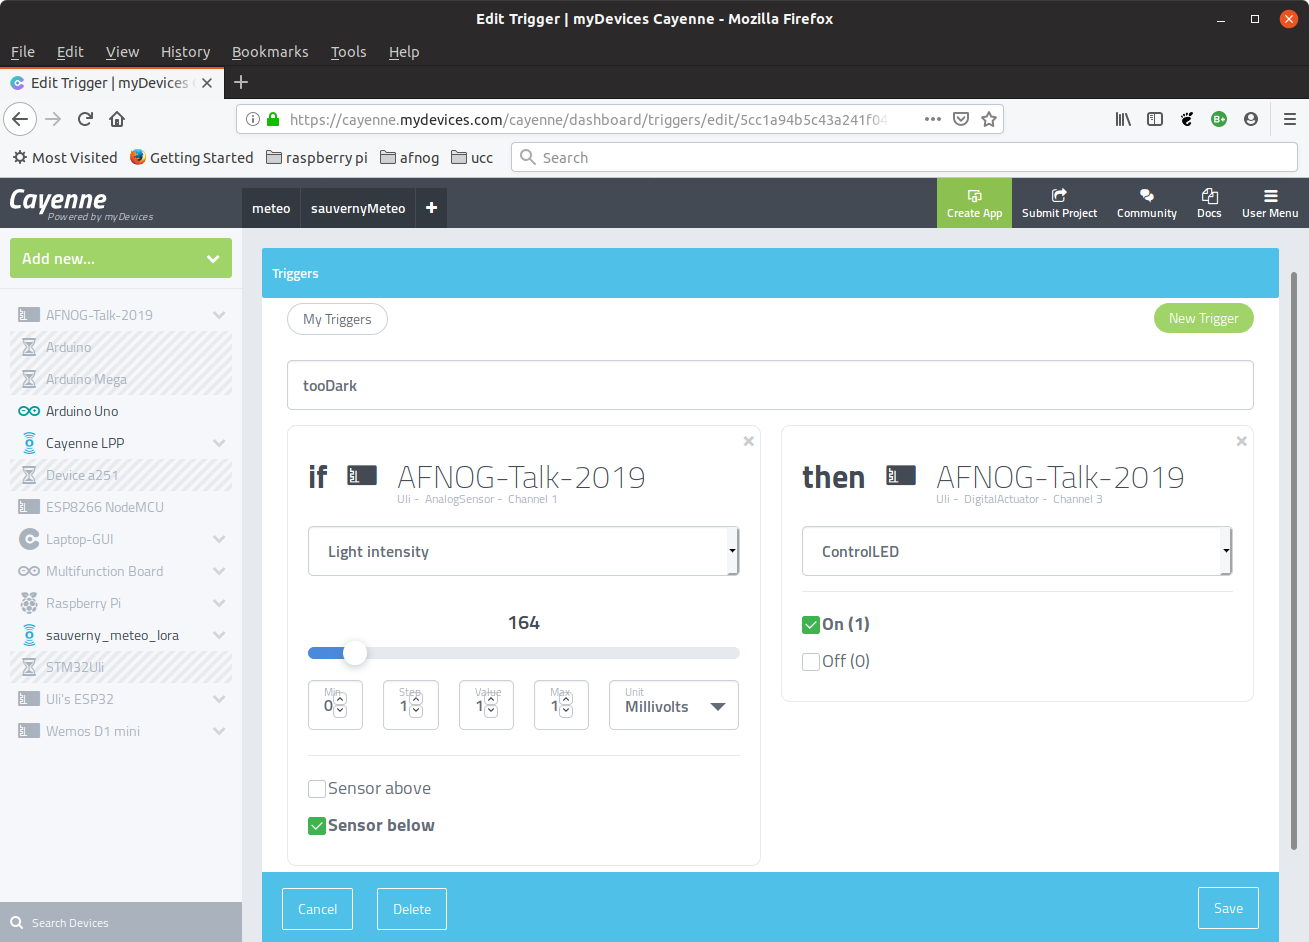
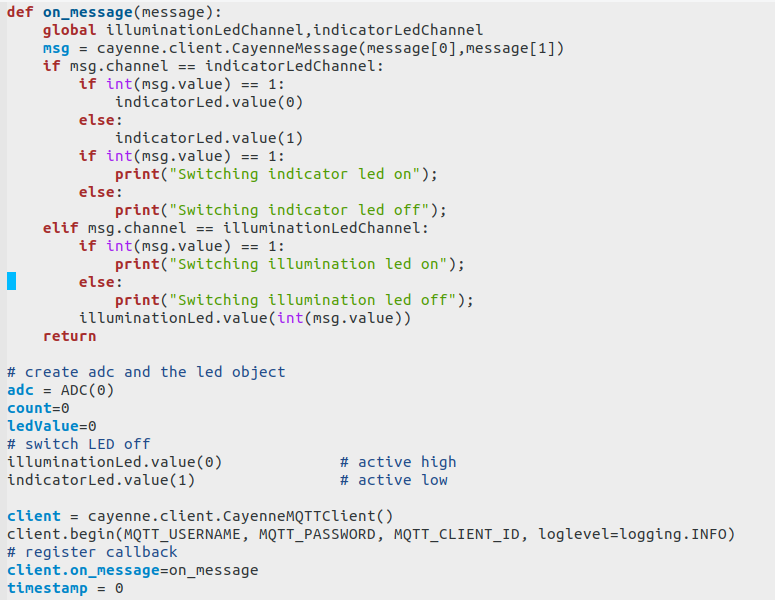
Slide 37: The trigger code
Slide 38: A Qt app and Cayenne MQTT
The graphical user interface of Cayenne is fairly limited.Can we write an application with another GUI system interacting with our devices connected to the Cayenne MQTT broker?
Example:
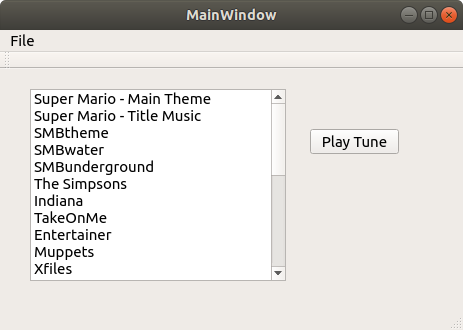
The WeMos D1 buzzer.
We want to play a song from a list of choices.
Slide 39: The Buzzer GUI
Slide 40: The Cayenne MQTT C library
The Cayenne MQTT C library contains everything we need to communicate with the Cayenne MQTT broker:- Network and CayenneMQTTClient data structures defined in include files
- NetworkInit and NetworkConnect to connect to the Network
- CayenneMQTTClientIni and CayenneMQTTConnect
to connect to the Cayenne MQTT broker
- CayenneMQTTPublishDataInt to publish the song number
Slide 41: The end of the show
There is still work for you during the exercises session to make you IoT node work with Sensor readoutPublishing the result on Cayenne (for the SHT30)
Subscribe to a command message from the Cayenne slider to modify the settings of a colour component of your WS2812 rgb LED
For further study please consult:
https://afnog.iotworkshop.africa/do/view/AFNOG/AFNOGWorkshop2019
You will find plenty examples on
https://github.com/uraich?tab=repositories
--
Comments
| I | Attachment | History | Action | Size | Date | Who | Comment |
|---|---|---|---|---|---|---|---|
| |
CayenneSHT30Publish.png | r1 | manage | 67.3 K | 2019-05-24 - 08:11 | UliRaich | |
| |
QtBuzzer.png | r1 | manage | 22.8 K | 2019-05-24 - 08:15 | UliRaich | |
| |
cayenneCallback.png | r1 | manage | 37.0 K | 2019-06-08 - 16:21 | UliRaich | |
| |
cayenneCmdMsg2.png | r1 | manage | 68.6 K | 2019-05-24 - 07:38 | UliRaich | |
| |
cayenneCredentialsCmp.png | r1 | manage | 30.6 K | 2019-06-08 - 16:11 | UliRaich | |
| |
cayenneDataTypes.png | r1 | manage | 33.1 K | 2019-05-24 - 08:08 | UliRaich | |
| |
cayenneMsg.png | r1 | manage | 9.6 K | 2019-06-09 - 13:57 | UliRaich | |
| |
cayenneMsgClass.png | r1 | manage | 59.5 K | 2019-06-09 - 12:25 | UliRaich | |
| |
cayenneProtoCode.png | r1 | manage | 68.0 K | 2019-06-09 - 14:07 | UliRaich | |
| |
cayenneProtoHistory.png | r1 | manage | 114.5 K | 2019-06-09 - 12:28 | UliRaich | |
| |
cayenneProtoResult.png | r1 | manage | 115.8 K | 2019-06-09 - 12:28 | UliRaich | |
| |
cayenneRegCallback.png | r1 | manage | 26.2 K | 2019-06-08 - 16:21 | UliRaich | |
| |
cayenneSHT30Publish1.png | r1 | manage | 82.0 K | 2019-05-24 - 08:11 | UliRaich | |
| |
cayenneTrigger.png | r1 | manage | 126.0 K | 2019-06-09 - 12:30 | UliRaich | |
| |
cayenneUnits.png | r1 | manage | 24.3 K | 2019-05-24 - 08:08 | UliRaich | |
| |
mqttfxBaseWindow.png | r1 | manage | 27.5 K | 2019-05-24 - 07:38 | UliRaich | |
| |
mqttfxButtonOn.png | r1 | manage | 140.6 K | 2019-05-24 - 07:38 | UliRaich | |
| |
mqttfxCmd.png | r1 | manage | 90.3 K | 2019-05-24 - 07:38 | UliRaich | |
| |
mqttfxCredentials.png | r1 | manage | 60.2 K | 2019-05-24 - 07:45 | UliRaich | |
| |
mqttfxPubCayenne.png | r1 | manage | 152.2 K | 2019-05-24 - 07:53 | UliRaich | |
| |
mqttfxPublish.png | r1 | manage | 37.2 K | 2019-05-24 - 07:39 | UliRaich | |
| |
mqttfxResponse.png | r1 | manage | 32.5 K | 2019-05-24 - 07:39 | UliRaich | |
| |
mqttfxSubscribe.png | r1 | manage | 54.6 K | 2019-05-24 - 07:39 | UliRaich | |
| |
mqttfxWaiting.png | r1 | manage | 143.4 K | 2019-05-24 - 07:58 | UliRaich | |
| |
mqttfxcredFromCayenne.png | r1 | manage | 155.7 K | 2019-05-24 - 07:45 | UliRaich | |
| |
photoresistorSchema.png | r1 | manage | 18.2 K | 2019-06-09 - 12:25 | UliRaich | |
| |
proto.png | r1 | manage | 114.2 K | 2019-06-09 - 12:25 | UliRaich | |
| |
protoDriver.png | r1 | manage | 31.4 K | 2019-06-09 - 12:25 | UliRaich | |
| |
triggerCode.png | r1 | manage | 104.8 K | 2019-06-09 - 14:15 | UliRaich |
Ideas, requests, problems regarding TWiki? Send feedback


