End Presentation


TWiki Slide Show
Next
DHT11 Temperature and Humidity Sensor

Lecture 8

Uli Raich

UCC semester 2017/2018

First slide Previous Next Last slide
COPYRIGHT © 2024 by the contributing authors
Slide 1 of 21


TWiki Slide Show
Next
A single GPIO pin
We have seen how we can drive an LED from a single GPIO pin

programmed as output pin or how we can read its state

through another GPIO pin, programmed as input pin.

Can one do more with a single pin?

First slide Previous Next Last slide
COPYRIGHT © 2024 by the contributing authors
Slide 2 of 21


TWiki Slide Show
Next
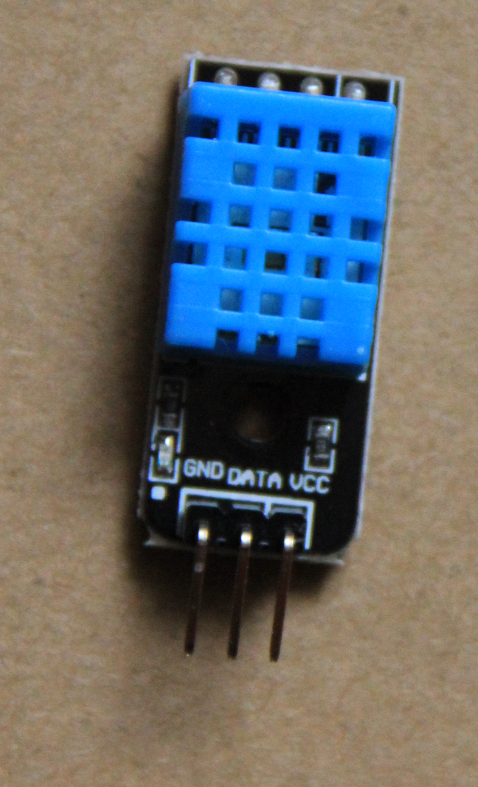
DHT11 pinout
The DHT11 has only
3 pins:

  • Vcc
  • Ground
  • one data pin
dht11.png

First slide Previous Next Last slide
COPYRIGHT © 2024 by the contributing authors
Slide 3 of 21


TWiki Slide Show
Next
Serial Protocol
How can we, with a single pin

  • initiate a measurement
  • read humidity and temperature data
  • make sure the data are correct?
The answer is: a serial protocol
and the DHT11 implements its own serial protocol

First slide Previous Next Last slide
COPYRIGHT © 2024 by the contributing authors
Slide 4 of 21


TWiki Slide Show
Next
Reading and understanding the data sheet
Let’s have a look at the DHT11 data sheet:

Most of the following information is just a copy from the data sheet.

dht11Intro.png

First slide Previous Next Last slide
COPYRIGHT © 2024 by the contributing authors
Slide 5 of 21


TWiki Slide Show
Next
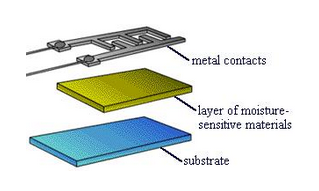
How does a resistive humidity measurement work?
resistiveHumiMeas.png

First slide Previous Next Last slide
COPYRIGHT © 2024 by the contributing authors
Slide 6 of 21


TWiki Slide Show
Next
Resistive Humidity Measurement(2)
  • Variations in relative humidity produce changes variations
    of resistivity,which is measured.
  • The resistance of certain hygroscopic materials such as
    hygroscopic salts have such a property
  • These materials are mounted as thin films on
    the substrate with metal contacts
  • The devices can be very small

First slide Previous Next Last slide
COPYRIGHT © 2024 by the contributing authors
Slide 7 of 21


TWiki Slide Show
Next
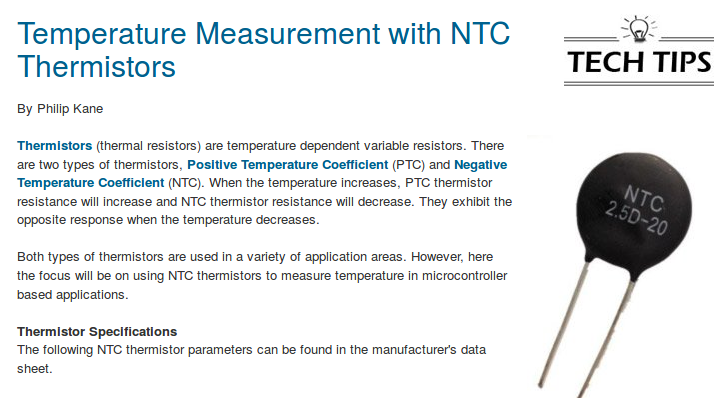
The NTC Thermistor
ntcThermistor.png

First slide Previous Next Last slide
COPYRIGHT © 2024 by the contributing authors
Slide 8 of 21


TWiki Slide Show
Next
A processor on chip
In order to convert these measurements into numeric values

and send them to the end user through a serial protocol,

a preprogrammed micro-controller must be implemented on the chip.

In the case of the DHT11 this is an 8 bit micro-controller,

which does the conversion into binary and which creates the serial protocol

First slide Previous Next Last slide
COPYRIGHT © 2024 by the contributing authors
Slide 9 of 21


TWiki Slide Show
Next
Text from the data sheet
humiCalib.png

First slide Previous Next Last slide
COPYRIGHT © 2024 by the contributing authors
Slide 10 of 21


TWiki Slide Show
Next
Measurement Precision
dht11Specs.png

First slide Previous Next Last slide
COPYRIGHT © 2024 by the contributing authors
Slide 11 of 21


TWiki Slide Show
Next
How to connect the device
connections.png

First slide Previous Next Last slide
COPYRIGHT © 2024 by the contributing authors
Slide 12 of 21


TWiki Slide Show
Next
Powering the device
As we can see from the specs below, the DHT11 power line

can be directly connected to the cobbler 3.3V (or the 5V) line

power.png

First slide Previous Next Last slide
COPYRIGHT © 2024 by the contributing authors
Slide 13 of 21


TWiki Slide Show
Next
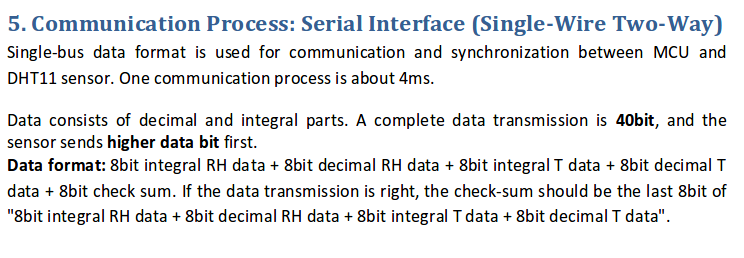
Single Wire two way interface
twoWay.png

First slide Previous Next Last slide
COPYRIGHT © 2024 by the contributing authors
Slide 14 of 21


TWiki Slide Show
Next
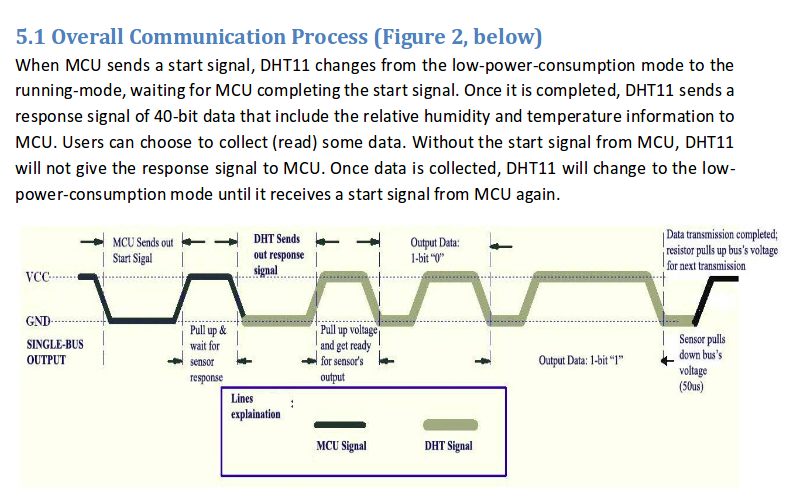
Overall Communication Process
overall.png

First slide Previous Next Last slide
COPYRIGHT © 2024 by the contributing authors
Slide 15 of 21


TWiki Slide Show
Next
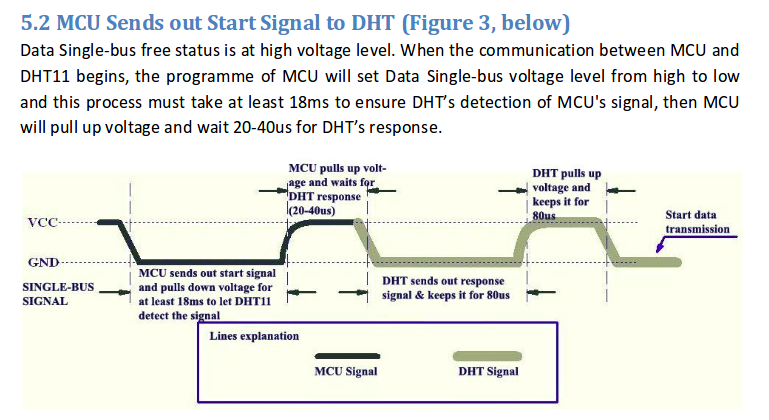
How to initiate a Measurement?
initiate.png

First slide Previous Next Last slide
COPYRIGHT © 2024 by the contributing authors
Slide 16 of 21


TWiki Slide Show
Next
What does this mean for our program?
We must:
  • Program the GPIO pin onto which we connected our DHT11 as output
  • We must pull this line done (send a login level zero) and
    keep it low for a minimum of 18 ms
  • We must pull it high again and wait for another 20-40 μs
  • Finally we must re-program the pin as input and wait for the DHT11 to respond.

First slide Previous Next Last slide
COPYRIGHT © 2024 by the contributing authors
Slide 17 of 21


TWiki Slide Show
Next
Response from DHT11response.png

First slide Previous Next Last slide
COPYRIGHT © 2024 by the contributing authors
Slide 18 of 21


TWiki Slide Show
Next
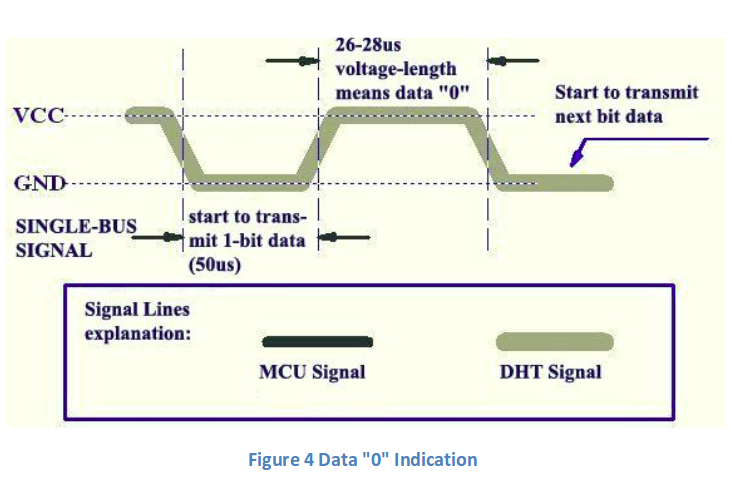
A zero bit
zero.png

First slide Previous Next Last slide
COPYRIGHT © 2024 by the contributing authors
Slide 19 of 21


TWiki Slide Show
Next
A one bit
one.png

First slide Previous Next Last slide
COPYRIGHT © 2024 by the contributing authors
Slide 20 of 21


TWiki Slide Show
Next
Complicated?
Wow, this looks complicated. How can we write a program to do all this?

Let's start slowly:

  • Initiating a measurement seems do-able
  • Why not just read the data from the device every 5 µs
    and print out the information?
The zeros and ones do not look too convincing.
Let’s save those onto a file and look at it with gnuplot

First slide Previous Next Last slide
COPYRIGHT © 2024 by the contributing authors
Slide 21 of 21


First slide Previous End Presentation


-- Uli Raich - 2017-10-20

Comments

I Attachment History Action Size Date Who Comment
PNGpng connections.png r1 manage 42.6 K 2017-10-20 - 16:27 UnknownUser  
PNGpng dht11.png r1 manage 597.9 K 2017-10-20 - 16:34 UnknownUser  
PNGpng dht11Intro.png r1 manage 26.5 K 2017-10-20 - 16:27 UnknownUser  
PNGpng dht11Specs.png r1 manage 11.5 K 2017-10-20 - 16:27 UnknownUser  
PNGpng humiCalib.png r1 manage 24.3 K 2017-10-20 - 16:27 UnknownUser  
PNGpng initiate.png r1 manage 153.8 K 2017-10-20 - 16:27 UnknownUser  
PNGpng ntcThermistor.png r1 manage 80.6 K 2017-10-20 - 16:27 UnknownUser  
PNGpng one.png r1 manage 149.6 K 2017-10-20 - 16:27 UnknownUser  
PNGpng overall.png r1 manage 180.3 K 2017-10-20 - 16:27 UnknownUser  
PNGpng power.png r1 manage 14.5 K 2017-10-20 - 16:27 UnknownUser  
PNGpng resistiveHumiMeas.png r1 manage 54.9 K 2017-10-20 - 16:27 UnknownUser  
PNGpng response.png r1 manage 28.8 K 2017-10-20 - 16:28 UnknownUser  
PNGpng twoWay.png r1 manage 32.0 K 2017-10-20 - 16:28 UnknownUser  
PNGpng zero.png r1 manage 181.6 K 2017-10-20 - 16:28 UnknownUser  

This topic: Embedded_Systems > WebHome > LectureSlides > Lecture8:DHT11TemperatureAndHumiditySensor
Topic revision: r2 - 2017-10-20 - uli
This site is powered by the TWiki collaboration platform Powered by PerlCopyright © 2008-2024 by the contributing authors. All material on this collaboration platform is the property of the contributing authors.
Ideas, requests, problems regarding TWiki? Send feedback