Lecture 1: Basic Python Programming
CSC 321: Embedded Sysytem
First Semester 2020/2021
Slide 1: Introduction of Lecturers
- Uli Raich -- Formally CERN, Geneva, Switzerland
- Isaac Armah-Mensah -- University of Cape Coast Ghana
Slide 2: The TWiki server
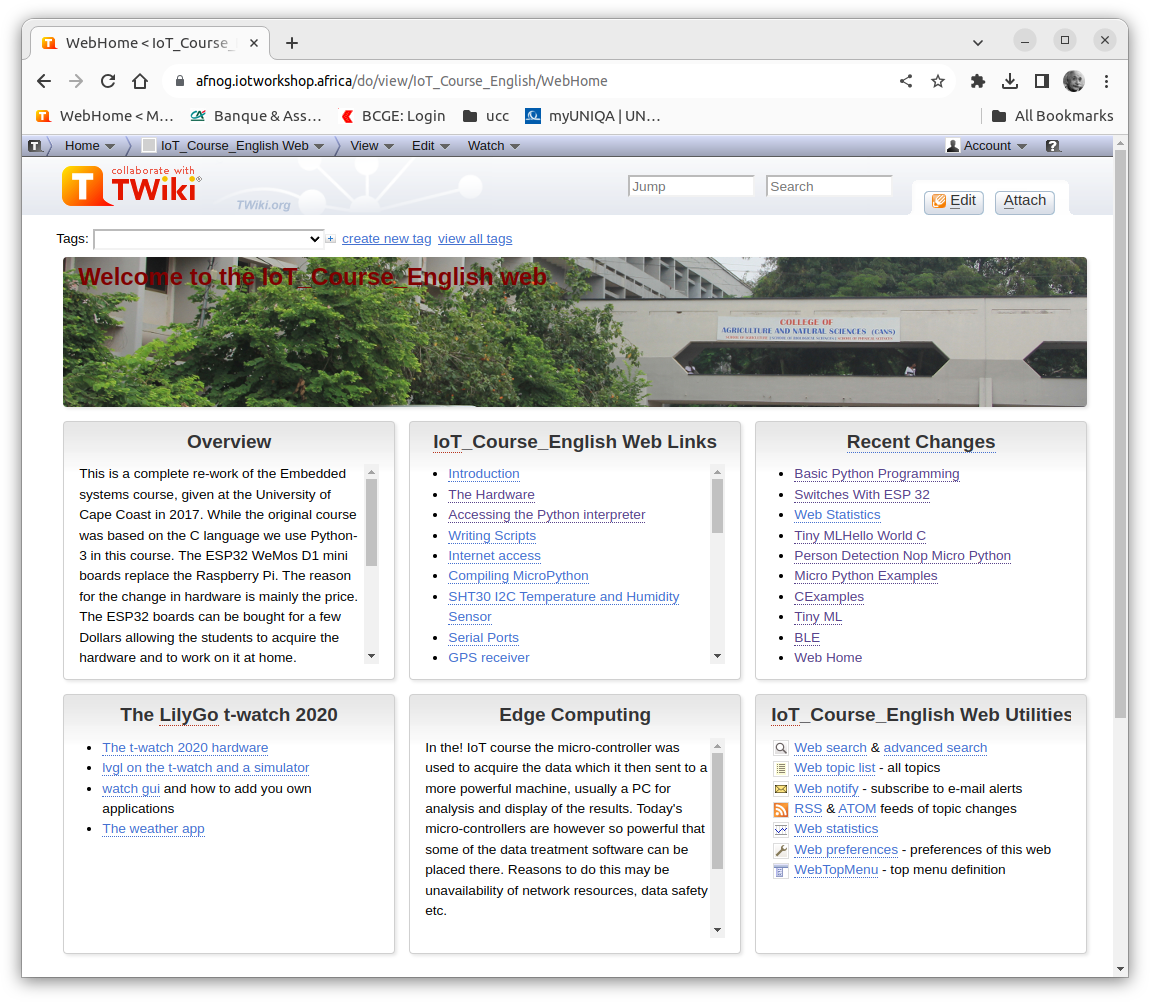
All information about this tutorial is available on a TWiki server. TWiki uses the same documentation format as Wikipedia. This makes it very simple for the lecturer to provide on-line documentation, which can be extended by students. This is our Twiki server: https://afnog.iotworkshop.africa/do/view/UCC_Course_2021/WebHomeSlide 3: Course Page
Slide 4: What is the “I” in IoT ?
The “I” stands for Internet. This means:We need a processor (IoT node) that can connect to the Internet.
It must be powerful enough to run Internet protocols and
it needs an interface to the Internet.
- Ethernet interface
- WiFi interface
- GSM
- … connection to a gateway with access to the internet
Slide 5: Standard way to access the Internet
Usually the Internet is used by humansTypical applications are
- WEB browsing
- Email
- Social media
- Telephone and chats
!IoT: “Things” communicate also without human intervention.
Slide 6: Things, Sensors, Actuators
- Coffee machines, dish washer, washing machine, …
- Burglar alarm system
- Intelligent farming
- Weather station
- Scientific measurements
- Industrial factory control
- Car electronics, ignition system, ABS,…
- You name it!
Slide 7: The IoT system
We need a system with a number of processors that read out sensors and/or control actuatorsThese processors communicate with each other over the Internet with or without human intervention. Design decisions:
- Which processors?
- Which communication protocol
- Which GUI to be able to see what is going on?
- Which programming language?
Slide 8: The Raspberry Pi
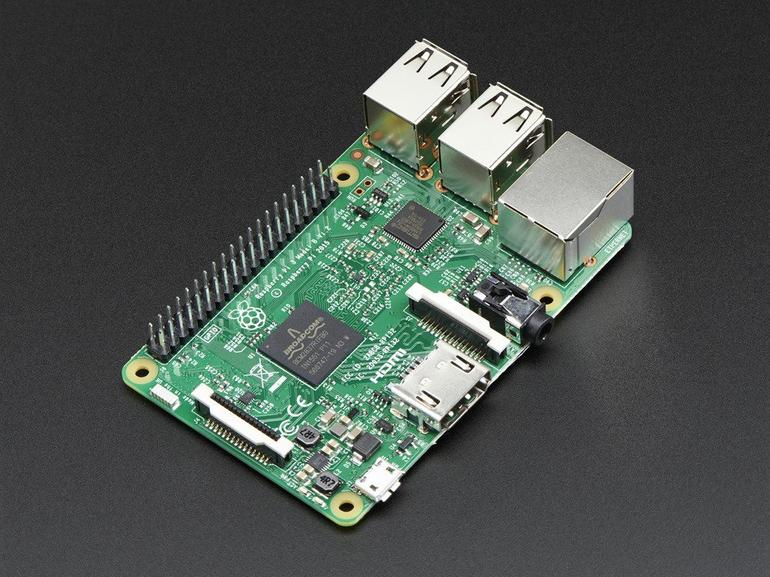
| The Raspberry Pi is a small computer powerful enough to run a full blown Linux operating system: A quad core 1.2 GHz Broadcom 64 bit ARM CPU
|
 |
Slide 9: Arduino + WiFi shield
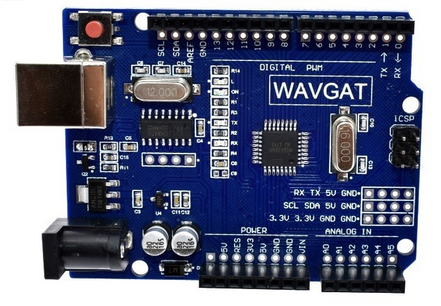
Total cost: ~12-15 US $
Slide 10: The ideal IoT solution?
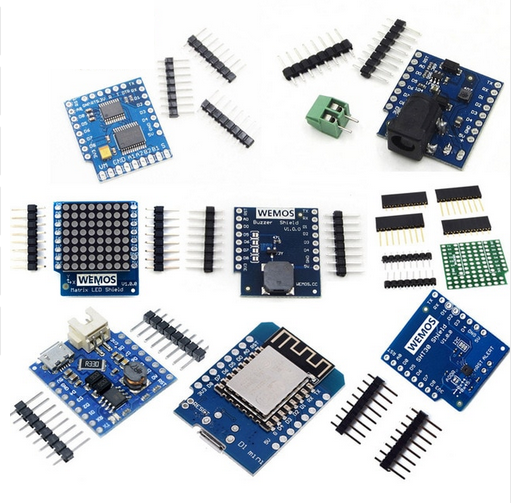
| ESP8266 or ESP32 processor board ESP8266 specs:
ESP32 is even more powerful Cost: ~ 4.5 US$ |
 |
Slide 11: Communication
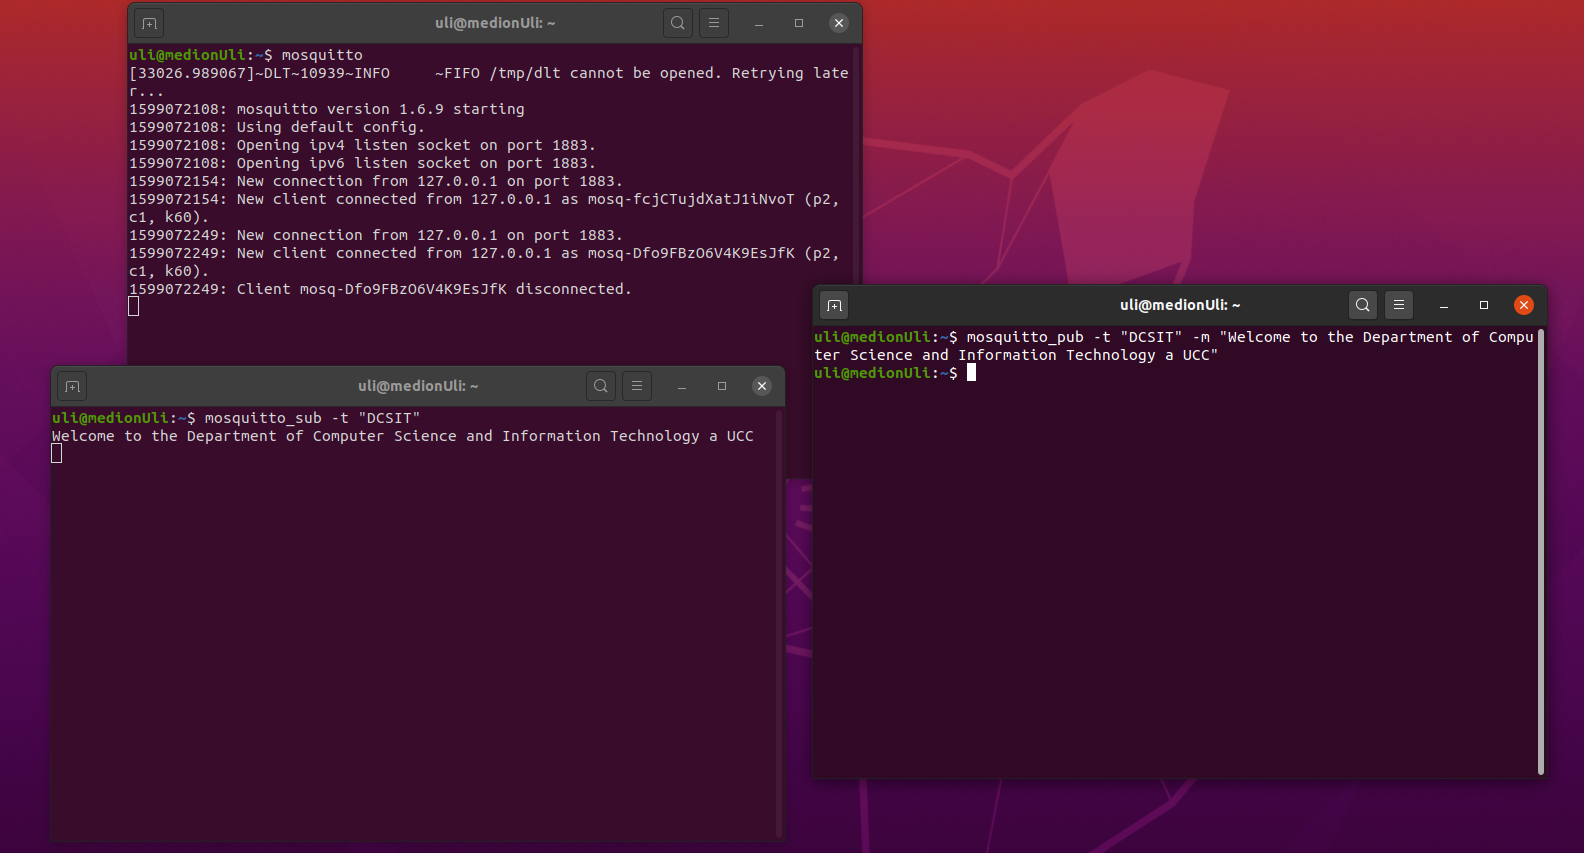
MQTT (Message Queuing Telemetry Transport: a publish-subscribe basedMessage protocol running of top of TCP.
A processor can subscribe to messages of a certain “topic” and/or it can push its
results on a certain topic
Slide 12: Programming language
- Only the data recovered from the communication protocol is seen
- Any programming language will do
- Cayenne/MQTT libraries are available for
- C, C++
- Python
- Java
- Java Script
- C, C++
Slide 13: Introduction to Python
The python programming language is a high level programming language that is very interactive and object oriented. Python is an interpreted language which means that the statements which make up the python program is processed at run-time but not compiled first. Python also supports object oriented programming style which employs the use of encapsulating codes within objects. What can python be used for?-
Used to create web applications.
-
Used to connect to database systems.
-
It can be used to perform complex mathematics
-
It can be used in data analysis.
and for everybody the Python docs: https://docs.python.org/3/index.html
Slide 14: Writing Python Programs
Python is a programming language that lets you work more quickly and integrate your systems more effectively.-
Python is powerful... and fast;
-
plays well with others;
-
runs everywhere;
-
is friendly & easy to learn;
-
is Open.
Slide 15: Using the Command Line (Interactive mode)
Simply type python in your terminal and press the enter key to start the interactive python mode. Type print(“Hello world”). Hit enter and it prints Hello world on the screen. To exit from the interactive mode, type quit().
Slide 16: Using the script mode
Using the interactive mode doesn’t keep the statements of code we wrote permanently . But in an ideal situation we might want to keep the codes for future reference. Hence we make use of an editor like the nano, emacs, etc.
Slide 17: Using Thonny
Instead of running a standard editor like nano or emacs you may want to run an Integrated Development Environment (IDE) created specifically for Python instead. Thonny is Easy to get started. Thonny comes with Python 3.7 built in,so just one simple installer is needed and you're ready to learn programming. It is very suitable for beginners and programming micro-controllers For basic description of Thonny check https://thonny.org/
Slide 18: Thonny Python Shell and Editor
Here you see the 2 thonny windows. The top one contains the editor, the second the Python shell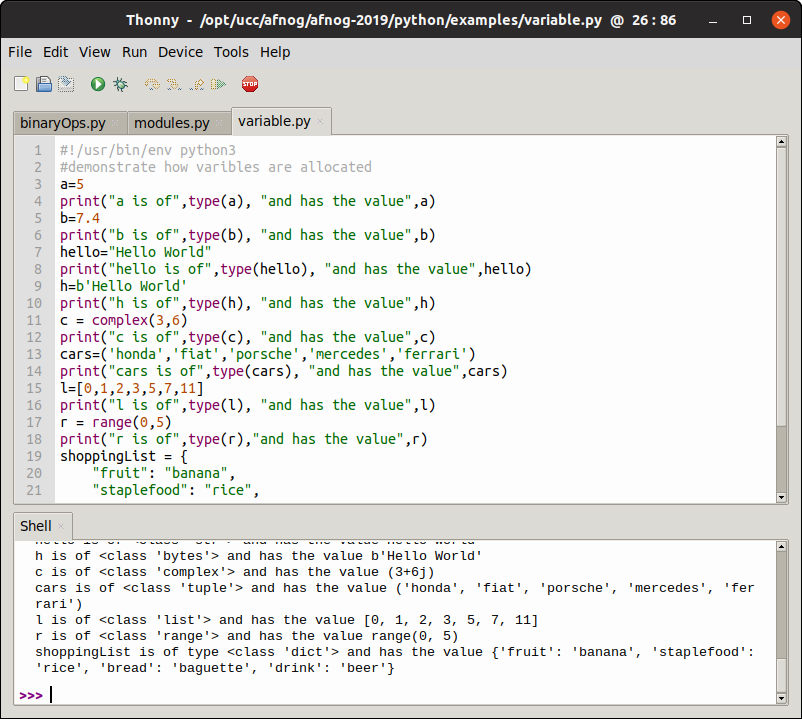
Slide 19: Running a python script
Script in python can be run from the Linux command shell with: python3 scriptName or we can make it executable and run it like we would run any compiled C program or any bash script: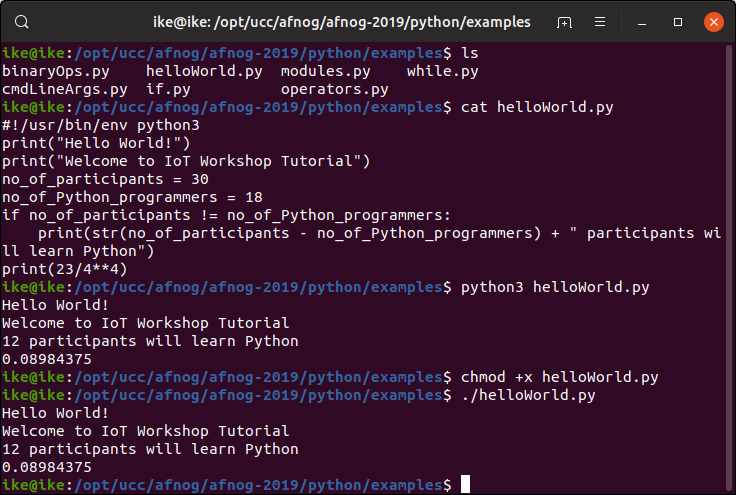
Slide 20: Command Line Arguments
Programs can be called with arguments. Python has a module that helps users parse command-line options and arguments. Many programs can be run to provide basic information about how theyshould be run and it employs the use of command line arguments. The Python sys module provides access to any command-line arguments via the sys.argv .


Slide 21: Variables
Variables are just memory allocations for storing values. Every variable created has a space in memory allocated for it. Based on the data type of a variable, the interpreter allocates memory anddecides what can be stored in the reserved memory. Python variables do not need explicit declaration to reserve memory space. The declaration happens automatically when you assign a value to a variable. The equal sign (=) is used to assign values to variables. The operand to the left of the = operator is the name of the variable and
the operand to the right of the = operator is the value stored in the variable.

Slide 22: Data Types in Python
Programs store data in one form or the other and must be of a certain type. We discuss the following data types- Strings
- Lists
- Tuple
- Dictionary
- ByteArray
Slide 23: Strings in Python
Strings in Python are identified as a contiguous set of characters represented in the quotation marks. Python accepts either pair of single, double quotes and triples(single/double) quotes.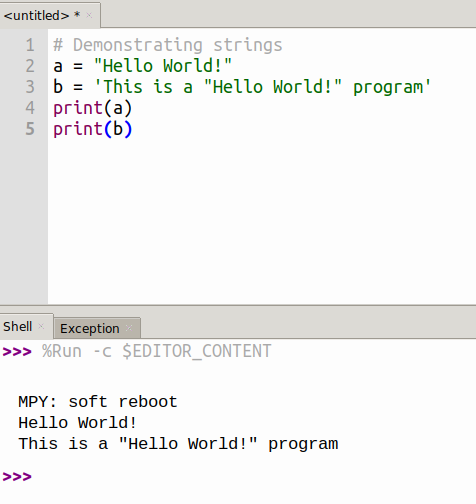
Slide 24: List in Python
The list is a most versatile datatype available in Python. It can be written as a list of comma-separated values (items) between square [] brackets. A list need not be of the same type. The values present in a list are indexed starting from zero. The values stored in a list can be accessed using the slice operator ([ ] and [:]) withindexes starting at 0 in the beginning of the list and working their way to end -1.

Slide 25: Tuple in Python
Tuples are much more like a list. They are enclosed in brackets(). Their content cannot be changed unlike the list whose content can be changed. Thus tuples are read only.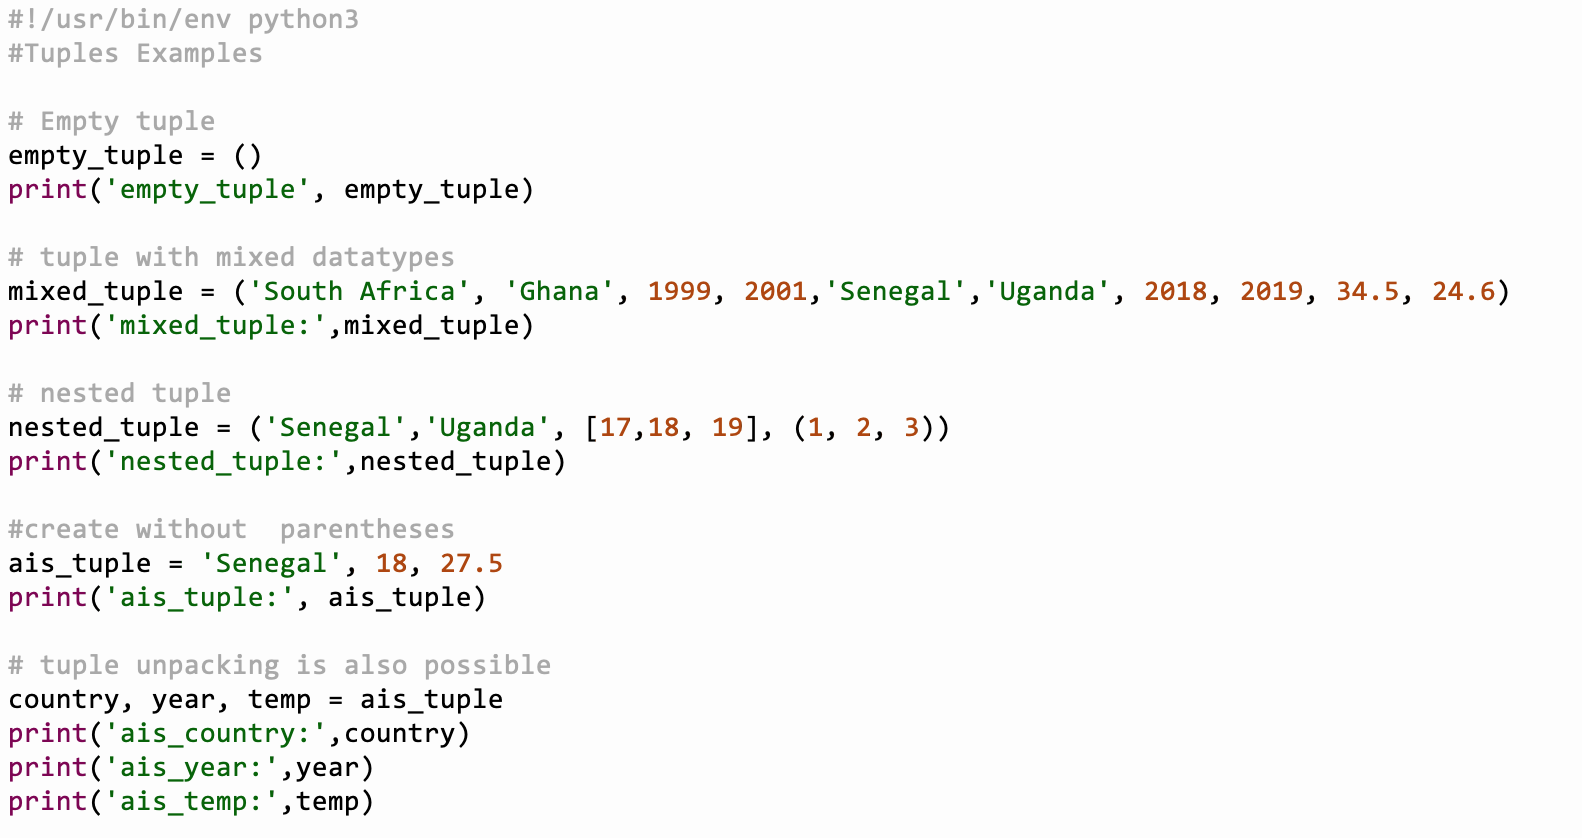
Slide 26: Dictionary in Python
A dictionary is a collection which is unordered, changeable and indexed. In Python dictionaries are written with curly brackets, and they have keys and values. Python's dictionaries allow you to connect pieces of related information. Each piece of information in a dictionary is stored as a key-value pair. When you provide a key, Python returns the value associated with that key. You can loop through all the key-value pairs, all the keys, or all the values.
Slide 27: Basic Operators
Python supports multiple operators including- arithmetic,
- comparison,
- assignment,
- logical,
- bitwise,
- membership and
- identity operators.
Slide 28: Arithmetic Operators:
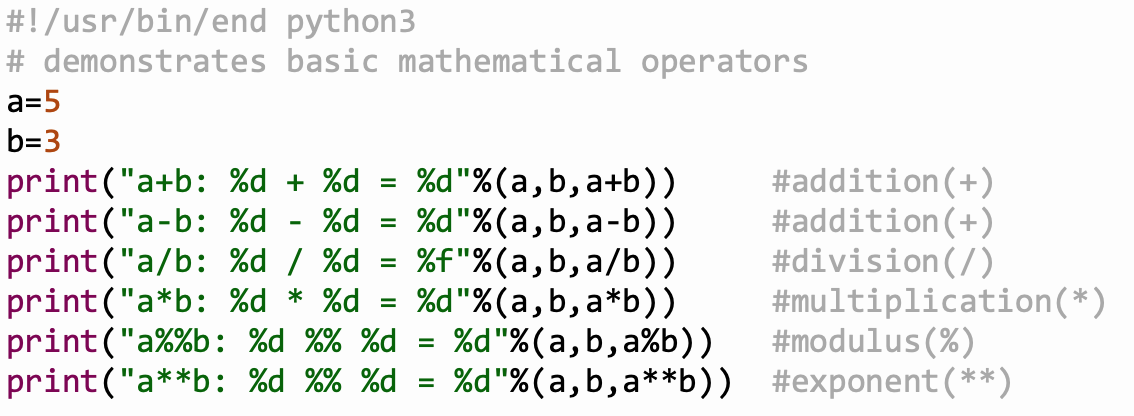
The arithmetic operators supported by python is addition(+) , subtraction(-),multiplication(* ), division(/), modulus(%), exponent(**)
Slide 29: Python Bitwise Operators
Bitwise operator works on bits and performs bit-by-bit operation
Slide 30: Conditional Statements
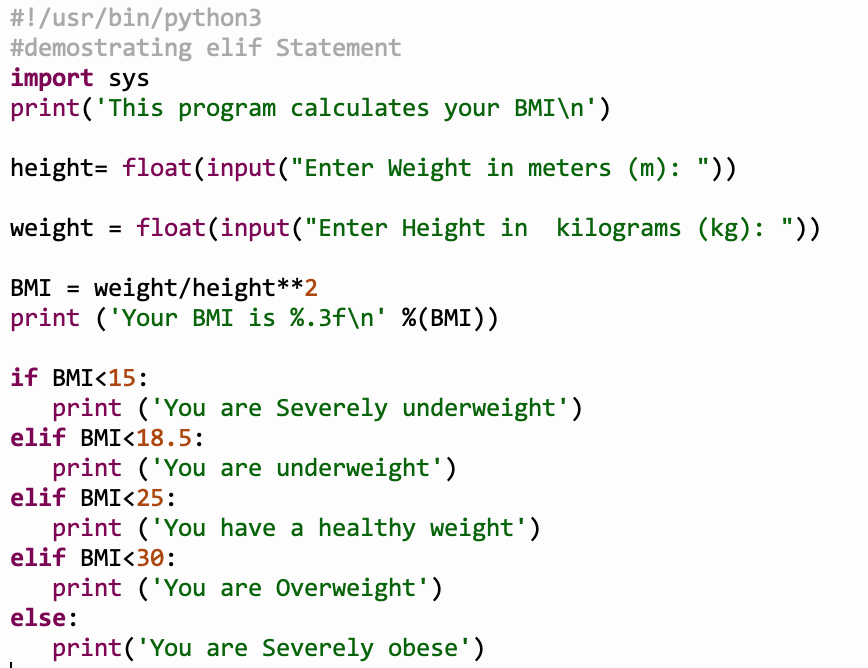
We have seen conditions already in the very first example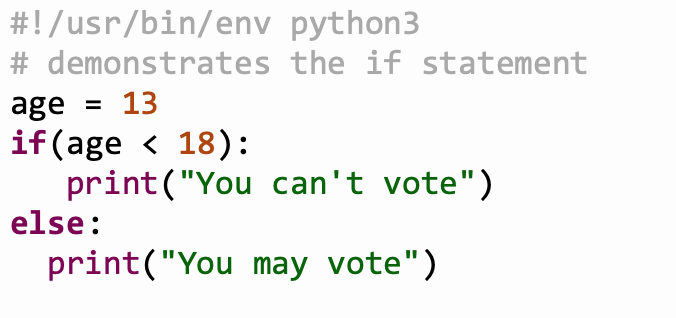
Slide 31: Loops
A loop statement allows us to execute a statement or group of statements multiple times. Python has two primitive loop commands:- while loop
- for loops

Slide 32: Functions
Programs are written in blocks of codes which are reusable but performs similar actions. Python comes with builtin functions such as print(). Users can define and use their own functions in the code. User defined functions begin with the keyword def followed by the name of the function. A function may take parameters
Slide 33: Modules
Modules in a python are file with .py extensions containingdefinitions of functions or variables. We may want to keep function definitions in separate files and use these definitions in several main programs. In our example of the functions we can save the definitions in a file called function.py In order to use the definitions we must import them with import function In order to call the functions we have to use the module name: function.sum(20,30) or if we we want to import a single function: from function import sum sum(20,30) The module name is found in the variable name
Slide 34: Modules Examples

Slide 35: Executing Modules
Often modules contain only function or class (see later) definitions However it is also possible to include the function calls (the main routine) into the module e.g. to demonstrate how the functions are to be used. In this case the name of the module changes to __main__We can therefore find out if the module is imported or executed by checking the name variable: if __name __ == "__main__" this executes the main code only if not imported into a main program
Slide 36: Packages
Packages simply group modules under one name. Each package is a directory which MUST contain a specific file called __init__.py indicating the directory is a package. the __ init __.py file may be empty. Package can be imported the same way as module. Suppose we have several modules prime.py, fibonacci.py, factorial.py in a directory, we may group them in a package called priff.
Slide 37: Class
Almost everything in Python is an object, with its properties and methods.
A class defines the behavior of an object and the kind of information an object can store.
The information in a class is stored in attributes, and functions that belong to a class are called methods.
A child class inherits the attributes and methods from its parent class.
Slide 38: Creating a Class
The syntax for creating a class is similar to functions You may define a method with name __init__which is called when
the instance object of the class is created (in the above example: mc = MyClass)
The short description of the class can be found in the instance variable __Doc.__
Slide 39: Class Example

Slide 40: Libraries
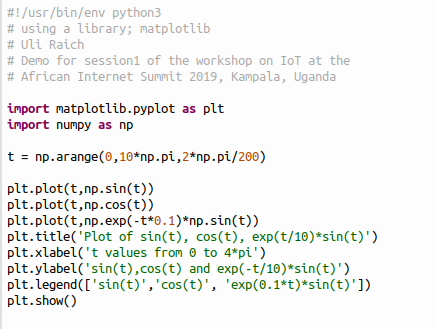
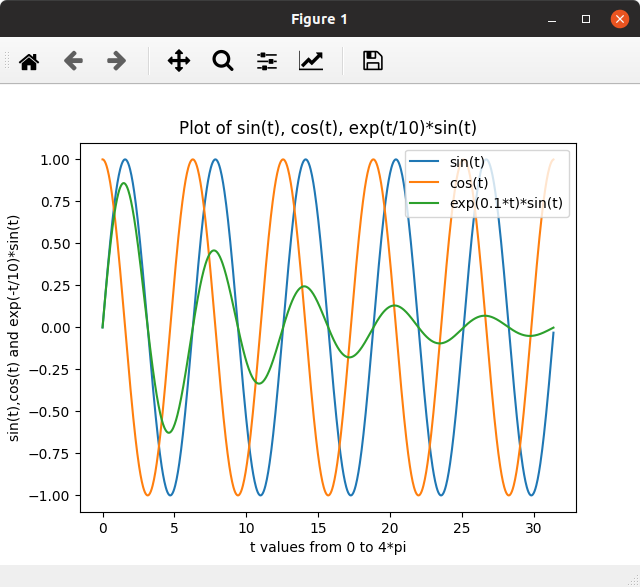
Python library is a collection of functions and methods that allows you to perform many actions without writing your codeA very typical example of a python library is matplotlib for plotting.
Slide 41: Callbacks
Callbacks are very often used in Graphical User Interface (GUI systems) GUI elements (widgets) are set up by the programmer and events are attached to them. Typical examples are:- Selection of an intem in a list
- Selection on a menu item
- pushing a push button
- checking a check box
Slide 42: A Dummy GUI
Our dummy GUI allows to register a callback and if one is registered it will call it every 2 s.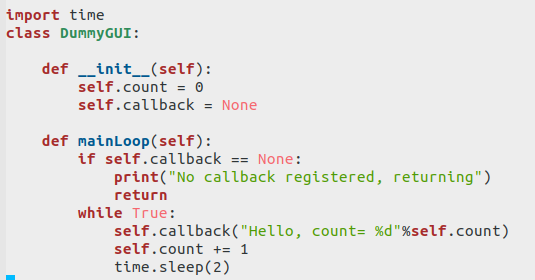
Slide 43: The application running the dummy GUI
The application first registers the callback and then gives control to the dummy GUI main loop. The main loop will wait for an event (2 s elapsed) and call the callback function when the event has occurred.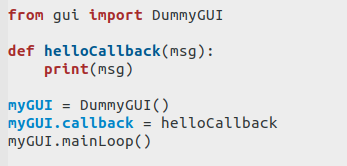
--  Isaac Armah-Mensah - 2021-02-07
Comments
| I | Attachment | History | Action | Size | Date | Who | Comment |
|---|---|---|---|---|---|---|---|
| |
Home_page.png | r1 | manage | 534.7 K | 2023-11-27 - 09:43 | UliRaich | |
| |
arduino.png | r1 | manage | 191.1 K | 2021-02-07 - 19:31 | IsaacArmahMensah | |
| |
commandline.png | r1 | manage | 23.9 K | 2023-11-27 - 10:02 | UliRaich | |
| |
dictionary.png | r1 | manage | 217.8 K | 2021-02-07 - 20:30 | IsaacArmahMensah | |
| |
list.png | r1 | manage | 206.8 K | 2021-02-07 - 20:26 | IsaacArmahMensah | |
| |
mosquittoDemo.png | r1 | manage | 522.0 K | 2023-11-27 - 10:14 | UliRaich | |
| |
mqtt.png | r1 | manage | 53.5 K | 2021-02-07 - 19:36 | IsaacArmahMensah | |
| |
raspberry-pi-3-b.jpg | r1 | manage | 78.4 K | 2023-11-27 - 09:45 | UliRaich | |
| |
raspberry-pi.webp | r1 | manage | 583.5 K | 2021-02-07 - 19:25 | IsaacArmahMensah | |
| |
raspberry_pi.png | r1 | manage | 914.0 K | 2021-02-07 - 19:27 | IsaacArmahMensah | |
| |
script.png | r1 | manage | 139.9 K | 2021-02-07 - 15:06 | IsaacArmahMensah | |
| |
sheild.png | r1 | manage | 743.0 K | 2021-02-07 - 19:34 | IsaacArmahMensah | |
| |
string.png | r1 | manage | 31.2 K | 2023-11-27 - 10:13 | UliRaich | |
| |
uno.png | r1 | manage | 254.6 K | 2023-11-27 - 09:55 | UliRaich | |
| |
variable.png | r1 | manage | 33.5 K | 2023-11-27 - 10:19 | UliRaich | |
| |
wemosShields.png | r1 | manage | 388.3 K | 2023-11-27 - 09:55 | UliRaich | |
| |
while.png | r1 | manage | 146.3 K | 2021-02-07 - 20:26 | IsaacArmahMensah |
Ideas, requests, problems regarding TWiki? Send feedback
