Internet access
Once we have collected data from the sensors, we want to get access to them. This can be accomplished most easily by transferring the data over the Internet. Most of the time we want to plot the data in some form or another. Often it is also desired to see real-time data.WiFi
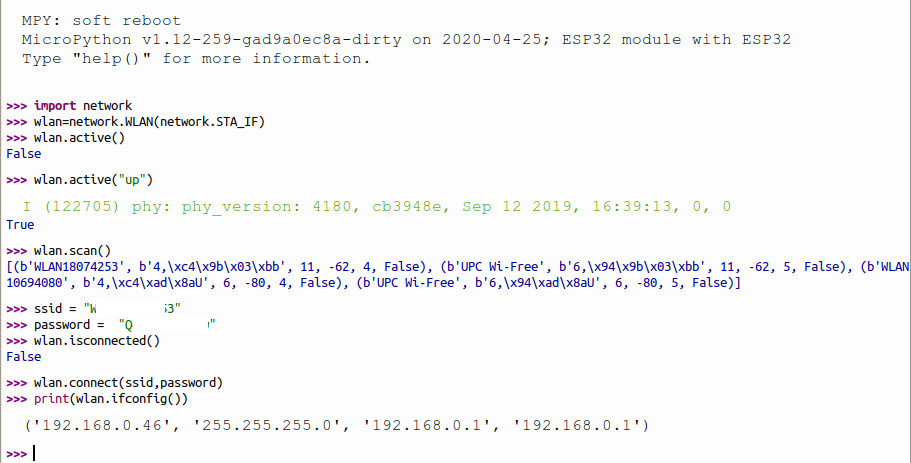
The WeMos D1 mini ESP32 CPU board offers WiFi access implementing a TCP/IP and full 802.11 b/g/n Wi-Fi MAC protocol (see the ESP32 datasheet All you need to do is putting in the correct ssid for your WiFi network and the corresponding password. Of course you do not want to type all this each time you connect to your network and for this reason a wifi_connect.py module is already included in your MicroPython binary.
https://iotworkshop.africa/pub/IoT_Course_English/InternetAccess/wifi_connect_public.py.txt
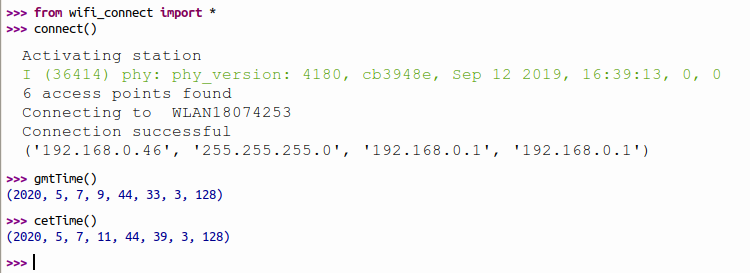
provides all necessary functions to do this. It first connects to WiFi as a station interface and prints the IP address it is connected to. If it is already connected it simply returns. Once connected it gets the current time from the NTP time server and sets up the ESP32 real time clock. You can get the current GMT time with gmtTime() or CET time with cetTime(). The module is already included in the MicroPython binary.
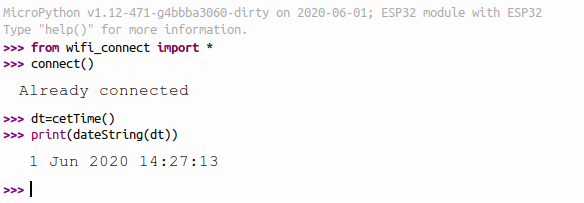
 You can also get the current date and time in a more readable format with dateString(currentTime), where currentTime is the tuple returned by gmtTime() or cetTime()
 Since I cannot know the SSID and password of your WiFi network, connect() will only work for my private network. You can however pass your SSID and password as parameters:
connect(ssid="YourSSID",password="YourWiFiPasswword",hostname="yourHost") You get the IP address allocate with getIPAddress(). Since we have defined the hostname with:
 and this hostname is made known to your DNS server through mDNS, you can also address the ESP32 under its hostname: yourHost.local
An FTP server
When collecting data it may be interesting to transfer them for analysis to a PC. For this an FTP server is very helpful and there is one included in the MicroPython binary. Make sure you are connected to the network with wifi_connect and then simplyimport uftpd. You may stop the server again with uftpd.stop(). More information about the ftp server can be found at https://github.com/robert-hh/FTP-Server-for-ESP8266-ESP32-and-PYBD
Telnet
A simple telnet server is included in the MicroPython binary. To start it: import utelnetserverutelnetserver.start()
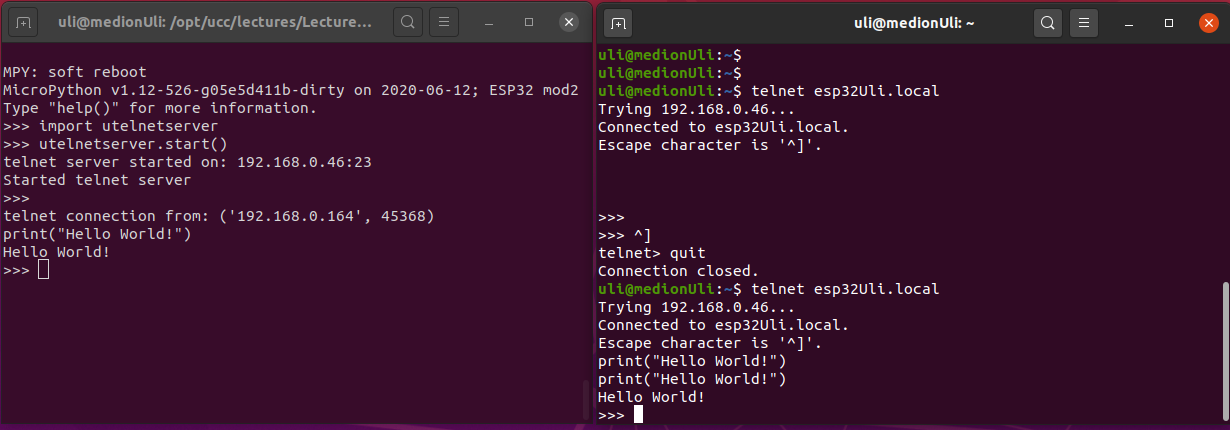
Once started you can telnet to the ESP32 and connect to its REPL. Attention: This does NOT work when running the shell in thonny! Here is an example:
 On the left you have a minicom window connected to the ESP32 REPL through the serial line. On the right you have a window on the PC where I connect to the ESP32 REPL through telnet over the network.
Exercises for the Internet part of the IoT course
In this course we will have a look into two ways of accessing our data:- a WEB Server implemented on the ESP32
- transfer of the data through MQTT to a Cayenne server offering display and logging of our data.
Comments
| I | Attachment | History | Action | Size | Date | Who | Comment |
|---|---|---|---|---|---|---|---|
| |
dateString.png | r1 | manage | 20.5 K | 2020-06-01 - 12:30 | UliRaich | |
| |
hostname.png | r1 | manage | 22.0 K | 2020-06-10 - 20:02 | UliRaich | |
| |
utelnetserver.png | r1 | manage | 100.5 K | 2020-06-13 - 06:50 | UliRaich | |
| |
wifi_connect.jpg | r1 | manage | 105.4 K | 2020-06-04 - 08:21 | UliRaich | |
| |
wifi_connect.png | r1 | manage | 30.9 K | 2020-05-07 - 09:46 | UliRaich | |
| |
wifi_connect.py.txt | r1 | manage | 2.5 K | 2020-05-07 - 09:14 | UliRaich | |
| |
wifi_connect_public.py.txt | r3 r2 r1 | manage | 3.5 K | 2020-06-10 - 20:02 | UliRaich |
Ideas, requests, problems regarding TWiki? Send feedback


