Motors
Introduction
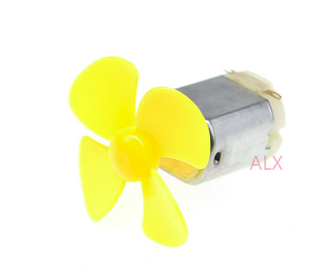
We have 3 different types of motors in our kit:- DC motor: Used for continuous movement in either forward or backward direction and at different speeds
- Servo motor: Allows to move to a precise angle. Used e.g. for steering the direction of a robot car, RC controlled model air planes or ships. Allowed angles are usually 0..180 degrees
- Stepping motors: Move in steps and therefore allow to move forward or backward to a precise position of any distance.
The DC motor
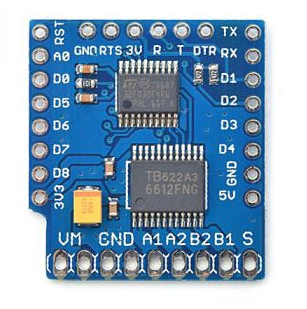
The DC motor we use needs ~ 350 mA of power and can therefore not be run when the ESP32 power is coming from the USB connector, delivering a maximum ~200mA. We will need an external power supply! The motor is controlled by a motor control shield:
| Motor Control Shield Front view |
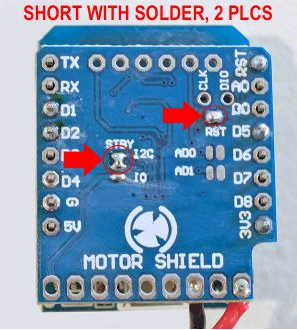
Motor Controller Shield Back side |
 |
 |
- tie the reset pin to the reset signal of the system
- to allow access to motor standby through an I2C command
- A Motor instance must be created with the parameters
- index: 0 or 1 which corresponds to either motor 1 or motor 1 (2 DC motors can be controlled be the shield)
- ic2: an I2C object, which must be created before (we did this in the exercise on the SHT30)
- frequency(freq): if freq == None this method returns the PWM frequency used to control motor speed otherwise its sets the frequency
- speed(motor_speed): if motor_speed == None: returns the current speed,otherwise it sets the speed.
motor_speed values can be 1..10000 to move clockwise or -1..-10000 to move counterclockwise.
I found that for values below 1500 the current is too low to make the motor move - brake: stop the motor
- sleep: put the motor into standby mode to save power
The Servo Motor
The servo motor we use is of type SG90. It is a cheap hobbyist servo which can be run directly off the ESP32 power supply even it that board is powered through an USB connector. For connections and technical details pleas consult the SG90 data sheet The servo motor is connected to the WeMos D1 as follows
| Cable from Servo Motor | Cable color | Pin on ESP32 |
| Gnd | brown | Gnd |
| Power | red | 5V |
| Signal | orange | any GPIO pin, default: D0, on ESP32: GPIO 26 |
I wrote and integrated into the MicroPython binary a simple servo driver which makes it extremely simple to control the servo motor:
from servo import Servo
servo = Servo()
servo.angle(90)
will move the servo to 90 degrees.
Stepping Motor
In order to learn about how stepping motors work please refer to the 2017 course on embedded systems lecture 9: Embedded_Systems/Lecture9:SteppingMotors. We will use a 27BJY-48 stepper motor with its associated ULN-2803 driver module. http://robocraft.ru/files/datasheet/28BYJ-48.pdf| Pin on the driver module | pin on the ESP32 |
| 5-12V | 5V |
| Gnd | Gnd |
| In1 | D0: GPIO 26 |
| In2 | D5: GPIO 18 |
| In3 | D6: GPIO 19 |
| In4 | D7: GPIO 23 |
from stepper import steppingMotor
stepper = steppingMotor() # the parameters p1,p2,p3,p4 are optional and allow to connect the stepping motor to different GPIO lines
The steppingMotor class uses different modes for stepping:
- SINGLE_PHASE_FORWARD (default)
- SINGLE_PHASE_BACKWARD
- DOUBLE_PHASE_FORWARD
- DOUBLE_PHASE_BACKWARD
- HALF_STEP-FORWARD
- HALF_STEP_BACKWARD
stepper.stepMode(stepper.DOUBLE_PHASE_FORWARD)You can change the movement speed with the method waitAfterSteps() which defines how long to wait after each step in ms. Valid values are 2..1000. Again the method returns the value currently in use if called without a parameter. The method clrAll() set all coils (IN1..IN4) to zero. Finally the method move(noOfSteps) moves the stepping motor noOfSteps in the mode and with the speed currently selected. The exercise sheet in odt format: https://iotworkshop.africa/pub/IoT_Course_English/Motors/exercise_7.odt --
Comments
| I | Attachment | History | Action | Size | Date | Who | Comment |
|---|---|---|---|---|---|---|---|
| |
dcMotorProp.png | r1 | manage | 51.4 K | 2020-06-25 - 08:42 | UliRaich | |
| |
exercise_7.odt | r1 | manage | 374.2 K | 2020-08-09 - 08:59 | UliRaich | |
| |
motorShieldBack.png | r1 | manage | 192.2 K | 2020-06-25 - 08:43 | UliRaich | |
| |
motorShieldFront.png | r1 | manage | 170.7 K | 2020-06-25 - 08:43 | UliRaich | |
| |
servo.png | r1 | manage | 143.0 K | 2020-06-25 - 11:55 | UliRaich | |
| |
stepping.png | r1 | manage | 152.3 K | 2022-03-05 - 19:40 | UliRaich |
Ideas, requests, problems regarding TWiki? Send feedback


