Exercise 8: RTC and data logging
Introduction
The ESP32 has a real time clock implemented on chip. This will however only work as long as the ESP32 is powered. It may therefore be interesting to employ an external RTC like the DS1307, backed up with a battery, to keep time even when the ESP32 is powered off or in deep sleep mode. Getting the current (GMT) time from the internet is easy when using the ntptime module. We can make use of this to setup our RTC with the correct time.Exercise 1: Set the ESP32 to the current time read from the Internet
The module ntptime allows you to get the current UTC time from the NTP server. It's function settime() sets the time of the ESP32 real time clock. Write a module that connects to the Internet through Wifi and that sets up the ESP32 with the current UTC time Check with the ESP32 RTC moduleExercise 2: Set the ESP32 RTC manually
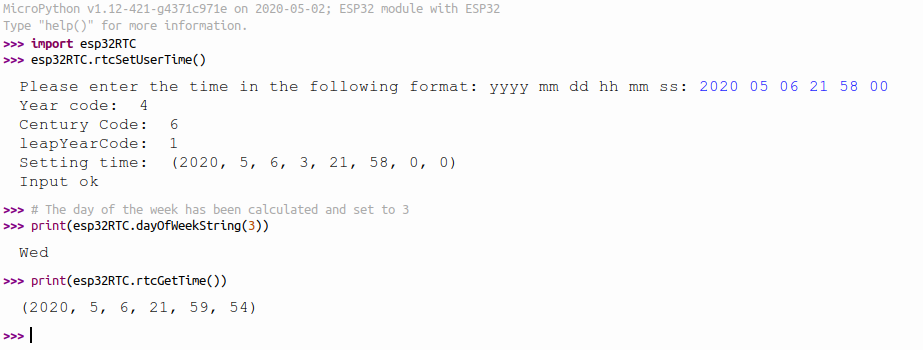
If you do not have Internet access you can still set up the ESP32 RTC manually. Ask the user for the current date and time and set the real time clock in the ESP32 correspondingly. Read back the time a little later and print it out. Use a parser similar to the one we wrote in session 1, exercise 2, for the calculator to check user input. Be careful about the parameters passed into rtc.datetime((currentTime)). currentTime is a Python tuple with the following members: yyyy mm dd ww hh mm ss us where- yyyy: 4 digits for the year
- mm: 2 digits for the month
- dd: 2 digits for the day
- ww: 2 digits for the day in the week. In fact these data do not seem to be used!
- hh: the hour
- mm: minutes
- ss: seconds
- us: microseconds (I always put these to 0)
https://artofmemory.com/blog/how-to-calculate-the-day-of-the-week-4203.html
- rtcSetUserTime(): This asks the user for date and in in the form yyyy mm dd hh mm ss
It then calls parse, another function of the esp32RTC module checking user input and parsing it.
rtcSetUserTime finally creates a machine.RTC instance and sets the RTC with rtc.datetime() - rtcSetTime(year,month,day,hours,minutes,secs): takes the parameters year,month,day ... and tries to set the RTC time without any checks
- rtcGetTime(): returns the current time as a tuple (yyyy,mm,dd,hh,mm,ss)
- dayOfWeek(year,month,day): returns the code for the weekday (0=sun,6=sat)
- dayOfWeekString(dayCode); returns a humanly readable string to the day of the week: "sun"..."sat"

Exercise 3: Set and read the time on the DS1307 I2C Real Time Clock
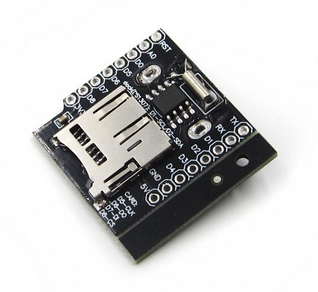
The disadvantage of getting the current time from the ESP32 RTC is that time is lost when the ESP32 is powered off. The DS1307 RTC however is batttery backed and time is kept even when the rest of the system is shut down. Here is a photo of the DS1307 RTC shield: As you can see, it features the DS1307 RTC chip itself but also an SD card reader. This board can therefore be used to generate a time stamp of the measurement, which can be saved, together with the measurement data, on an SD card file. Since SD cards have very high capacity, data can be taken over many hours without filling the file system.
Do the same thing as exercise 1 and 2 but use the DS1307 RTC instead of the ESP32 internal RTC.
You will need the DS1307 data sheet
 Exercise 4: Synchronize the clocks
Write a module with 2 functions synchronizing the clocks:- synchronize the ds1307 clock with the ESP32RTC time
- synchronize the ESP32RTC with the ds3017 time
Exercise 5: Mount the SD card
Write a script to mount the SD card on the RTC and data logger module on "/sd". Create a directory /sd/data and check that is has been created as expected.Exercise 6: Data logging
Write a script that- sets up the ESP32 RTC using ntptime
- reads temperature and humidity values from the SHT30 every 5 s
- write the time stamp and temperature and humidity values for the file /sd/data/sht30Data.txt
- transfer the data to the PC and analyze them
Comments
| I | Attachment | History | Action | Size | Date | Who | Comment |
|---|---|---|---|---|---|---|---|
| |
cetTime.py.txt | r1 | manage | 0.8 K | 2020-05-25 - 10:00 | UliRaich | |
| |
dayOfWeek.py.txt | r1 | manage | 1.7 K | 2020-05-25 - 10:00 | UliRaich | |
| |
esp32RTC.png | r1 | manage | 43.5 K | 2020-05-06 - 20:01 | UliRaich | |
| |
esp32RTC.py.txt | r1 | manage | 4.5 K | 2020-05-25 - 10:00 | UliRaich | |
| |
exercise_8.odt | r1 | manage | 180.0 K | 2020-08-09 - 09:01 | UliRaich | |
| |
rtc-1.png | r1 | manage | 112.9 K | 2020-05-25 - 17:47 | UliRaich |
Ideas, requests, problems regarding TWiki? Send feedback


