Connecting to WiFi
Exercise 1:
Verify the available access points before the activation of the ESP32 WiFi.Study the MicroPython documentation on the WLAN class
- Configure the WiFi interface as an access point.
- Check if the interface is already active and activate it, if not. Confirm that activation succeeded. If activation fails, emit an error message.
| WiFi network before activation of the ESP32 access point | WiFi after activation |
 |
 |

Exercise 2:
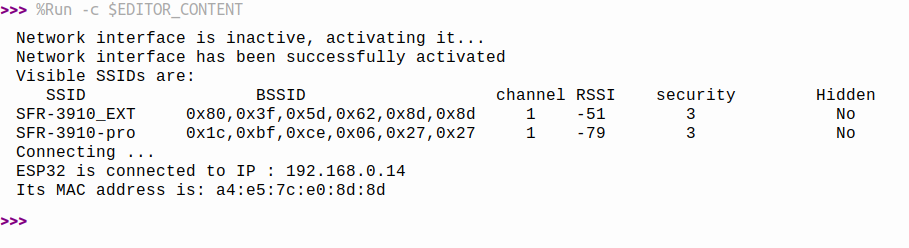
- Configure the ESP32 as "station interface"
- Verify if the interface is active, activate it if not.
- Scan the network and print all available information about the SSIDs found in a tabular format
- Connect the ESP32 with the router specifying the SSID and the password
- Verify that the connection was successful. (This may take a few seconds. Wait up to 10 s for the connection to be established)
- Print the IP address assigned to your ESP32
- Print the MAC address of the ESP32 WiFi interface
- Verify with ping that the ESP32 is accessible
 This is what you will see if you try to ping the ESP32:
 You can try ping also on the ESP32:
from uping import ping
ping("the machine_to_be-checked")
Exercise 3:
Write a module: wifi.py which encapsulates the functionality of exercise 2. Upload the module to the /lib folder on the ESP32. The code connecting to the ESP32 will then be as simple as this: from wifi importconnect()

Exercise 4 :
Add a function returning the ESP32's IP address. Read the current UTC time from the network using NTP. Set the real time clock on the ESP32. Provide a function that converts UTC into your local time.Exercise 5 :
Write a TCP server and a client program running both on the PC. The server waits for a connection request from the client on port 5000, accepts it and sends a message to the client. After that, a prompt appears on the client and the user can type a message to be sent to the server. The server prints this message and creates a prompt on its side, where a message can be entered, to be sent to the client. A ping-pong communication is started. Typing the message "bye" on the client side terminates the connection.
Exercise 6 :
- Move the server to the ESP32. In this case, the WiFi initialization is needed before starting the server part. Test the communication as you did in exercise 5.
- Move the client to the ESP32 and run the server on the PC.
Exercise 7 :
Write a client on the ESP32 which reads the temperature and humidity from the DHT11 every 5s and packs the result into a message of the following form:temperature [°C]: 25,humidity [%]: 56
Send this message to a server on the PC The server parses the message and extracts the parameter names (temperature [°C] and humidity [%]) and the values and plots them in a dynamic plot created with matplotlib. The parameter names are used for the legend, the values are displayed graphically.
 In the above plot, I put a finger on the DHT11, which quickly increases the measured humidity and more slowly increases the temperature.
--
In the above plot, I put a finger on the DHT11, which quickly increases the measured humidity and more slowly increases the temperature.
-- Comments


| I | Attachment | History | Action | Size | Date | Who | Comment |
|---|---|---|---|---|---|---|---|
| |
ap_ping.png | r1 | manage | 61.1 K | 2022-08-29 - 08:09 | UliRaich | |
| |
client-server.png | r1 | manage | 199.2 K | 2022-09-04 - 08:17 | UliRaich | |
| |
dht11Plot.png | r1 | manage | 31.3 K | 2022-09-25 - 08:36 | UliRaich | |
| |
noESP32_AP.png | r1 | manage | 20.4 K | 2022-08-29 - 08:09 | UliRaich | |
| |
solution_ex2.png | r2 r1 | manage | 71.0 K | 2022-09-03 - 19:52 | UliRaich | |
| |
sta_ping.png | r2 r1 | manage | 52.7 K | 2022-09-04 - 08:48 | UliRaich | |
| |
wifi_connect.py.png | r1 | manage | 20.9 K | 2022-08-29 - 08:28 | UliRaich | |
| |
withESP32_AP.png | r1 | manage | 22.0 K | 2022-08-29 - 08:09 | UliRaich |

Ideas, requests, problems regarding TWiki? Send feedback