
Slide 1: Accessing the Real World
Lecture 7
Uli Raich
UCC semester 2017/2018
Slide 2: Access libraries
As we have already seen, the Raspberry Pi flat cable connector and the cobbler + bread board, give access to external hardware though- gpio
- I2C bus
- SPI
- serial port interface
Slide 3: Software access
Of course you can access the external hardware through the BCM-2837 interfaces and their registers directly, however, this is not for the faint-hearted (read the 200 page manual first!) The easier way to access these devices are ready made libraries giving you a simpler API for access To my knowledge there are 2 such libraries around (at least these are the most popular ones):Slide 4: How to download and install
Both libraries can be downloaded as git source archives, which allows you to have the very latest version and to keep your version up to date. git is a revision control system allowing many developers to work on the same project. You check out the current version, work on it and you can upload to the git server the modifications you made. You can also create a new code branch where you implement new functionality which may be specific to what you want to use the code for, or it may be a try to implement new options which may later be discarded or, in case everybody is interested in this new functionality it may be merged back into the main branch.Slide 5: Our use of git
We do not want to develop the code but just use it. In this case we decide, where in our file system tree we want to install the source code of the library and then we download it with git clone git://git.drogon.net/wiringPi This will download the source code which we will have to compile which is done with ./build. This is a shell script! Have a look to see if you can understand what it does. In order to keep the library up to date we go to the wiringPi directory just created and we type: git pull This will update the source code to the latest version Here is the installation manual of wiringPi.Slide 6: Getting the LED blink program to work
The wiringPi library has included a few example programs to show its use. The most simple one is a program making a LED blink. WiringPi has its own numbering system for the GPIO pins:
Slide 7: Creating blink.c
As you would expect, wiringPi has its own include file which you must use in order to access the library: #include <wiringPi.h> On our systems we have installed this include file is in /usr/include on the Pi file system while the library itself is in /usr/lib As these are the standard positions for include files and libraries on a Linux system all we have to do in the Makefile is to add -lwiringPi to the LDLIBS macro.Slide 8: The C code of blink.c

Slide 9: The Makefile to build blink

Slide 10: Ohm's law
If you consider that the LED has no resistance and the Raspberry Pi drives the GPIO pins with 3.3V and you connect as shown in the circuit diagram, then what is the current flowing through the LED?
Slide 11: WiringPi functions
The library has functions to- Setup and initialize the library
This will open the needed device drivers and give access to them - Core functions: Functions to
- set gpio pins to input or output and
- to read and write from /to them
- define pull-ups/pull-downs
- Some Pi specific functions liking getting the version no
- Timing functions (e.g. delays)
Slide 12: WiringPi functions (2)
- Priority, interrupts, threads
- I2C bus functions
- Serial line functions
- SPI functions
- Miscellaneous function
Slide 13: A bit more on bash scripts
As explained before bash provides it own programming language with- Assignments
- Conditional statements
- Loops
Slide 14: A bash script to setup the Pis
During the weekend I wanted to install the latest version of the wiringPi library from git on all 15 Raspberry Pis in the lab. I needed to- Create a file system structure with
/opt/ucc/micros/raspberry into which I put the wiringPi sources - Change its owner to root:ucc such that members of the
ucc group have access to the files - Change the permissions to allow members of the
ucc group to also write into these directories
Slide 15: A bash script to setup the Pis (2)
- Download the wiringPi source code into the /opt/ucc/micros/raspberry directory
- Modify a Makefile in the wiringPi subdirectory
- Compile the code and install using the build bash script supplied with wiringPi
- Compile all the examples
- Create the examples/solutions directory on /opt/ucc
owned by uccstaff:uccstaff and only readable by this used - Transfer the solutions of the exercise associated to this lecture
- Try out everything
Slide 16: ... a lot of work
This is a lot of typing! The solution: a shell script! The shell script can only be executed by root because only theroot user can create directories in /opt How to check if we are root? A conditional statement in the script!

Slide 17: The rest of the script

Slide 18: Loops in bash
You can write- for loops
- while loops
- until loops
Slide 19: Example of an endless loop in bash
 You can also read command line arguments just like you do it in C:

Slide 20: The gpio command
There is the gpio command, which is part of wiringPi. It has many options. Please have a look at its man page! One option allows to read and write GPIO pins: gpio write $PIN $ON_OFF If PIN is 0 and ON_OFF is 1 then the LED connected to GPIO pin 0 will go on.Slide 21: A bit more on C programming
We have just seen the very basics of C programming and we need to learn a bit more about the libraries we can use Here we will look at- String handling functions
- Some bit handling function
- Exiting a program gracefully
Slide 22: String handling functions
There is a series of functions to- Compare strings strcmp and strncmp
- Copy strings strcpy and strncpy
- Locate a sub-string strstr
Slide 23: Treating command line arguments
Consider a wave generator where the user can choose the type of waveform using command line arguments. His options are:- sine
- rectangular
- triangular
- sawtooth
---++
Slide 24: First check it the number of arguments is correct

Slide 25: The test and assignment of the wave type

Slide 26: Bit handling functions
We need to learn a few bit handling functions before being able to prepare the data for the DAC:| : bitwise or
& : bitwise and
data += 5 <=> data = data + 5
data |= 5 <=> data = data | 5
~data: invert all bits in data
data >> 4 all bits in data are shifted right by 4
data << 4 all bits in data are shifted left by 4
Slide 27: Writing data to a DAC
Imagine a 12 bit digital to analogue converter with the following register outline:(both RS bits zero) The medium significant digit to register 1
(RS=01) And the highest significant digit to register 2
(RS=10) To strobe the data into the register the strobe line must see a low to high transition
Slide 28: The DAC
We have a 12 bit DAC, which creates signal levels from 0V to Vcc What is the max. number this DAC can take in decimal and in hex? What is the signal resolution in This is Physics!
Slide 29: Preparing data for the DAC
Remember the bit layout of the DAC register?We must write the
- lowest significant,
- medium significant and
- highest significant bits
Slide 30: DAC preparation
Write a function which prepares a byte for the DAC The function takes 3 arguments:- The data nibble (4 bits of data)
- The register selection (0,1,2)
- The read/write bit
What will be the result if you want to write 5 to register to the middle nibble?
Slide 31: Solution: DAC preparation

Slide 32: Now the test program generating data for the DAC

Slide 33: Strobe
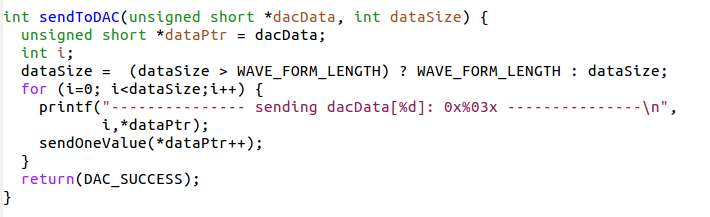
Now create a strobe function which takes DAC data (including the register bits) and generates a strobe signal on the STR line without touching the other bits With a correctly prepared data and register byte this will write the data to the correct register within the DACSlide 34: Solution: Strobe

Slide 35: Exiting a program gracefully
When we have a program like our blink program, then the only way to exit the endless loop is a ^C which will leave the LED in an unknown state. Is there a way to exit the program gracefully and to make sure the LED is always off once the program exits?Yes, there is!
Slide 36: Killing the program
When we kill the program with ^C, a signal (SIGINT) is sent to it which normally results in a brutal stop of the program. It is however possible to capture the signal and do some cleanup before the program finally exits.Slide 37: Signal handler

Slide 38: Catching signals

--
Comments
Preparing data for the DAC

| I | Attachment | History | Action | Size | Date | Who | Comment |
|---|---|---|---|---|---|---|---|
| |
argCountCheck.png | r1 | manage | 19.9 K | 2017-10-16 - 11:17 | UnknownUser | |
| |
argsBash.png | r1 | manage | 9.0 K | 2017-10-16 - 11:17 | UnknownUser | |
| |
bashRoot.png | r1 | manage | 7.1 K | 2017-10-16 - 11:16 | UnknownUser | |
| |
blink.png | r1 | manage | 48.9 K | 2017-09-27 - 14:26 | UnknownUser | |
| |
blinkMakefile.png | r1 | manage | 6.6 K | 2017-09-27 - 16:36 | UnknownUser | |
| |
dacPrep.png | r1 | manage | 42.0 K | 2017-10-16 - 12:18 | UnknownUser | |
| |
enum.png | r1 | manage | 20.0 K | 2017-10-16 - 11:19 | UnknownUser | |
| |
gpioNumbering.png | r1 | manage | 157.9 K | 2017-09-27 - 14:26 | UnknownUser | |
| |
lecture_7.odp | r1 | manage | 548.1 K | 2017-10-16 - 12:37 | UnknownUser | |
| |
ledschematics.png | r1 | manage | 7.2 K | 2017-09-27 - 16:48 | UnknownUser | |
| |
loopBash.png | r1 | manage | 5.7 K | 2017-10-16 - 11:16 | UnknownUser | |
| |
piRemoteDesktop.png | r1 | manage | 378.8 K | 2017-09-27 - 14:53 | UnknownUser | |
| |
reminna.png | r1 | manage | 3.9 K | 2017-09-27 - 14:53 | UnknownUser | |
| |
restScript.png | r1 | manage | 28.4 K | 2017-10-16 - 11:16 | UnknownUser | |
| |
sendToDAC.png | r1 | manage | 29.7 K | 2017-10-16 - 12:11 | UnknownUser | |
| |
sendToHWInclude.png | r1 | manage | 28.4 K | 2017-10-16 - 12:11 | UnknownUser | |
| |
signal.png | r1 | manage | 19.0 K | 2017-10-16 - 11:17 | UnknownUser | |
| |
signalHandler.png | r1 | manage | 24.4 K | 2017-10-16 - 11:17 | UnknownUser | |
| |
ssh-X.png | r1 | manage | 293.5 K | 2017-09-27 - 15:07 | UnknownUser | |
| |
strobe.png | r1 | manage | 45.1 K | 2017-10-16 - 12:11 | UnknownUser | |
| |
waveTypeTest.png | r1 | manage | 32.8 K | 2017-10-16 - 11:19 | UnknownUser |

Ideas, requests, problems regarding TWiki? Send feedback