Of course we can use the interfaces on the Raspberry Pi
to connect a screen, keyboard and mouse and use it
in stand-alone mode but we can also make use
of the PC resources and access it remotely.
There are several ways to access the RPI remotely:
There are several ways to access the RPI remotely:
- Using the VNC server on the Pi you can access
it with a remote desktop from the PC - The secure shell (ssh) allows you to get a remote terminal in the Pi
With scp you can copy files back and forth between the Pi and the PC - With nfs you can mount part of the Pi file system into the
PC file system tree and access the PI SD card as if it was a local PC disk.
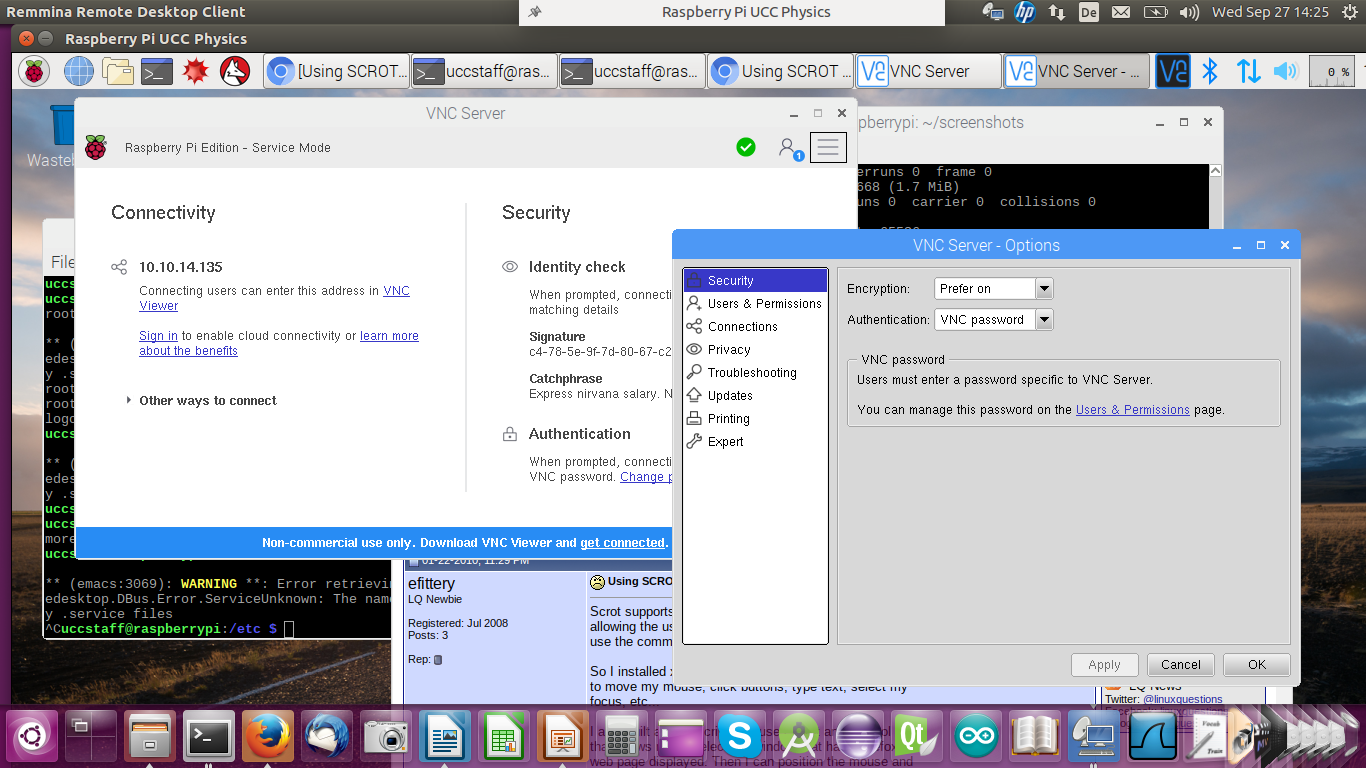
When running the remote desktop you are working on the Raspberry Pi
with the screen, keyboard and mouse replaced by the devices on the PC.
You have the same functionality as if the screen was connected
to the Piís HDMI port and keyboard and mouse were connected
to the USB ports on the Pi.
With nfs you can mount part of the Piís file system tree
onto your PC file system.
This allows you access to the Piís files as if you were
using a local disk. You cannot run any Rasberry Pi
programs this way however.
It is interesting if you cross-compile Pi programs on your PC,
which will be immediately visible on the Pi.
In the case of ssh you have a single terminal window
that is connected to a shell on the Pi.
The command is:
ssh userOnPi@piIPaddress
Where piIPaddress can be the Piís IP address of hostname.
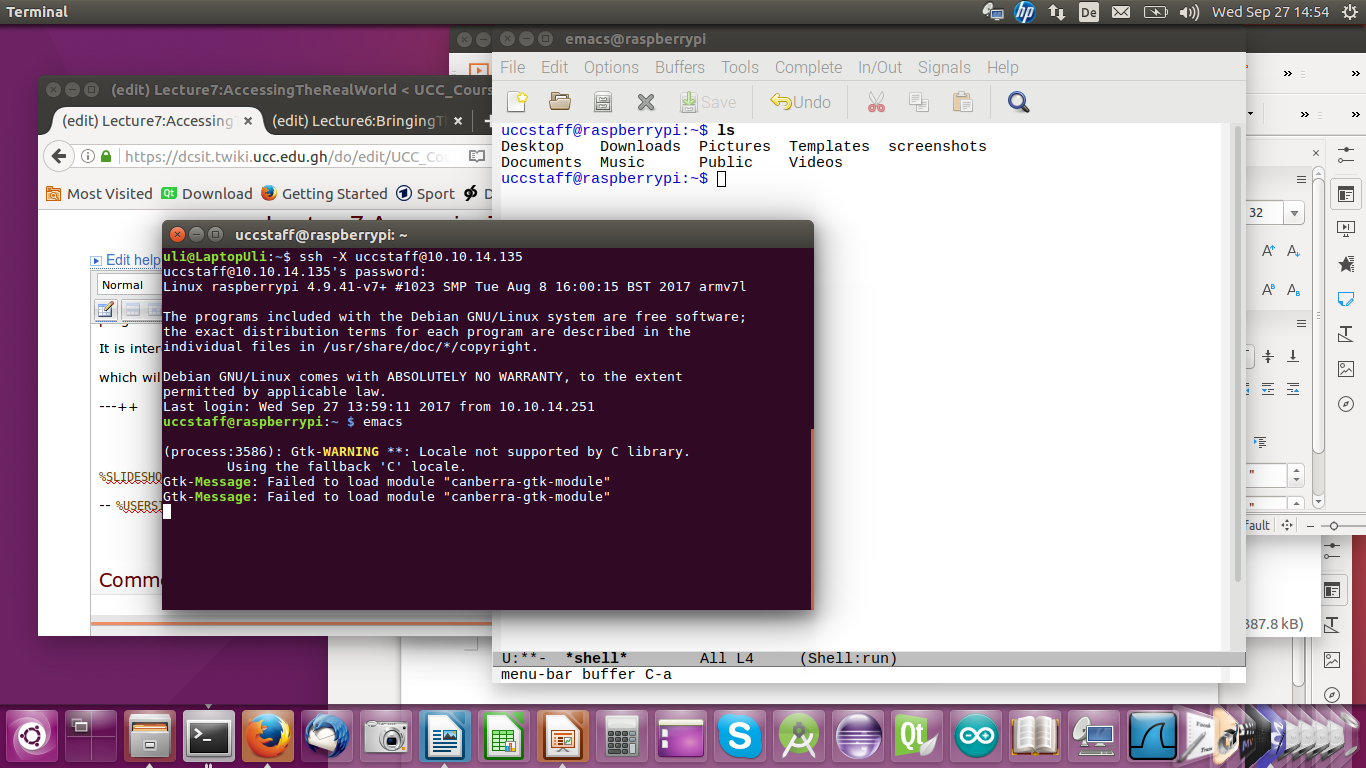
If you specify the -X option you can run X-11 based programs where the X protocol is run over the ssh connection.
If you specify the -X option you can run X-11 based programs where the X protocol is run over the ssh connection.
Here you see a screen dump from the PC with a remote terminal
that started an emacs session on the Pi.


To copy a file from the PC to the Pi this would be the command:
scp myfile.c uli@raspberry10:exercises/solutions/exercise_2
This will copy the file ďmyfile.cĒ into the sub-directory exercises/solutions/exercise_2 on my home directory on the Pi. Of course user uli must exist on raspberry10. Instead of specifying the machine name: raspberry10 you can also give its IP address.
This will copy the file ďmyfile.cĒ into the sub-directory exercises/solutions/exercise_2 on my home directory on the Pi. Of course user uli must exist on raspberry10. Instead of specifying the machine name: raspberry10 you can also give its IP address.
Just like Linux on the PC, Linux on the Raspberry Pi uses the GNU C compiler gcc.
The
However, the code generator is different since now we compile for the ARM processor and not the Intel processor used on the PC
- front end:
- Lexical Analyzer
- and the parser for the grammar
However, the code generator is different since now we compile for the ARM processor and not the Intel processor used on the PC
As explained in a previous lecture we can also compile
C programs for the Raspberry Pi on the PC Linux
system using a cross-compiler.
The cross compiler we will use is named
arm-linux-gnueabihf-gcc
and it is part of the tools package for the Pi.
As we have already seen, the Raspberry Pi flat cable connector
and the cobbler + bread board, give access to external hardware though
- gpio
- I2C bus
- SPI
- serial port interface
Of course you can access the external hardware through
the BCM-2837 interfaces and their registers directly, however,
this is not for the faint-hearted (read the 200 page manual first!)
The easier way to access these devices are ready made
libraries giving you a simpler API for access
To my knowledge there are 2 such libraries around
(at least these are the most popular ones):
Both libraries can be downloaded as git source archives,
which allows you to have the very latest version and
to keep your version up to date.
git is a revision control system allowing many developers
to work on the same project. You check out the current version,
work on it and you can upload to the git server
the modifications you made.
You can also create a new code branch where you implement
new functionality which may be specific to what you want
to use the code for, or it may be a try to implement new options
which may later be discarded or, in case everybody is interested
in this new functionality it may be merged back into the main branch.
The wiringPi library has included a few example programs to show its use.
The most simple one is a program making a LED blink.
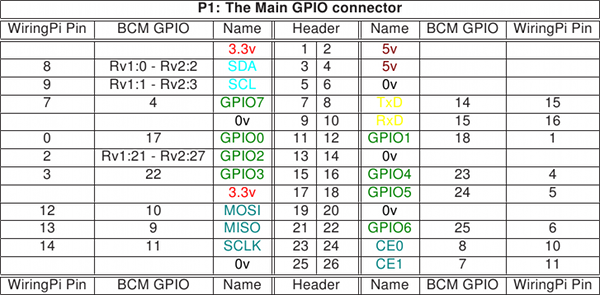
WiringPi has its own numbering system for the GPIO pins:


As you would expect, wiringPi has its own include file
which you must use in order to access the library:
#include <wiringPi.h>
On our systems we have installed this include file is in /usr/include
on the Pi file system while the library itself is in /usr/lib
As these are the standard positions for include files and libraries on a
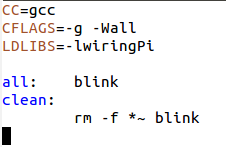
Linux system all we have to do in the Makefile is to add
-lwiringPi to the LDLIBS macro.
If you consider that the LED has no resistance and the Raspberry Pi
drives the GPIO pins with 3.3V and you connect as shown in the circuit diagram,
then what is the current flowing through the LED?


The library has functions to
- Setup and initialize the library
This will open the needed device drivers and give access to them - Core functions: Functions to
- set gpio pins to input or output and
- to read and write from /to them
- define pull-ups/pull-downs
- Some Pi specific functions liking getting the version no
- Timing functions (e.g. delays)
- Priority, interrupts, threads
- I2C bus functions
- Serial line functions
- SPI functions
- Miscellaneous function
In addition to the library functions a new command:
gpio
is provided. This can be used to set gpio pins from bash
It has however many more options. Look them up in its man page.
gpio
is provided. This can be used to set gpio pins from bash
It has however many more options. Look them up in its man page.


--
Comments
| I | Attachment | History | Action | Size | Date | Who | Comment |
|---|---|---|---|---|---|---|---|
| |
blink.png | r1 | manage | 48.9 K | 2017-09-27 - 14:26 | UnknownUser | |
| |
blinkMakefile.png | r1 | manage | 6.6 K | 2017-09-27 - 16:36 | UnknownUser | |
| |
gpioNumbering.png | r1 | manage | 157.9 K | 2017-09-27 - 14:26 | UnknownUser | |
| |
ledschematics.png | r1 | manage | 7.2 K | 2017-09-27 - 16:48 | UnknownUser | |
| |
piRemoteDesktop.png | r1 | manage | 378.8 K | 2017-09-27 - 14:53 | UnknownUser | |
| |
reminna.png | r1 | manage | 3.9 K | 2017-09-27 - 14:53 | UnknownUser | |
| |
ssh-X.png | r1 | manage | 293.5 K | 2017-09-27 - 15:07 | UnknownUser |
This topic: Embedded_Systems > WebHome > LectureSlides > Lecture7:AccessingTheRealWorld
Topic revision: r3 - 2017-09-27 - uli
Ideas, requests, problems regarding TWiki? Send feedback


