Installing an Ubuntu System on an external USB drive and making it bootable
As a first step when preparing a development environment for the Raspberry Pi one must prepare an operating system on which all the development software will be running. For the course at UCC we will use the latest Ubuntu Linux system, which we install on a bootable external USB hard drive. Before starting system installation the 64bit version of the Ubuntu desktop system (ubuntu-16.04.1-desktop-amd64.iso at the time of writing) is downloaded from ubuntu.com/download and transferred to a DVD or installed on a USB memory stick. If you have a running Ubuntu system then this can easily be accomplished with the usb-creator-gtk program.
The DVD or memory stick contains a live Ubuntu system which can be used to get acquainted with Ubuntu without touching the operating system currently running on the computer. Once we get to grips with the new system we install it onto an external USB hard drive.
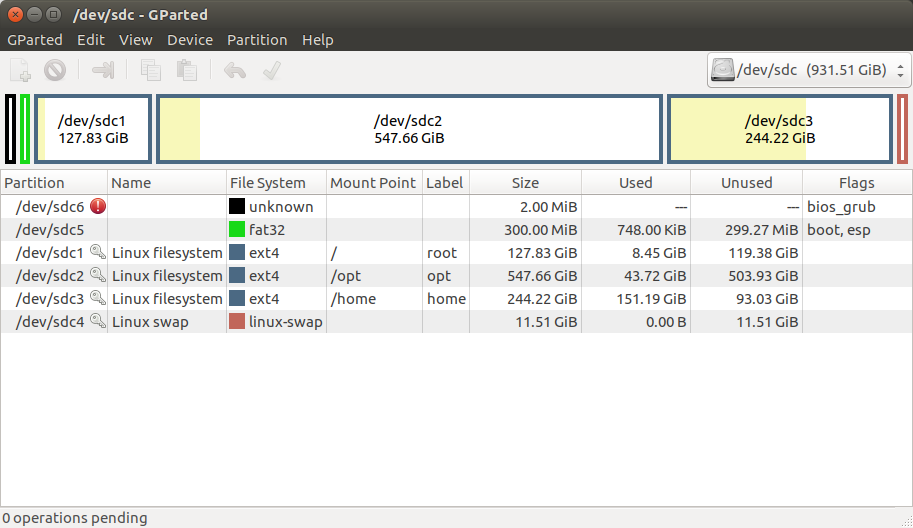
Before installing the system I prepared the partition layout on the USB drive using gparted a GUI style partition editor available on the installation DVD or memory stick.Alternatively you may user the command line program gdisk. Be sure that you are using the correct disk! Otherwise you may overwrite your existing OS! I check in /dev before:

As you can see, I have /dev/sda, which is the internal drive, /dev/sdb which is the installation USB memory stick and finally /dev/sdc, the USB hard disk, onto which I want to install my new Ubuntu system.
Today there are 2 different ways to boot the system- the old style BIOS boot
- the new UEFI (Unified Extensible Firmware Interface) boot
- the old style MBR partition table where you can have a maximum of 4 primary partitions. Here the partitions are created with fdisk
- the new GPT partitions which allow up to 128 primary partitions.
 When looking at the same thing with gdisk, this is what we get:
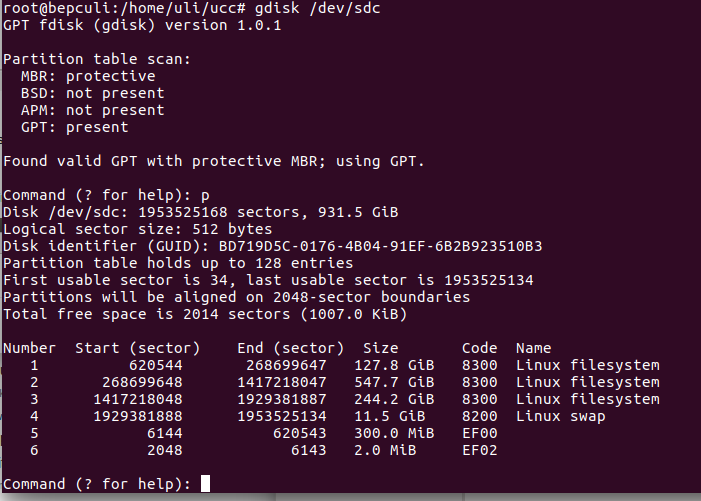 Apart from the Linux file system partitions, which will be dedicated to
 - "/", the root file system, containing the system proper,
- /opt, the file system that will contain everything we will need to develop our programs for the course,
- /home the file system reserved for user files and Linux
- swap, the swap area used by the system to save memory contents when we run out of memory
Clicking the “install Ubuntu” button on the desktop or rebooting the DVD or memory stick and selecting “Installation” instead of “Live system” starts the installation.
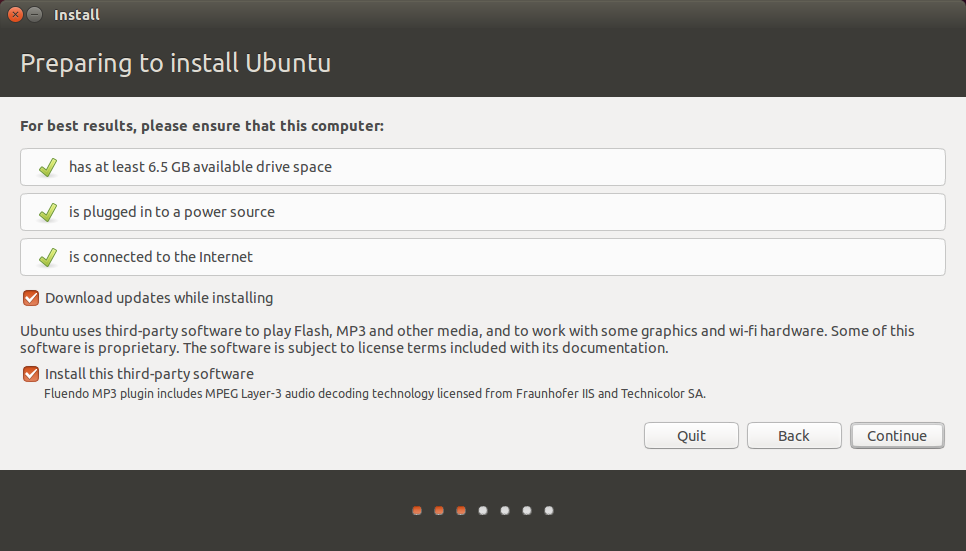 After clicking continue we should get the window shown above. I selected to update immediately and to install third party software.
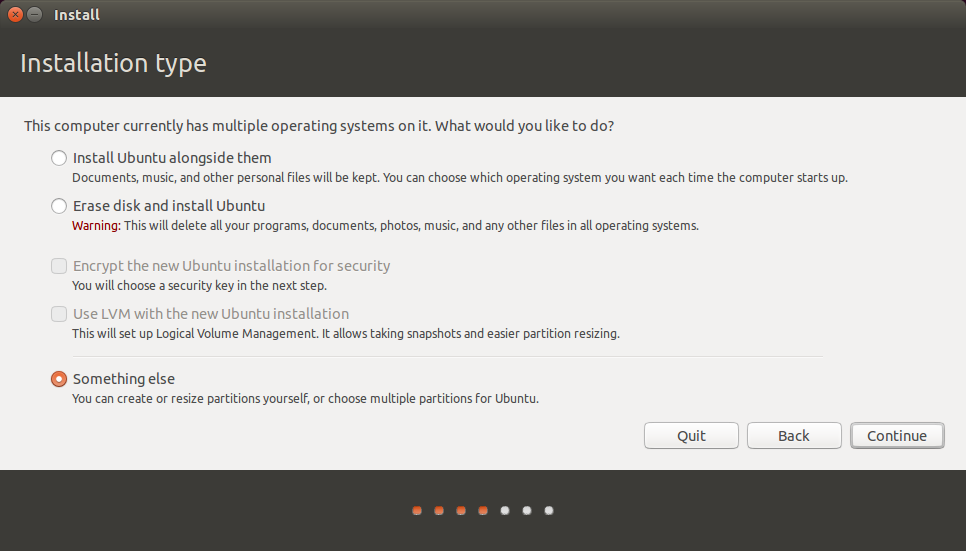 Do not install Ubuntu alongside e.g. Windows and clearly don't erase the disk and install but select the something else option. This brings up the Installation Type window. If you started from a new disk (as I did), first create a new partition table partitioning the USB disk (1TB) as shown below:
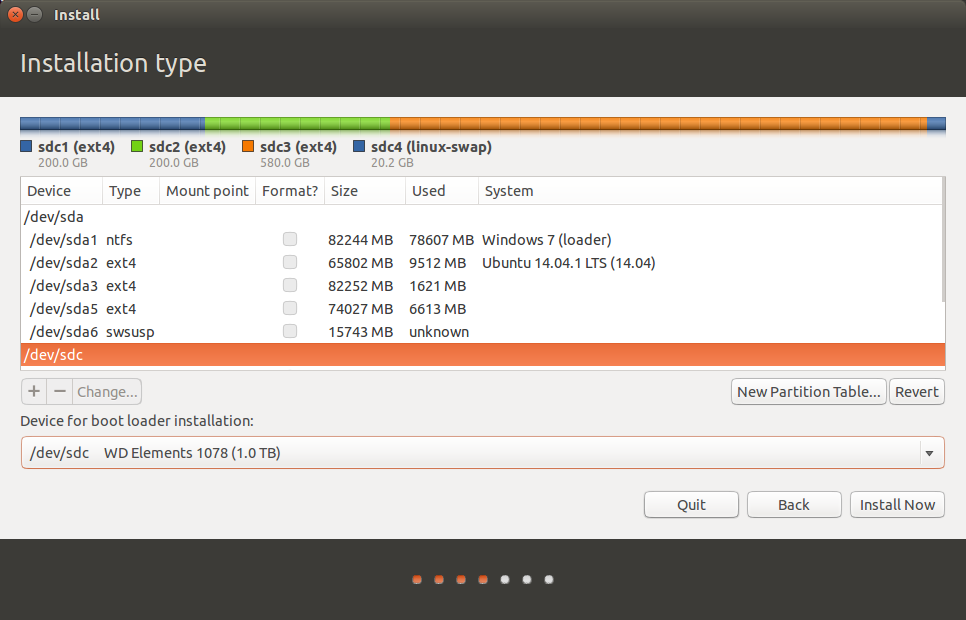 Use the partition layout created earlier and just tell the installer which file system you want to install on which partition. Make sure that all partitions (except the swap partition) are newly formatted as ext4 file systems.
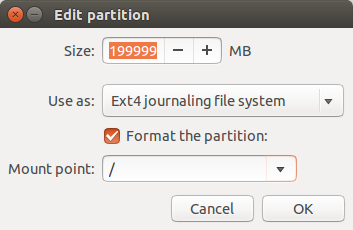 In the Installation Type window, selecting a partition (in my case e.g. /dev/sdc1 because the USB drive is seen as /dev/sdc) and clicking Change brings up the window above on which you can select the mount point (/dev/sdc1 is the root partition), the file system type and if the partition must be formatted or not. Be sure to select your USB hard drive as disk on which the boot loader will be installed (/dev/sdc in my case).
Before clicking install be absolutely sure that the disk you are installing to is the fresh USB hard disk. Check also that the boot loader goes onto the USB drive and NOT onto /dev/sda. If you get it wrong, you might kill your Windows system that might be installed e.g. on your internal hard disk. If the boot loader goes onto the wrong drive your Windows system may not boot any more.
In the Installation Type window, selecting a partition (in my case e.g. /dev/sdc1 because the USB drive is seen as /dev/sdc) and clicking Change brings up the window above on which you can select the mount point (/dev/sdc1 is the root partition), the file system type and if the partition must be formatted or not. Be sure to select your USB hard drive as disk on which the boot loader will be installed (/dev/sdc in my case).
Before clicking install be absolutely sure that the disk you are installing to is the fresh USB hard disk. Check also that the boot loader goes onto the USB drive and NOT onto /dev/sda. If you get it wrong, you might kill your Windows system that might be installed e.g. on your internal hard disk. If the boot loader goes onto the wrong drive your Windows system may not boot any more.!!!!!!!!!!!!!!!!!!! So... be careful! !!!!!!!!!!!!!!!!!!!!!!!!!!!! Clicking Install now starts the installation. Once the system and the boot loader are installed on the external USB disk, we can restart the machine and boot from that disk into Ubuntu. If you only want to boot a single type of system (either BIOS or UEFI), then you are done and you can start playing and improving the system, e.g. install other Ubuntu packages.If you wnat to be able to use the drive on both types of systems then you have to do the following: I first installed the system on a BIOS machine, which installs the BIOS version of grub. In order to be able to boot the disk from a UEFI system, we must create a vfat file system on the UEFI (300 MByte) partition (see the partitioning description at the beginning of this document). mkfs -vfat /dev/sdc5 did this in my case. Again: Be sure that you use the correct partition Then boot the computer with the installation media and go to "try system" with the USB hard drive attached. Make sure the USB drive is mounted e.g. mkdir /media/sdc1
mount /dev/sdc1 /media/sdc1 Then we have to re-mount /dev, /dev/pts, /sys and /proc on the USB hard drive: mount --bind /dev /media/sdc1/devmount --bind /dev/pts /media/sdc1/dev/pts
mount --bind /sys /media/sdc1/sys
mount --bind /proc /media/sdc1/proc
and finally we change the root directory to be the one installed on the USB hard drive: chroot /media/sdc1 Now we have set up the system as it would be after booting the hard drive directly. To install grub we first have to mount the UEFI partition:
mkdir /boot/efimount /dev/sdc5 /boot/efi Now we have to install the uefi version of grub-install: apt install grub-efi-amd64
and finally we can install the boot loader: grub-install --target=x86_64-efi /dev/sdc (again make sure /dev/sdc is the correct disk!) When I did not manage to install grub-efi-amd64 I got the efi boot to work by copying the directory /usr/lib/grub/x86_64-efi from a working efi disk to the new one. The directory name on the new system was slightly different (x86-64-efi instead of x86_64-efi) which I solved through a symbolic link. In oder to make boot even nicer we want to customize our system with a nice SplashScreen. Once the system boots nicely as we expect we can start to install AdditionalSoftware.
| I | Attachment | History | Action | Size | Date | Who | Comment |
|---|---|---|---|---|---|---|---|
| |
disks.png | r1 | manage | 11.7 K | 2017-01-03 - 16:48 | UnknownUser | attached disks |
| |
gdisk.png | r1 | manage | 81.3 K | 2017-01-03 - 16:54 | UnknownUser | partition layout ass seen with gdisk |
| |
gparted.png | r1 | manage | 72.8 K | 2017-01-03 - 16:31 | UnknownUser | partition layout |
Ideas, requests, problems regarding TWiki? Send feedback


