End Presentation

Lecture 2: LEDs and NeoPixel

CSC 321: Embedded Sysytem

First Semester 2020/2021


TWiki Slide Show
Next
The ESP32-WROVER-B MCU
esp32board.jpg esp32boardlab.jpeg

First slide Previous Next Last slide
COPYRIGHT © 2024 by the contributing authors
Slide 1 of 32


TWiki Slide Show
Next
CPU Pinout
esp32board.png

Please note: The pin numbers IOxx on the ESP32 correspond to the GPIO pin numbers

Datasheet: https:// www.espressif.com /sites/default/files/documentation/esp32-wrover-b_datasheet_en.pdf

First slide Previous Next Last slide
COPYRIGHT © 2024 by the contributing authors
Slide 2 of 32


TWiki Slide Show
Next
Meaning of pins on ESP32
pinout.jpg pinout3.png


First slide Previous Next Last slide
COPYRIGHT © 2024 by the contributing authors
Slide 3 of 32


TWiki Slide Show
Next
How to program the processor
connect.png Several development tools are available:
  • ESP_IDF: The official Espressif development tool.
    Includes a gcc compiler for the ESP8266 and the ESP32

Please see:
https://docs.espressif.com/projects/esp-idf/en/latest

  • The Arduino IDE
    Needs extensions for these processors
    and the different CPU boards

see:

https://docs.espressif.com/projects/esp-idf/en/latest

  • MicroPython

see:
https://micropython-docs-esp32.readthedocs.io/en/esp32_doc

First slide Previous Next Last slide
COPYRIGHT © 2024 by the contributing authors
Slide 4 of 32


TWiki Slide Show
Next
Flashing the code
esptool.png

First slide Previous Next Last slide
COPYRIGHT © 2024 by the contributing authors
Slide 5 of 32


TWiki Slide Show
Next
esptool
  • esptool is called from the Makefiles in ESP-IDF
  • esptool is used when we upload code from the Arduino IDE to the processor flash
  • esptool is used with Micropython IDE on uPyCraft/Thonny

    installs Micropython onto the processor flash
In the above cases the use of esptool is hidden to us.

We can however also execute esptool directly.

First slide Previous Next Last slide
COPYRIGHT © 2024 by the contributing authors
Slide 6 of 32


TWiki Slide Show
Next
How to write a Micropython program?
First we need a Micropython interpreter!

You find the sources here:

https://github.com/micropython/micropython/

In the repository you find ports for the ESP8266 and the ESP32.

In order to compile the code you need the ESP-IDF and its cross compilers

The code compiles into a binary file (firmware-combined.bin) which contains a boot loader and the interpreter.

This binary must be uploaded and flashed.

For documentation of the ESP32port of Micropython look at

http://docs.micropython.org/en/latest/esp32/tutorial/intro.html

First slide Previous Next Last slide
COPYRIGHT © 2024 by the contributing authors
Slide 7 of 32


TWiki Slide Show
Next
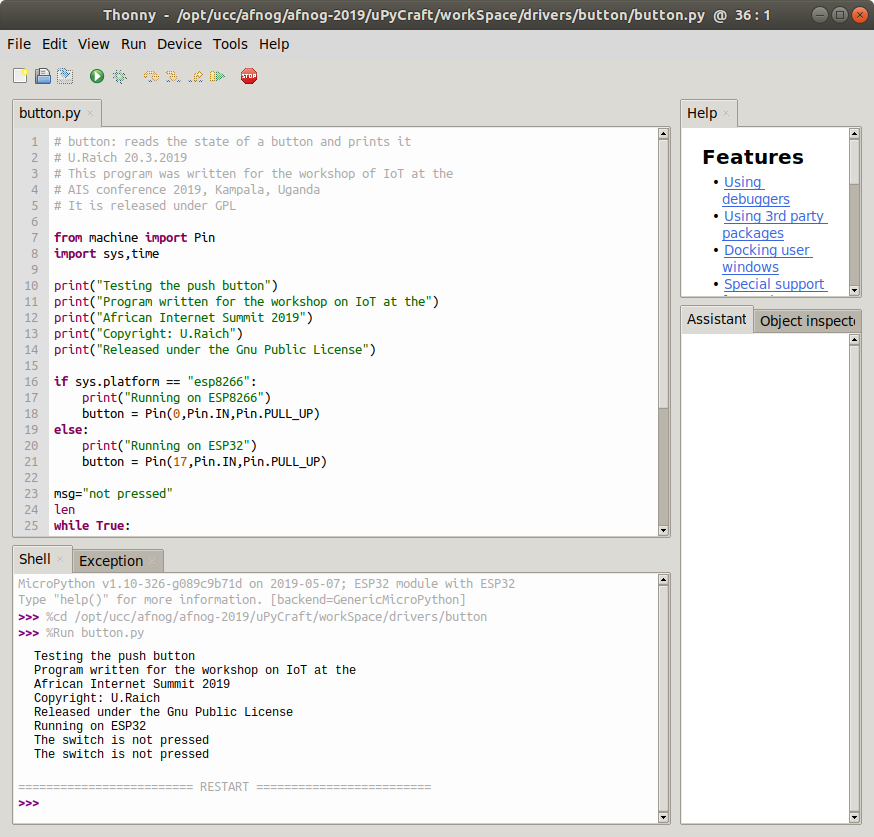
How to communicate with the Micropython interpreter?
We use a serial connection passing through the micro USB connection.

As soon as we connect the processor card to the PC we see the serial port to connect for communication

interpret.png

First slide Previous Next Last slide
COPYRIGHT © 2024 by the contributing authors
Slide 8 of 32


TWiki Slide Show
Next
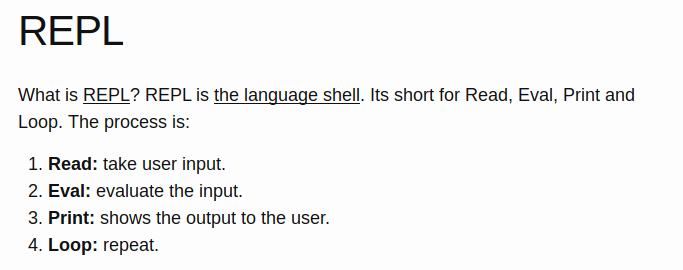
What is REPL?

repl.png

First slide Previous Next Last slide
COPYRIGHT © 2024 by the contributing authors
Slide 9 of 32


TWiki Slide Show
Next
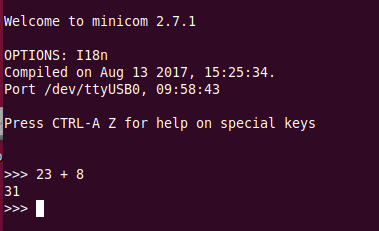
The communication tools: minicom
minicom.png

You see the command prompt and you can interact with Micropython.

But … how to upload scripts?

First slide Previous Next Last slide
COPYRIGHT © 2024 by the contributing authors
Slide 10 of 32


TWiki Slide Show
Next
The command line tool ampy
MPY1.png

First slide Previous Next Last slide
COPYRIGHT © 2024 by the contributing authors
Slide 11 of 32


TWiki Slide Show
Next
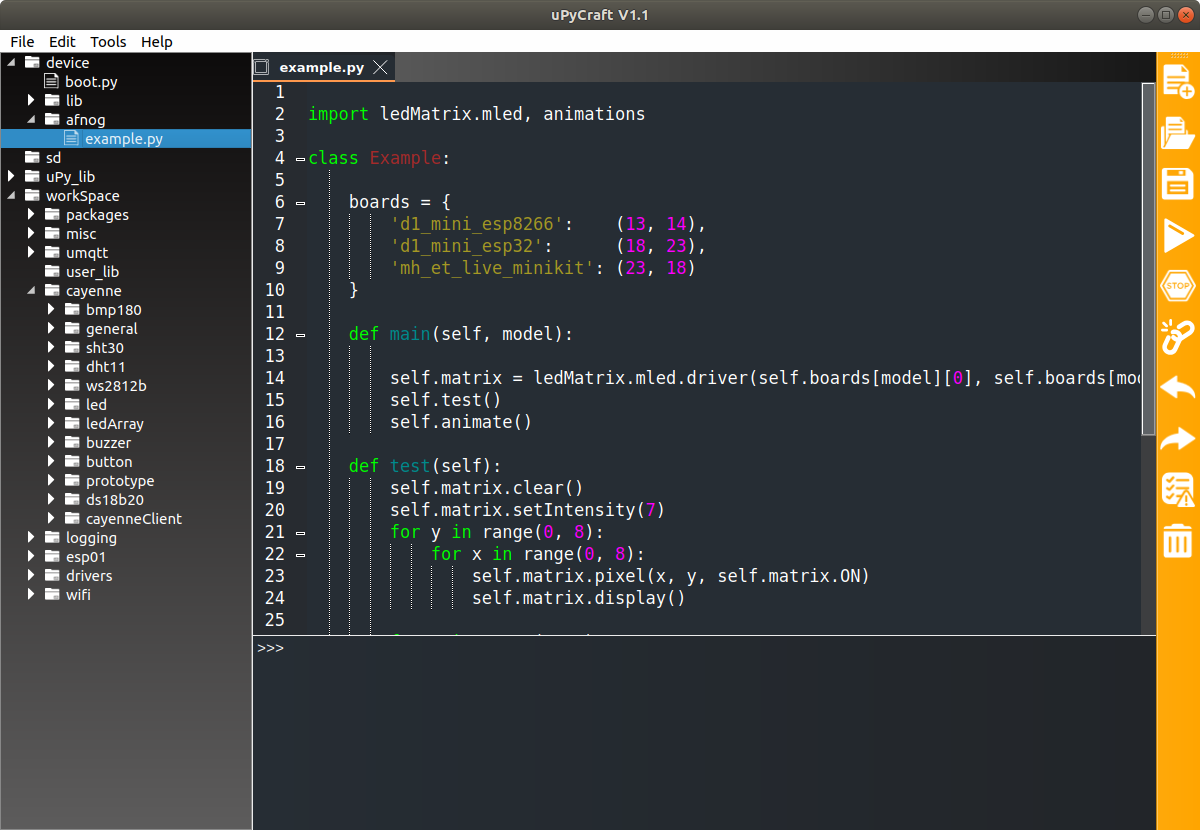
IDE for Micropython: uPyCraft
uPyCraft.png

First slide Previous Next Last slide
COPYRIGHT © 2024 by the contributing authors
Slide 12 of 32


TWiki Slide Show
Next

First slide Previous Next Last slide
COPYRIGHT © 2024 by the contributing authors
Slide 13 of 32


TWiki Slide Show
Next
Thonny
thonny.png

First slide Previous Next Last slide
COPYRIGHT © 2024 by the contributing authors
Slide 14 of 32


TWiki Slide Show
Next
Thonny
Thonny is a complete Integrate Development Environment (IDE)

which lets you

  • Access the REPL

  • Create directories on the Micropython file system

  • Upload scripts

  • Syntax check scripts

  • Run scripts

  • Install Micropython on your processor board

First slide Previous Next Last slide
COPYRIGHT © 2024 by the contributing authors
Slide 15 of 32


TWiki Slide Show
Next
Thonny
Thonny is an IDE for Python which has provisions for Micropython.

Under Tools → Options button you can select the type of

Python interpreter you intend to use.

interpret.png

First slide Previous Next Last slide
COPYRIGHT © 2024 by the contributing authors
Slide 16 of 32


TWiki Slide Show
Next
Flashing Micropython
Compiling a new version of Micropython is substantially much easier with Thonny.

You still need to install esptool first. You just select your port and firmware then install.

flashing.png

First slide Previous Next Last slide
COPYRIGHT © 2024 by the contributing authors
Slide 17 of 32


TWiki Slide Show
Next
!IoT Hello World program
A “Hello World” program, just printing “Hello World” on the screen

does not look very exciting.

However, this is generally used to verify that the infrastructure

Compiler, linker, downloader, flash program

are working correctly

In embedded systems printing can be quite complex

and a blinking LED is used instead.

First slide Previous Next Last slide
COPYRIGHT © 2024 by the contributing authors
Slide 18 of 32


TWiki Slide Show
Next
Switching on and off a LED
The ESP32-WROVER-B have a “user LED” connected to GPIO 19.

How do we control this LED?

  • Define that the LED is connected to GPIO 19

  • Program this pin as output

  • Write a logic 1 to the pin to switch it on

  • Write a logic 0 to the pin to switch it off

  • The logic state may be inverted if the LED is active low

First slide Previous Next Last slide
COPYRIGHT © 2024 by the contributing authors
Slide 19 of 32


TWiki Slide Show
Next
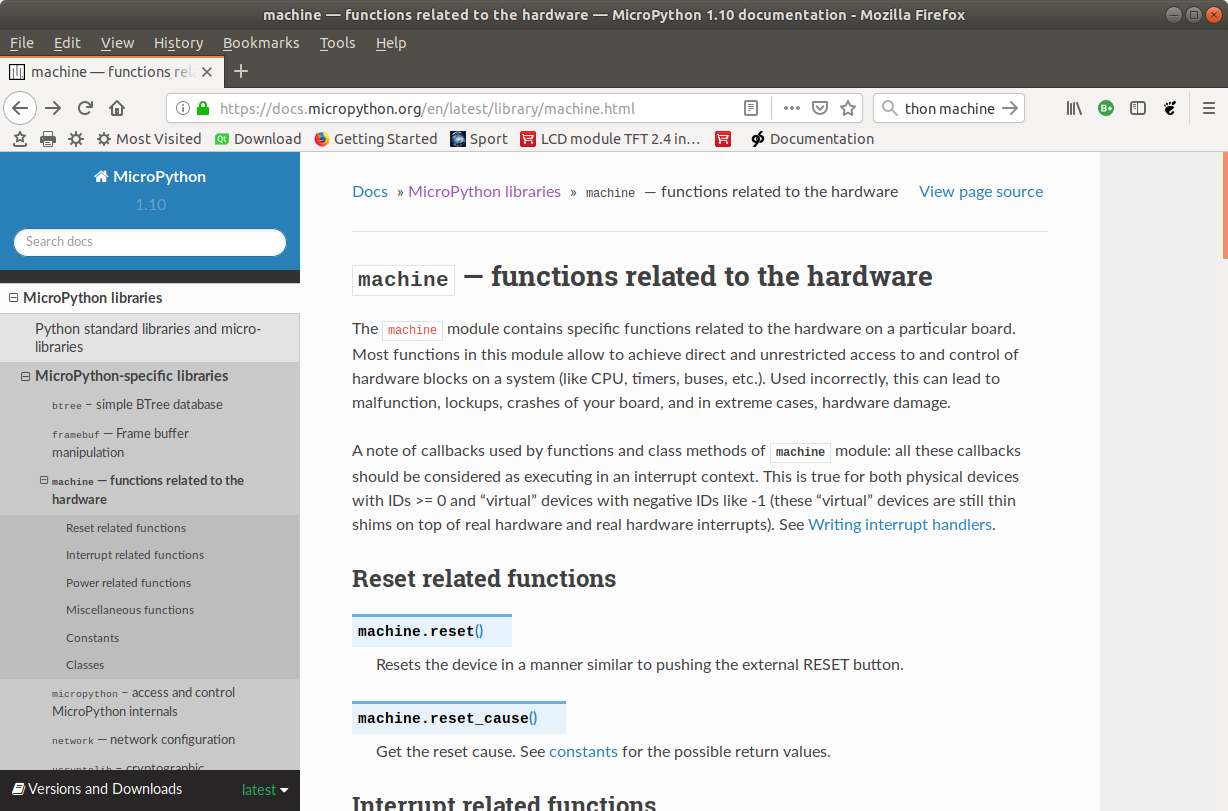
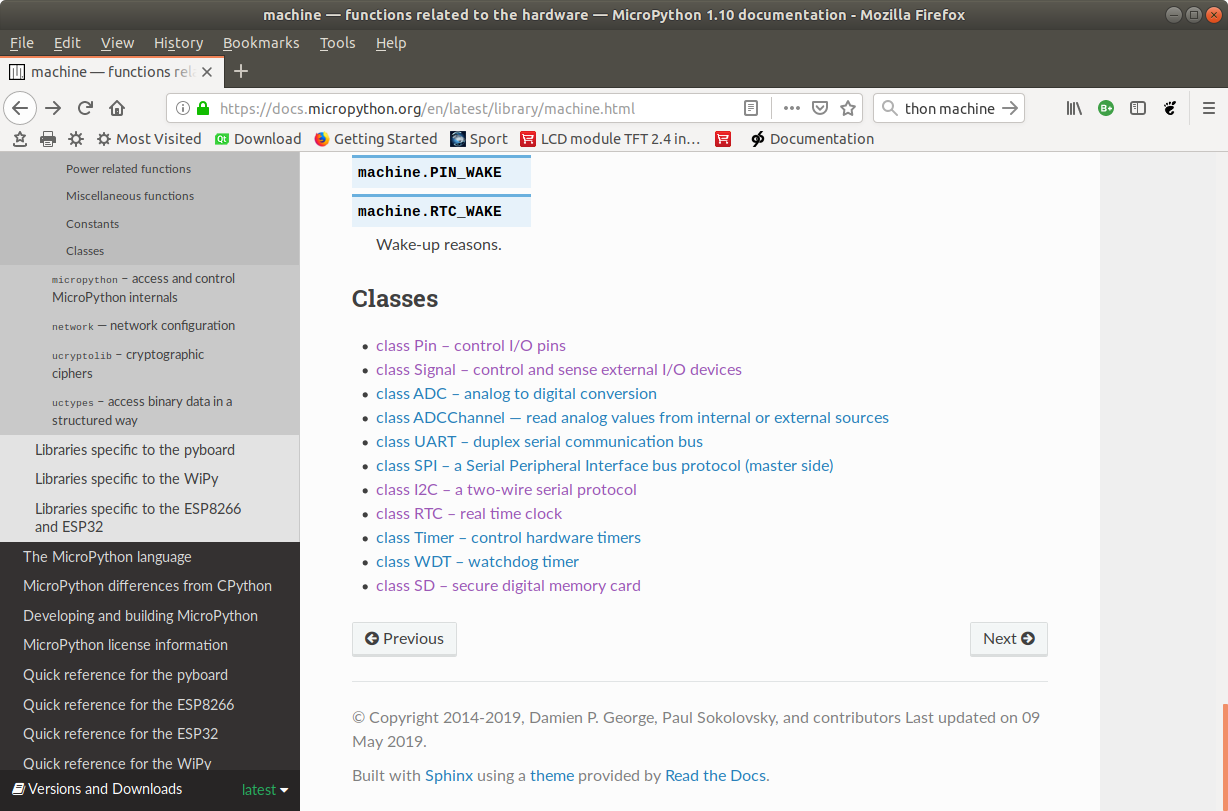
Micropython hardware functions
hardwareFunctions.png

First slide Previous Next Last slide
COPYRIGHT © 2024 by the contributing authors
Slide 20 of 32


TWiki Slide Show
Next
The machine.Pin class
pinClass.png

First slide Previous Next Last slide
COPYRIGHT © 2024 by the contributing authors
Slide 21 of 32


TWiki Slide Show
Next
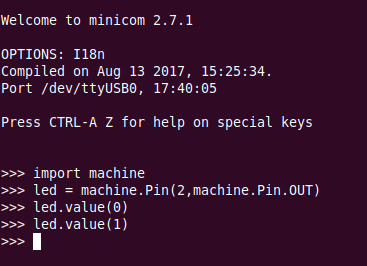
Switch the LED on, version 1
ledControl1.png

First slide Previous Next Last slide
COPYRIGHT © 2024 by the contributing authors
Slide 22 of 32


TWiki Slide Show
Next
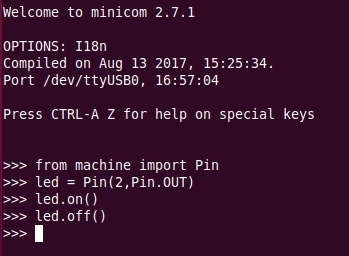
Switch the LED on, version 2
ledControl2.png

First slide Previous Next Last slide
COPYRIGHT © 2024 by the contributing authors
Slide 23 of 32


TWiki Slide Show
Next
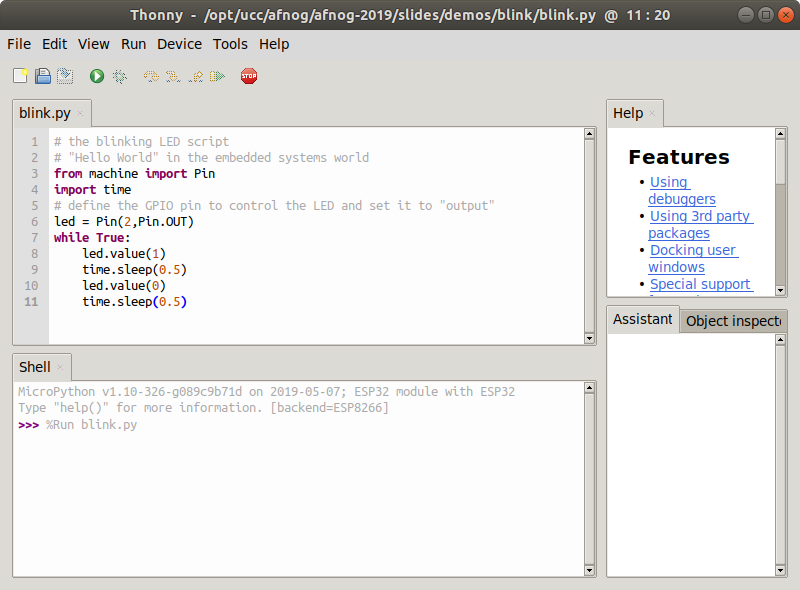
The blinking LED
Now we put the code into a script and run it

blinkingLed.png

First slide Previous Next Last slide
COPYRIGHT © 2024 by the contributing authors
Slide 24 of 32


TWiki Slide Show
Next
Changing the light intensity
The LED is connected to a digital line which can only be set to 0 or Vcc.

How can we change the light intensity and dim the LED?

The light intensity depends on the average current flowing through the LED.

The answer is PWM: pulse width modulation.

pwm.png

First slide Previous Next Last slide
COPYRIGHT © 2024 by the contributing authors
Slide 25 of 32


TWiki Slide Show
Next
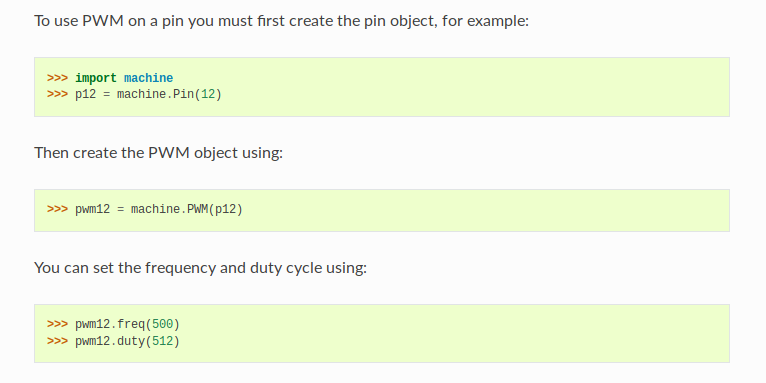
PWM in Micropython
pwm_uP.png

First slide Previous Next Last slide
COPYRIGHT © 2024 by the contributing authors
Slide 26 of 32


TWiki Slide Show
Next
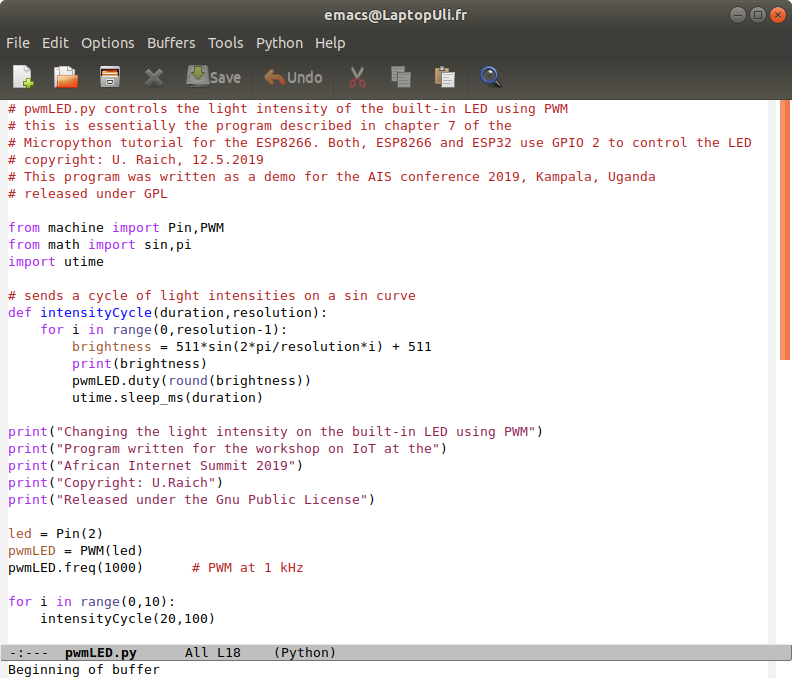
Our PWM implementation
pwmImpl.png

First slide Previous Next Last slide
COPYRIGHT © 2024 by the contributing authors
Slide 27 of 32


TWiki Slide Show
Next
The WS2812B LED
A more complex LED:

  • rgb LED used in LED chains.

  • each ws18b12 contains the 3 colored LEDs and a controller.

  • Can be cascaded and individually addressed, depending on its position in the chain

  • Needs precise timing

  • To use it we pass through the neopixel library built into micropython

First slide Previous Next Last slide
COPYRIGHT © 2024 by the contributing authors
Slide 28 of 32


TWiki Slide Show
Next
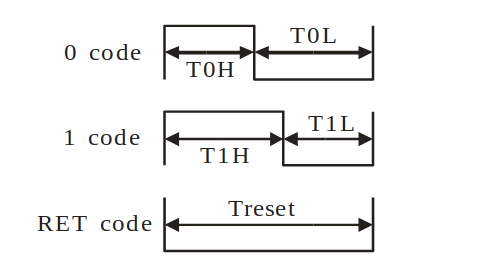
!WS2812B timing
For all the details on the ws2812b look at

https://cdn-shop.adafruit.com/datasheets/WS2812B.pdf

24 bit of colour data puts 2e24 colours at your disposal

Coding of a single bit
ws2812Bits.png

The control word:

ws2812ControlWord.png

First slide Previous Next Last slide
COPYRIGHT © 2024 by the contributing authors
Slide 29 of 32


TWiki Slide Show
Next
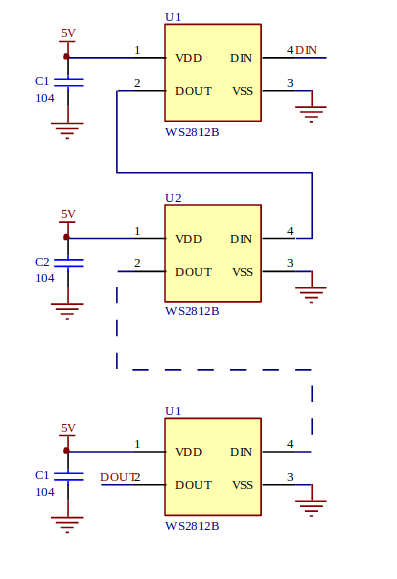
Cascading the WS2812B

ws2812Chain.png

First slide Previous Next Last slide
COPYRIGHT © 2024 by the contributing authors
Slide 30 of 32


TWiki Slide Show
Next
Using the neopixel library
neopixel.png

First slide Previous Next Last slide
COPYRIGHT © 2024 by the contributing authors
Slide 31 of 32


TWiki Slide Show
Next
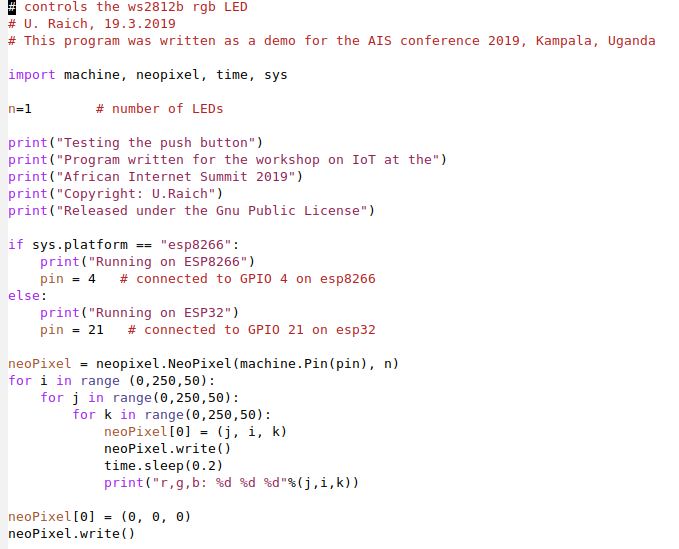
… and our code
We have a single neopixel connected to

GPIO pin 4 (ESP8266)

or

GPIO pin 21 (ESP32)

This code works on both CPUs!
neopixelCode.png

First slide Previous Next Last slide
COPYRIGHT © 2024 by the contributing authors
Slide 32 of 32


First slide Previous End Presentation


-- Isaac Armah-Mensah - 2021-02-28

Comments


I Attachment History Action Size Date Who Comment
PNGpng MPY1.png r1 manage 423.0 K 2021-03-02 - 08:20 IsaacArmahMensah  
JPEGjpg esp32board.jpg r1 manage 279.8 K 2021-03-02 - 00:20 IsaacArmahMensah  
PNGpng esp32board.png r1 manage 2095.9 K 2021-02-28 - 01:28 IsaacArmahMensah  
PNGpng esptool.png r2 r1 manage 385.0 K 2021-02-28 - 16:01 IsaacArmahMensah  
PNGpng interpret.png r1 manage 105.0 K 2021-03-02 - 00:42 IsaacArmahMensah  

This topic: IoT_Course_English > WebHome > Slides > LEDAndNeopixels
Topic revision: r7 - 2021-03-09 - UliRaich
This site is powered by the TWiki collaboration platform Powered by PerlCopyright © 2008-2024 by the contributing authors. All material on this collaboration platform is the property of the contributing authors.
Ideas, requests, problems regarding TWiki? Send feedback