A WEB Server on the ESP32
A "Hello World!" WEB server
Writing a WEB server from scratch is not a trivial task, but then the need of a WEB server is so common that you would expect that some kind soul has done the job for you. On MicroPython you find several WEB servers ready for deployment. I have selected picowebImplementing the Hello World! WEB server
As examples we provide 3 different versions of the Hello World WEB server:- Version1 does not use picoweb at all but opens a socket and listens to requests. Once it sees a request it sends some HTML text, stored in the MicroPython source code
- Version 2 exports the HTML code to a separate HTML file. It uses picoweb and answers if either serverHost/ or serverHost/index.html is requested. The HTML file is read and its text returned to the caller
- Version 3 works in a similar fashion to Version 2 but the HTML file is gzipped. Since the ESP32 has little free "disk space", well, space in its flash, it is interesting to compress the HTML file to save resources.
Version 1
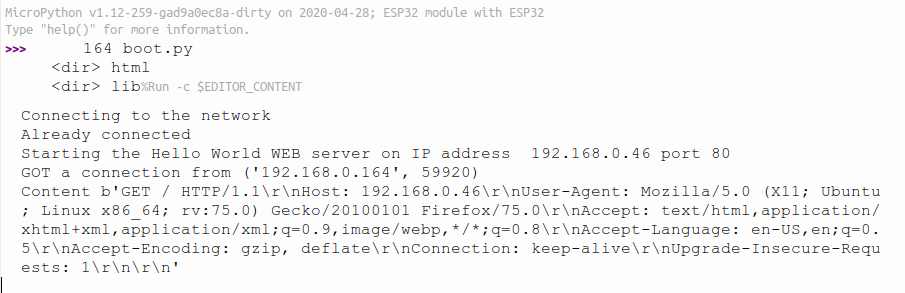
Version 1 is the basic WEB server we implemented in BasicWEBServerVersion 2:
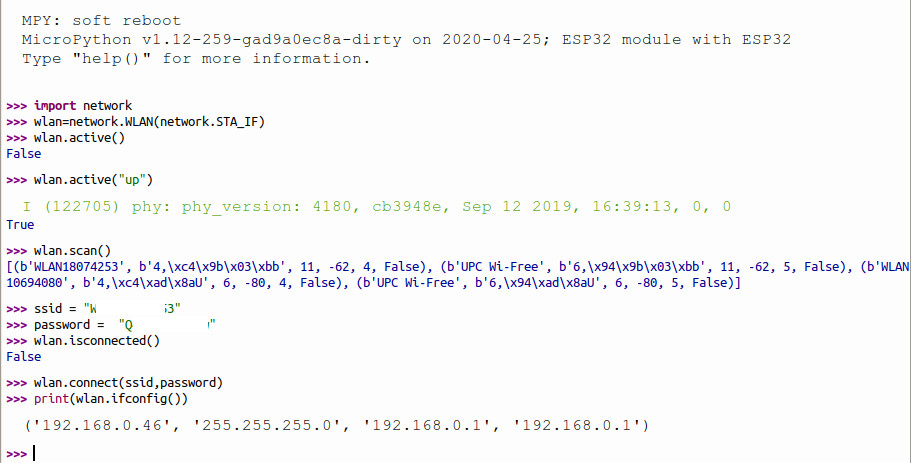
In the second version we will separate the HTML text from the server and store it in the html directory (to be created with ampy: ampy mkdir /html) on the ESP32. Now we can use a ready made Web server for MicroPython, picowebVersion 3:
If we do not use an external SD card, then space for the HTML pages is rather limited. It may therefore be interesting to use gzip compresses pages. Modify your picoweb server to use gzipped HTML. and finally a screen dump of the WEB pages as seen by the browser You can download the code here:
https://iotworkshop.africa/pub/IoT_Course_English/WEBServerPicoweb/helloWorldWebServer.tar.gz
To make the programs run, first execute setup.sh. This will create the directories needed on the ESP32 file system and upload the html files into their correct places. Please have a look into this shell script to understand what it is doing. Then run the WEB server in thonny:
thonny helloWorldWebServerV2.py
You can download the code here:
https://iotworkshop.africa/pub/IoT_Course_English/WEBServerPicoweb/helloWorldWebServer.tar.gz
To make the programs run, first execute setup.sh. This will create the directories needed on the ESP32 file system and upload the html files into their correct places. Please have a look into this shell script to understand what it is doing. Then run the WEB server in thonny:
thonny helloWorldWebServerV2.py
 The last line printed tells you that you can access the server on the URL: 192.168.0.46 with your browser.
Adding Temperature and Humidity Measurements
From the Hello World Web server to a server that actually shows measurements is only a small step. In the following example we create a table on HTML into which we insert the measurements taken with the SHT30 (see SHT30NopI2CTemperatureAndHumiditySensor) This is done with templates using the utemplate module in MicroPython. Have a look at the picoweb examples to see how this can be done. https://iotworkshop.africa/pub/IoT_Course_English/WEBServerPicoweb/sht30.tar.gz The tar archive contains:- sht30Server.py: The WEB server, based on picoweb, that must be run on the ESP32.
- templates/sensor.tpl: The template file that must be stored in the templates directory of the ESP32
- setup.sh: a shell script that creates the directories needed on the ESP32 (if they do not exists already) and uploads the template file into its correct place
- timeStamp.py: a test program creating a time stamp from the current time (not needed here)

Making the WEB page interactive
The WEB server above has one major flaw: for each measurement the complete page must be reloaded. Wouldn't it be nice if we could keep the table and only replace the measurement results and time stamp? Such types of actions can be accomplished with javascript, a full programming language for WEB programming running on the client side, in the browser. Teaching also javascript would largely exceed the scope of this course. However, if you don't know javascript well enough (as was the case for me!) here is a nice tutorial which will put you on track quickly: https://www.w3schools.com/js/DEFAULT.aspControlling the ESP32 User Led
Before looking at how to display the SHT30 measurements on our WEB server, let's first try to give WEB control to the user LED on the ESP32 CPU board. We want to create a WEB page allowing to switch this LED on and off. The icons for the LED are attached to this page: and
and  We will start with the light bulb example from the introduction
 Whenever you click the "Turn on the light" button the icon switches to led-blue-on-128.png showing a lighted blue LED while the other button shows the LED turned off. Just select the dummyLED.html in the tar archive with the browser and try.
https://iotworkshop.africa/pub/IoT_Course_English/WEBServerPicoweb/ledControl.tar.gz
Communication between the WEB client, on which javascript is running, and the WEB server on the ESP 32 can be accomplished with Asynchronous JavaScript And XML (AJAX). To understand this you will have to go through yet another tutorial: the AJAX tutorial
Whenever you click the "Turn on the light" button the icon switches to led-blue-on-128.png showing a lighted blue LED while the other button shows the LED turned off. Just select the dummyLED.html in the tar archive with the browser and try.
https://iotworkshop.africa/pub/IoT_Course_English/WEBServerPicoweb/ledControl.tar.gz
Communication between the WEB client, on which javascript is running, and the WEB server on the ESP 32 can be accomplished with Asynchronous JavaScript And XML (AJAX). To understand this you will have to go through yet another tutorial: the AJAX tutorialMaking Temperature and Humidity measurements available to the WEB page through AJAX
With the knowledge on how to measure temperature and humidity and the knowledge on how to communicate between the WEB client and the WEB server using AJAX we have all we need to create a WEB page showing periodic temperature and humidity measurements. For measurement of other parameters we only need to implement the driver code reading out the sensor in addition. Plotting the result on the client side is another story. However, a very powerful javascript library is available to do exactly this:https://www.highcharts.com/docs/index
 The plot shows temperature and humidity data taken at intervals of 30s during a whole night. It allows to
 - zoom into a particular time period
- save the acquired data on a .csv file for offline evaluation
- and much more.
Comments


| I | Attachment | History | Action | Size | Date | Who | Comment |
|---|---|---|---|---|---|---|---|
| |
dummyLED.png | r1 | manage | 44.4 K | 2020-06-04 - 09:03 | UliRaich | |
| |
helloWorldWEBServerV1.png | r1 | manage | 65.8 K | 2020-04-28 - 12:55 | UliRaich | |
| |
helloWorldWEBServerV1Log.png | r2 r1 | manage | 74.5 K | 2020-04-28 - 13:11 | UliRaich | |
| |
helloWorldWebServer.tar.gz | r1 | manage | 2.5 K | 2020-06-04 - 18:39 | UliRaich | |
| |
helloWorldWebServerV1.py.txt | r1 | manage | 1.6 K | 2020-04-28 - 13:14 | UliRaich | |
| |
helloWorldWebServerV2.py.txt | r1 | manage | 0.7 K | 2020-04-28 - 12:56 | UliRaich | |
| |
helloWorldWebServerV3.py.txt | r1 | manage | 0.8 K | 2020-06-04 - 15:32 | UliRaich | |
| |
highCharts.tar.gz | r2 r1 | manage | 3.6 K | 2020-06-04 - 18:51 | UliRaich | |
| |
led-blue-off-128.png | r1 | manage | 18.1 K | 2020-06-04 - 15:30 | UliRaich | |
| |
led-blue-on-128.png | r1 | manage | 23.8 K | 2020-06-04 - 15:30 | UliRaich | |
| |
ledControl.tar.gz | r3 r2 r1 | manage | 156.5 K | 2020-06-04 - 18:51 | UliRaich | |
| |
pic_bulboff.gif | r1 | manage | 2.4 K | 2020-06-04 - 09:05 | UliRaich | |
| |
pic_bulbon.gif | r1 | manage | 2.5 K | 2020-06-04 - 09:05 | UliRaich | |
| |
sht30.tar.gz | r1 | manage | 1.8 K | 2020-06-04 - 15:48 | UliRaich | |
| |
sht30WebServer.png | r1 | manage | 99.5 K | 2020-06-04 - 18:13 | UliRaich | |
| |
sht30WebSite.png | r1 | manage | 15.5 K | 2020-06-04 - 16:12 | UliRaich | |
| |
thonnyWEB.png | r1 | manage | 37.2 K | 2020-06-04 - 18:33 | UliRaich | |
| |
wifi_connect.png | r1 | manage | 194.5 K | 2020-04-28 - 08:02 | UliRaich |

Ideas, requests, problems regarding TWiki? Send feedback